
In the first part we have done quite a lot, but there is still more steps to come. We basically have those two Hyper-V nodes installed with Starwind Virtual SAN and we created some volumes on each of the node, which will be mirrored by Starwind. Now I'll show you how to go further, setup the synchronous mirroring within the Starwind console plus setting up the iSCSI storage which will be present to both Hyper-V nodes. We will also create Hyper-V and add those highly available storage to the clustered shared storage in order to be used as a storage for both Hyper-v nodes.
Now, we don't have to touch our Hyper-V nodes again (except installing MPIO driver later on) but we will have to create the mirrored storage through the Starwind console. If you missed the part 1 you should have a look in order to pick up here to continue the setup.
Go to the Starwind Management Console installed on the management station and follow those steps:
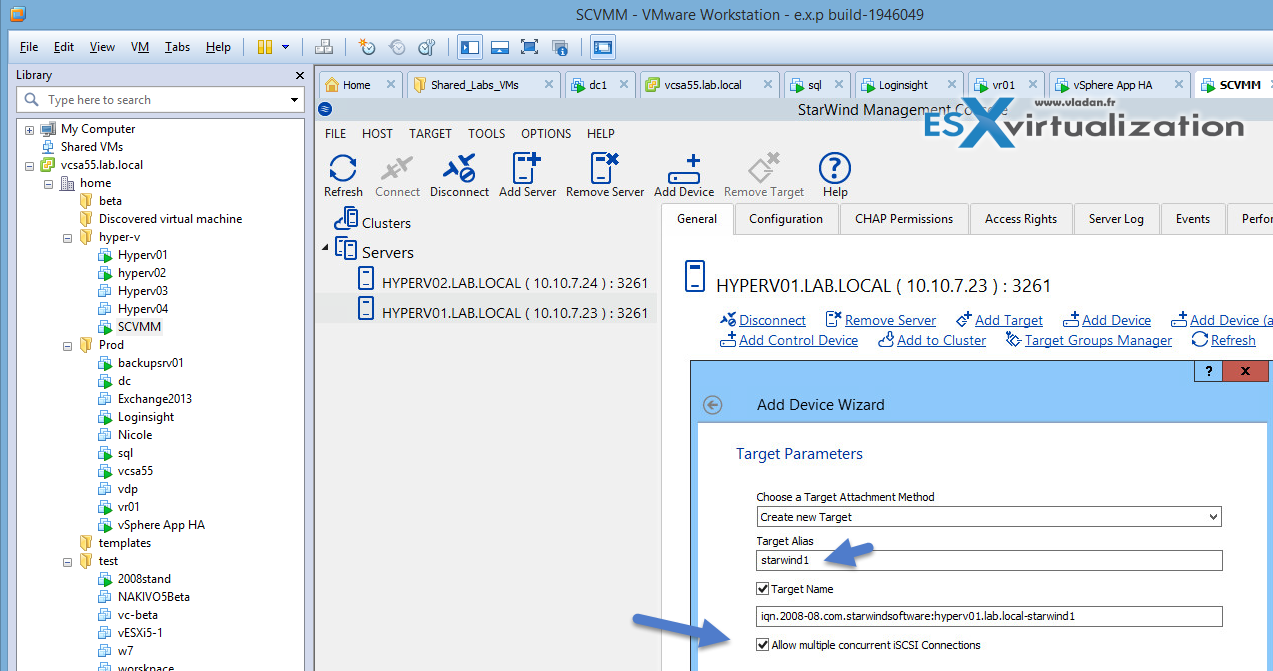
Click Add Device (advanced) > Hard Disk Device > Virtual Disk > Chose the destination (as on the screenshot below) and size > Then use Thick > Write-Back > Select L2 cache size (left default)
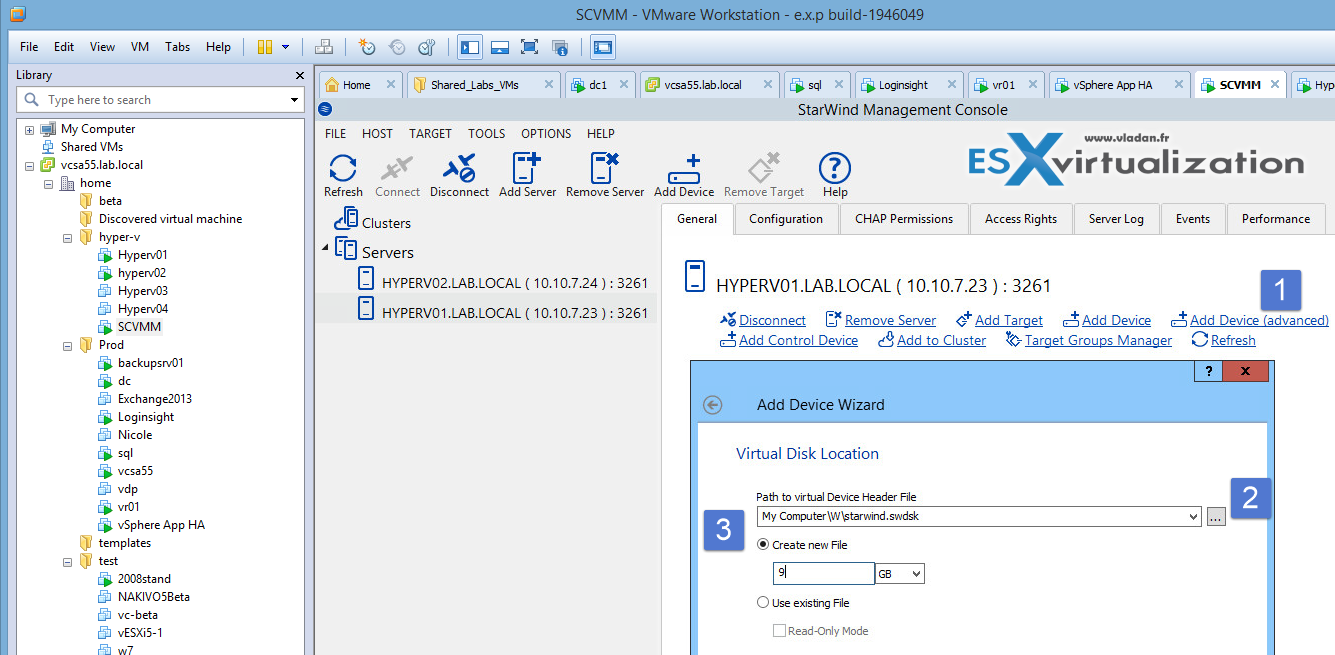
Continue the assistant and leave the Allow Multiple concurrent iSCSI connections checked.
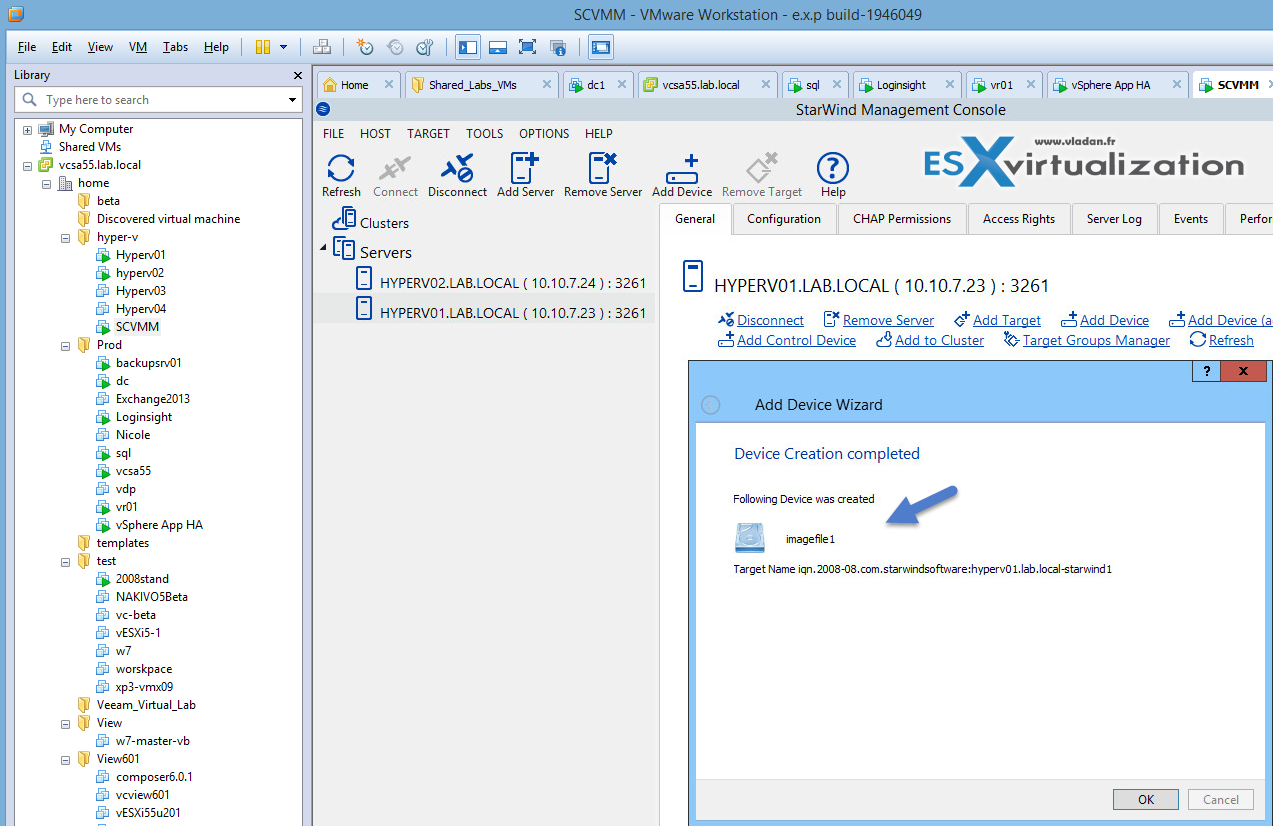
Click the Create button and you should see the final screen like this:
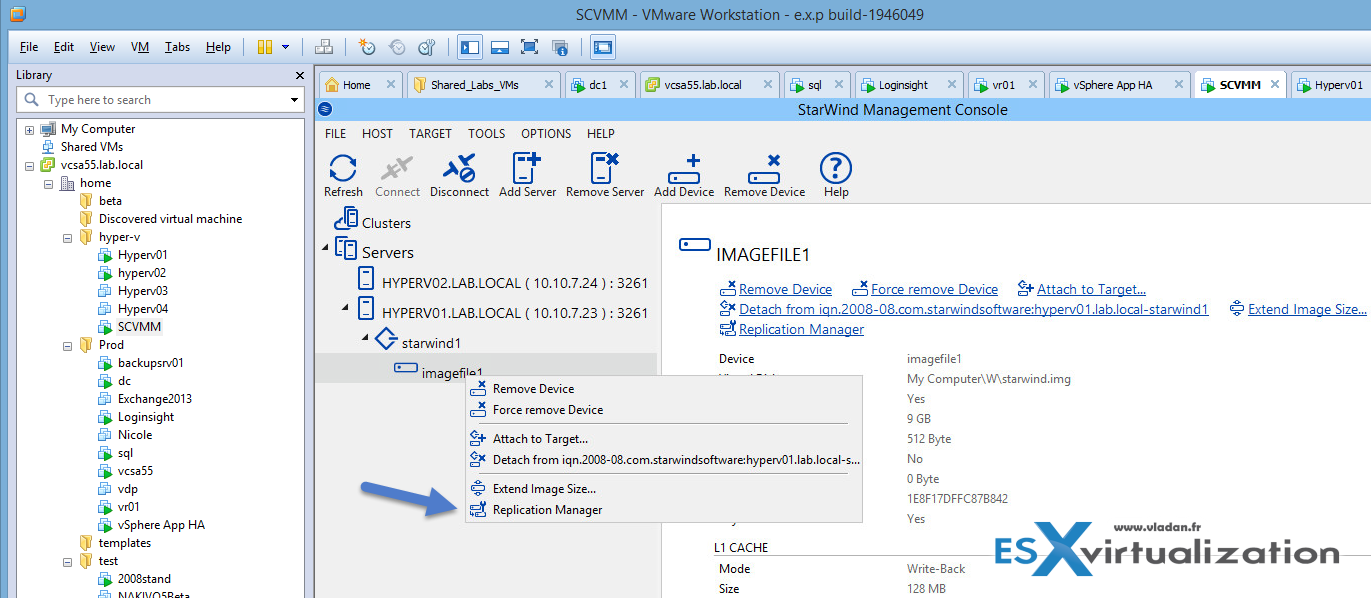
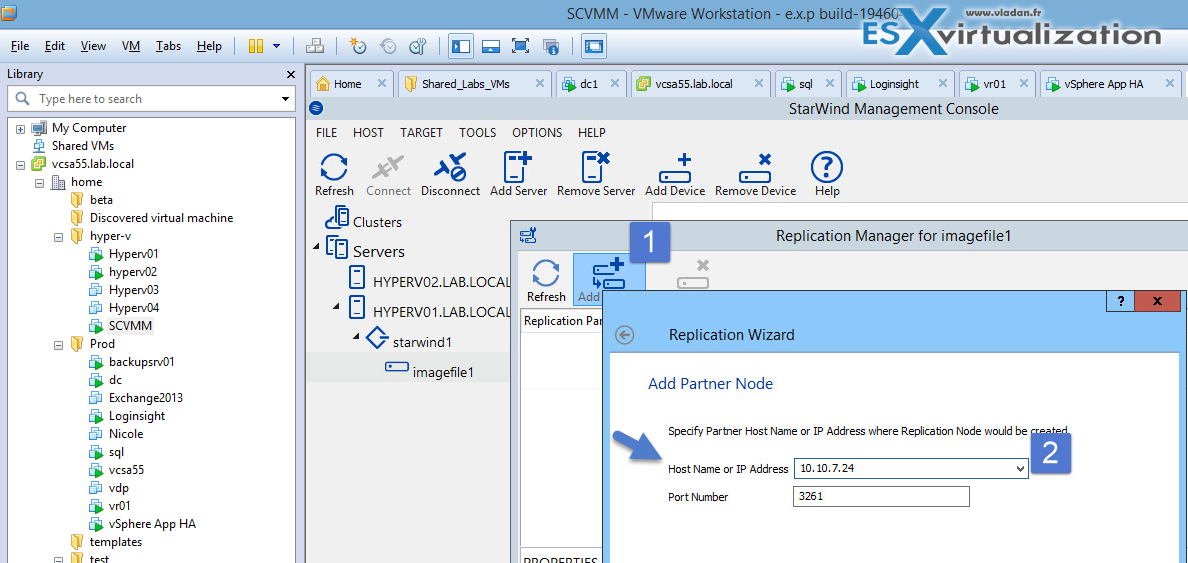
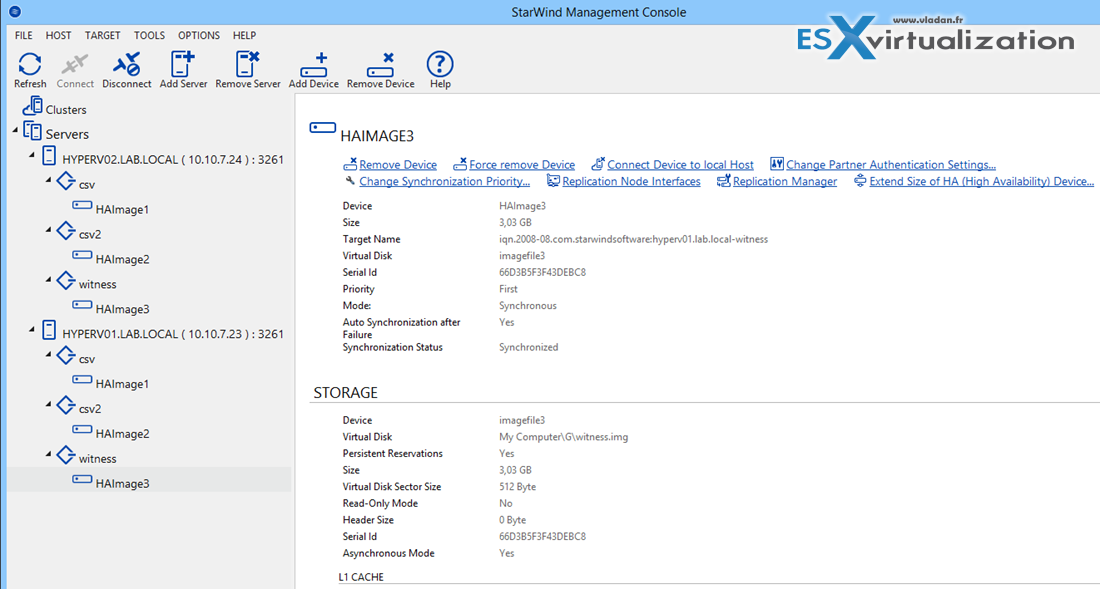
Now we need to configure the replication. Let right click the image file we have just created, through the Starwind console. Just expand the Starwind1 target you can see in the console to access the imagefile1.
There will be a new Window which will pop-up > click the Add Replica button > Leave the Synchronous “Two-Way” replication checked (default) and click next. You'll need to enter the IP address of the other Hyper-V node. Continue the wizard and select create new Partner device
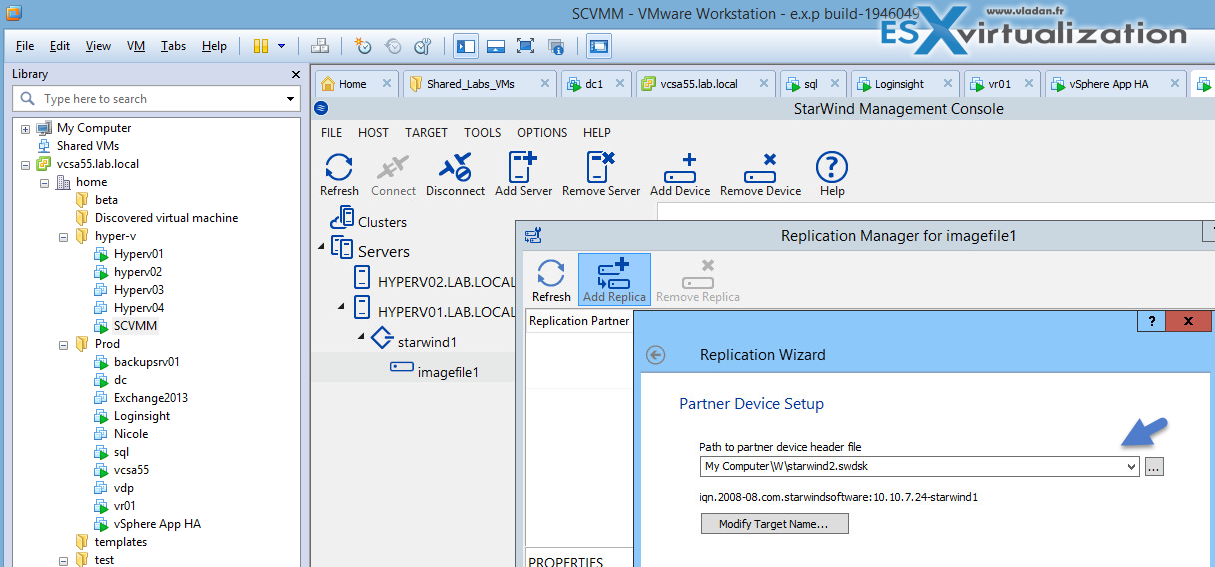
On the path select the same path for storing the replica, that we have selected for the Hyperv01 (it means the W: drive) . Until now, nothing supprising…
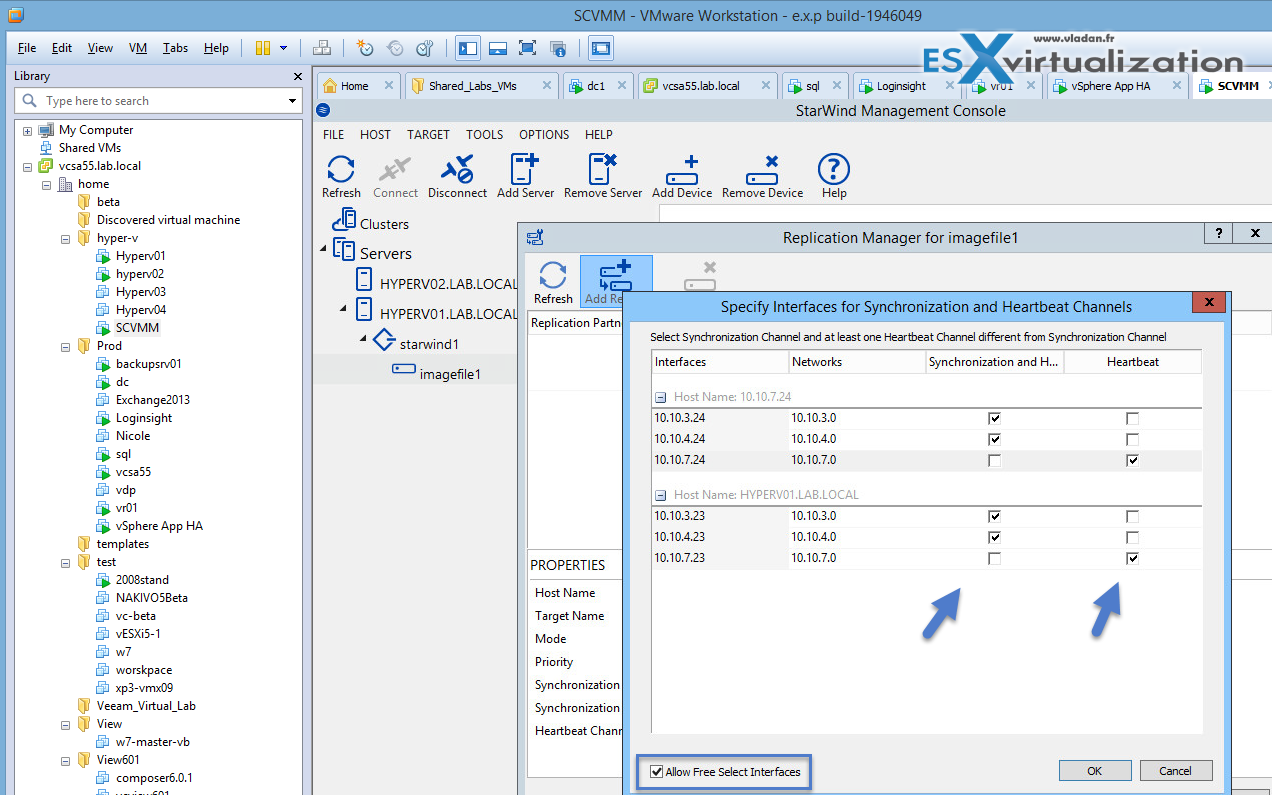
Now we come out to see the selection for the network for synchronization and heartbeat. You'll need to check the case “Allow free select interfaces”
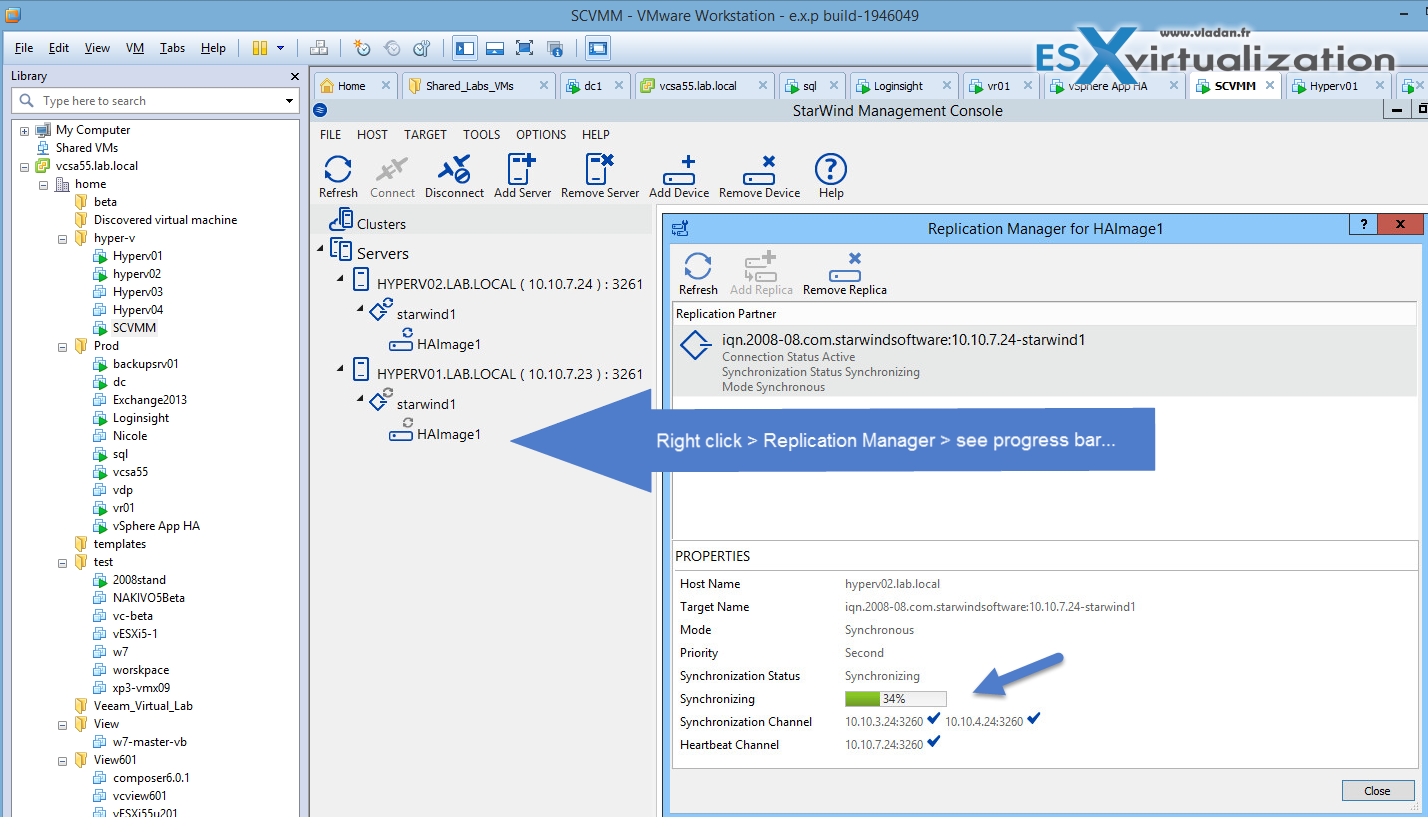
Next click the Create button and then Finish. You should see the progress and then the waiting window…

If you get an error of synchronizing, just check the NICs (mix and match). I swapped some and the syncing just kicked in. It's probably better approach to hook just 1 NIC and than add a second (at least for the synchronization channels), because if you don't you might end up “crossing” the channel's NICs like I did… -:).
Do the Same for CSV1 and CSV2 volumes (note you should create at least one CSV and one Witness).
The Starwind console should look like this:
Back to our Hyper-V hosts to configure the iSCSI and MPIO
The next step is to install MPIO drivers on each of the Hyper-V node so several paths between iSCSI initiator and target can be set.
At the command prompt type “powershell” and then type this command to install MPIO:
Install-WindowsFeature Multipath-IO
Reboot the host…
Open the Hyper-V console on the host and type this command to bring up iSCSI initiator configuration window:
iscsicpl
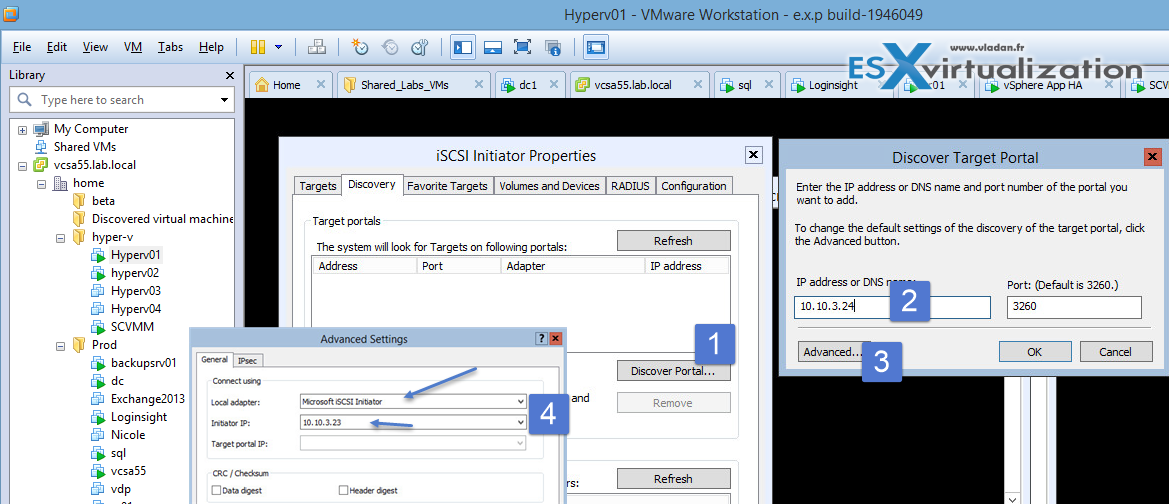
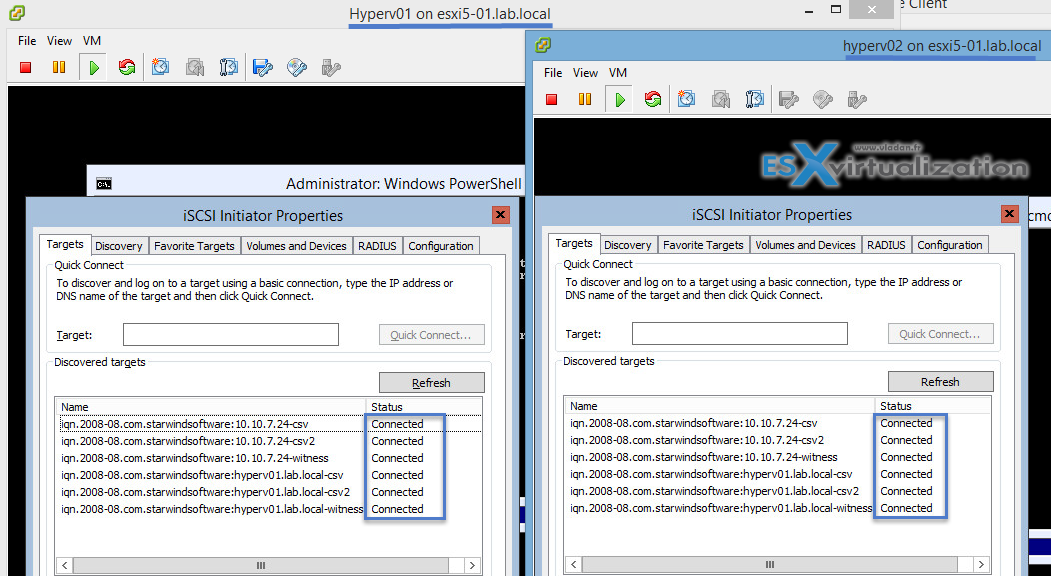
You should enter the other node's IP address and when clicking the advanced button, you should drop down the menu to select Microsoft iSCSI Initiator. Do this for both sync interfaces and also for localhost (127.0.0.1). So you should end-up on both Hyper-V nodes with an iSCSI config like this one:
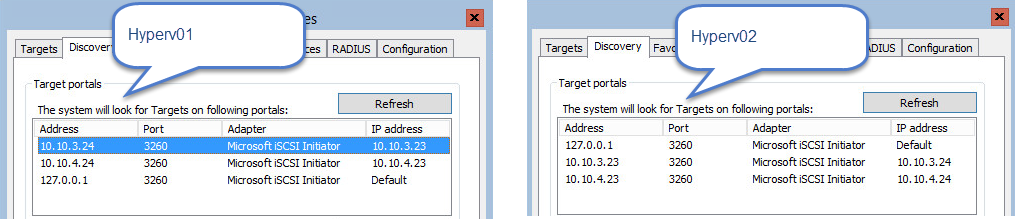
And then connect the target and enable multi-pathing… on both nodes. Use different IP subnet for each synchronization channel.
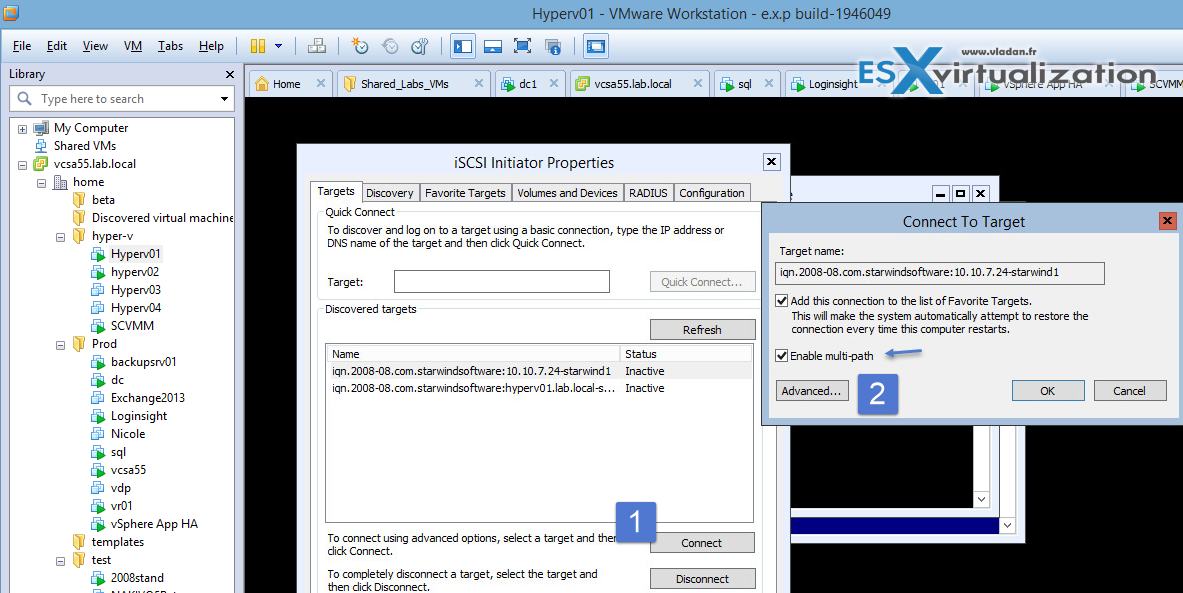
Your target TABS on both hypervisors should look like this….
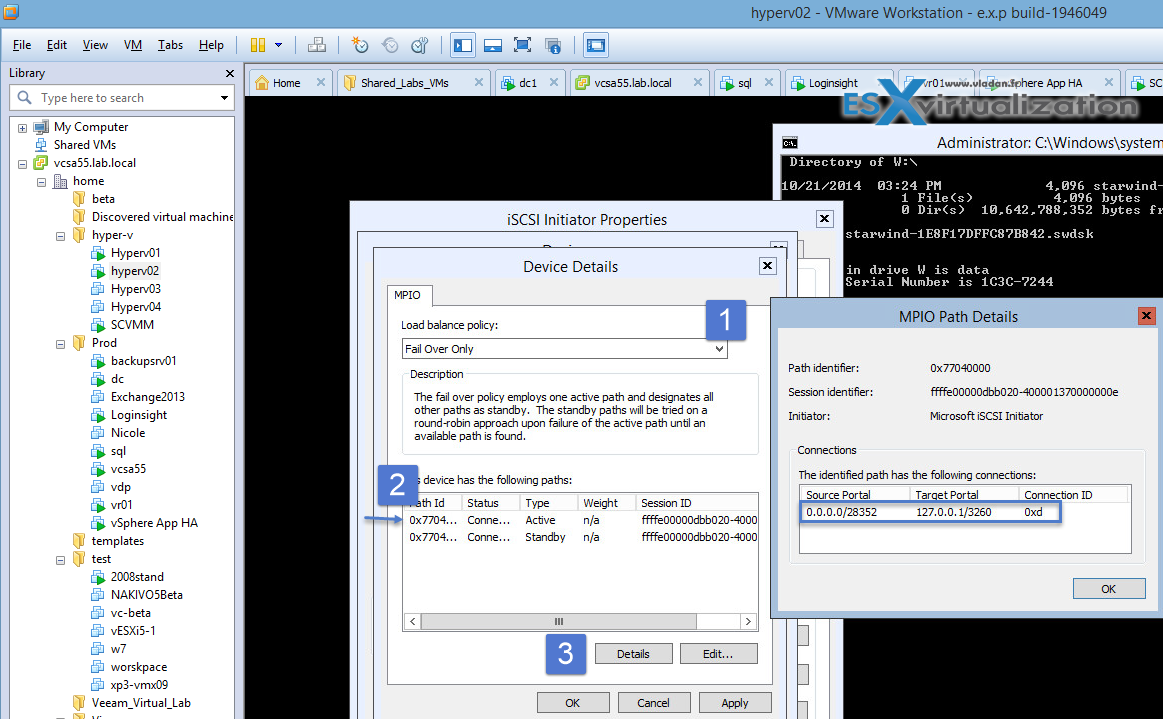
Now go and click the Devices button and then the MPIO button > change the Round robin policy to Fail Over Only . Check that's the localhost and 127.0.0.1 interface used for active path. Do the same on the other node.
Once you see that both hosts has both enabled MPIO and ou have sucesfully setup the iSCSI initiators and targets, we can now go tot the management station where we will format the newly created volumes – the iSCSI disks.
Start the Server manager and if you have not already done before, add both hyper-v nodes to the console >
Now go to the management console and start Microsoft Failover Cluster Manager Console. Click the Create Cluster on the right and start the wizard > Add the two hyper-v nodes to the cluster. then in the File and Storage services select Disks and right click one of the iSCSI bus types and do initialize as on the screenshot.
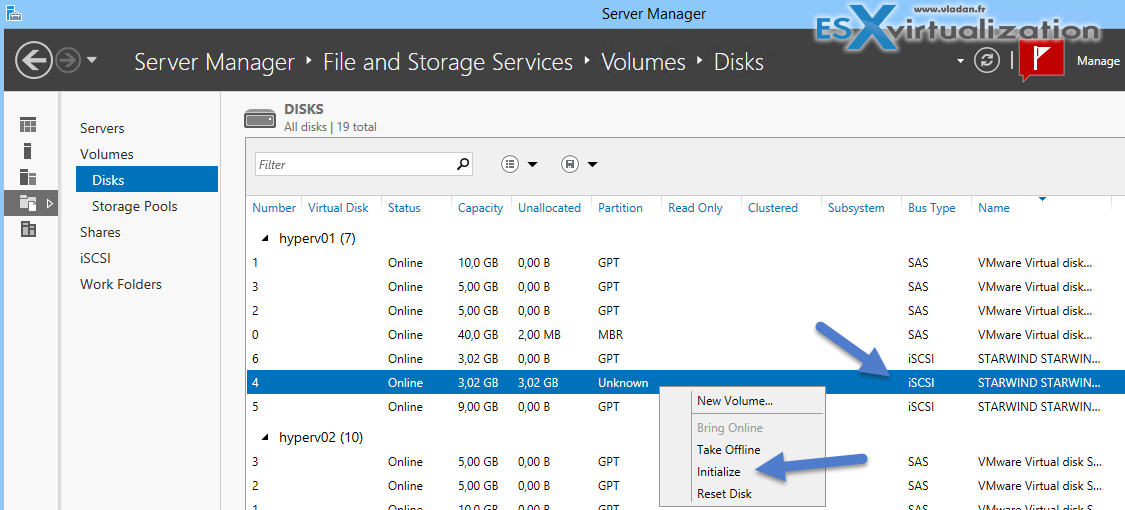
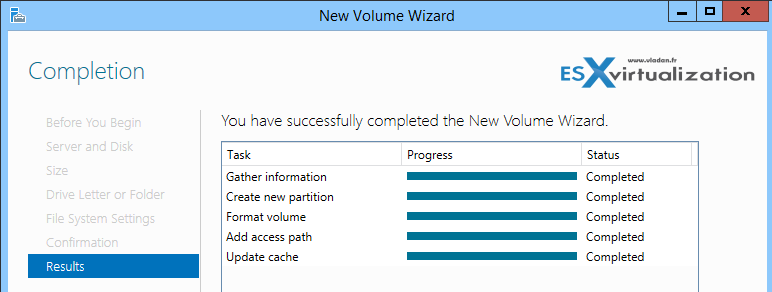
You'll get a small warning saying that you'll erase all data when initializing as a GPT disk. Once done right click again and create New Volume, format as an NTFS volume with a meaningful name.
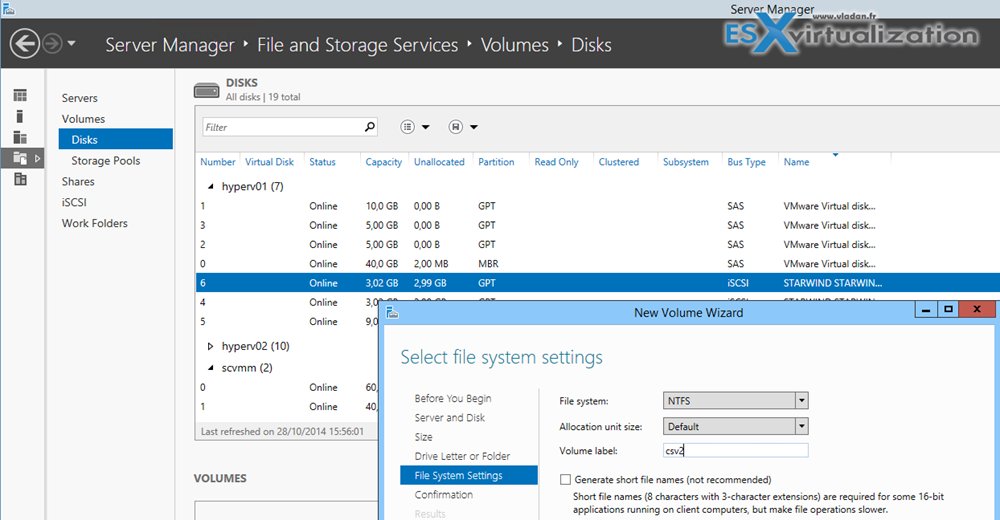
The wizard should finish like this…
Now when you have created the disks we can create a cluster via Failover cluster manager. But before we do that we have to first install the role on both hyper-v nodes. We can do it through the server manager once again. Right click the server > Add roles and features > go through the assistant until the Features pages appears. Check the Failover clustering feature.
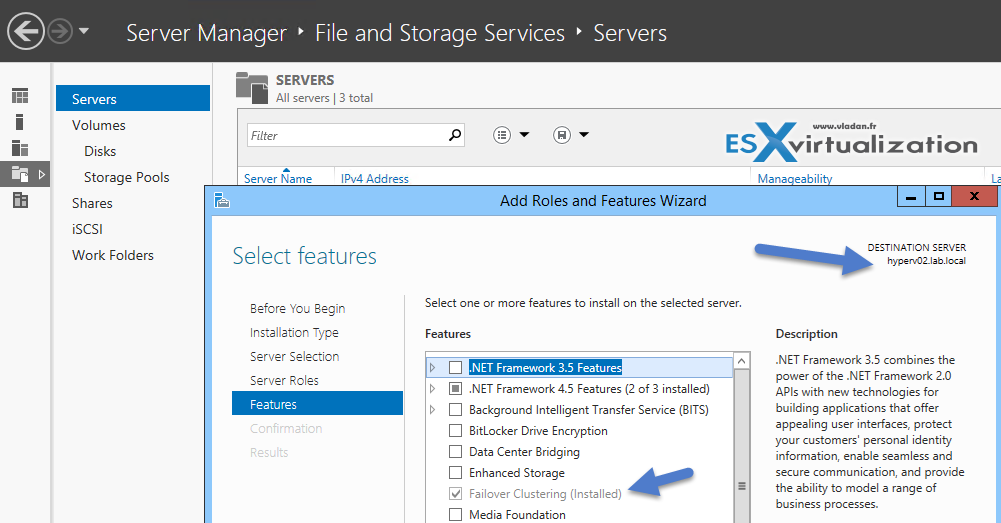
Do the same for the second node while you there, and then start the Failover Cluster manager console to create a cluster. First select both hyper-v nodes which will participate in the cluster.
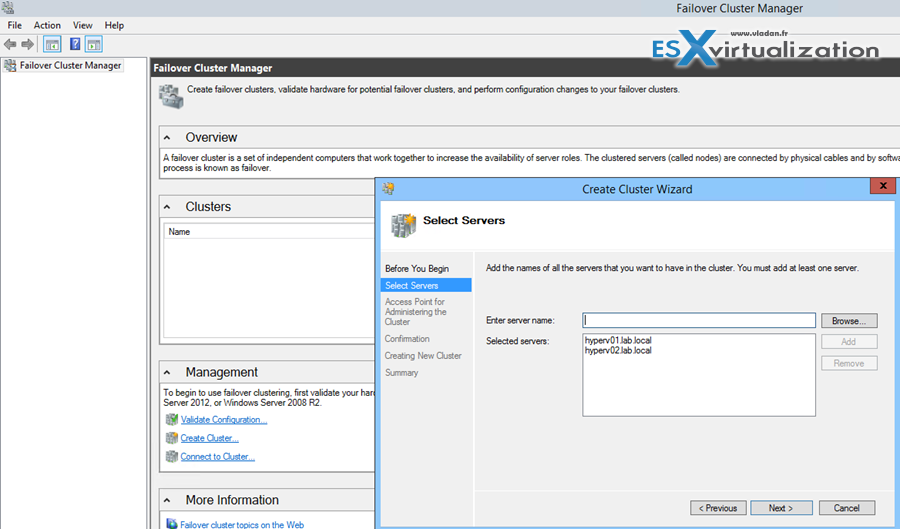
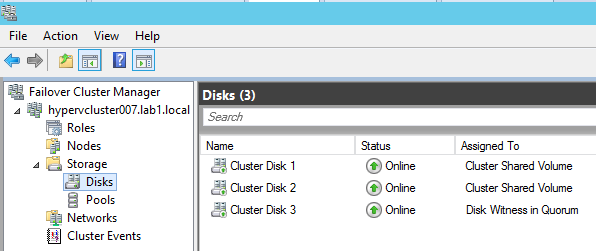
Next chose a name for the cluster and select the NICs which will be used and IP address of the cluster you're creating. You should see newly created cluster with some disks as well. And those disks shall be added to be part of the clustered shared volumes. Do a right click bring them online and add those disks to CSV.
That's about it. We have just successfully setup a high available storage based on local disks in each hyper-v node, and this storage is presented as a high available iSCSI volumes (protected by Starwind virtual SAN). Check out the full guide at Starwind's site here – Starwind Technical Papers.
Hi Vladan
its very very cool and useful for me.i really proud of you.
thanks for your time and energy
sharing is caring i believe that 😉
Wow, this is is exactly what I would like to do, I have 2 physical servers running windows server 2012 R2 STD each has their own storage in fact each is pretty much an exact replica.
Each server has 4 Nics in 2 1GB Nics and 2 10GB nics.
Can I use your example above create a shared highly available storage, also do you know what the limits of the storage is?
Kind regards
Dave
PS I’m not a techie by any stretch but the servers were setup and configured by myself. I dont really want to go down another server/SAN route for the shared storage.
You can always contact Starwind, to make sure you’re on the right track. -:) They’re helpfull.
I tried this on a full copy of 2012 R2 and I found I had to open the mpio control (from the control panel or mpiocpl from the prompt) and check the box to “add support for ISCSI devices”. Once I did that MPIO was no longer grayed out. I am not sure if I missed a step but just mentioning it in case anyone else has this issue.
thank you for your time and sharing
but please i have one issue : can i do this lab with just two nics teamed together (1Gb+1Gb) and create the nessecary vnics to acheive the lab
thank you again
best regards
Hello,
thank you for sharing your very useful and interesting experience.
I am looking for information about the recovery time in case of host switch off (power failure for example). Did you perform any test regarding the downtime duration for this two-node virtual SAN based failover cluster?
Would the operative system of the virtual machine be totally rebooted or would it be moved (including RAM content) to the virtual machine on the secondary node creating only a temporary service downtime?
Thanks in advance for your reply.
Best regards
Giulio