VCP6-DTM Certification exam from VMware continues with today's VCP6-DTM Objective 5.1 – Install and Configure VMware Mirage Components. VMware Mirage is fairly new product, which comes from Wanova acquisition back from 2012. Wanova itself was founded in 2008. I tested already the program in the lab, back in 2012. But since then the product has evolved. Mirage allows to mass protect your enterprise endpoints and create layers depending on which hardware you're running each group or hardware or users (you can create different application layers for different groups of users, but also other layers which will have specific sets of drivers depending of the hardware you're administering in your company.
Some of the capabilities allows for example a possibility to remote restore a changes to an endpoint after this has been infected with a virus which has done some damages to a system or filesystem. Today we'll have a look on what's the requirements and what's the steps to install this product (a several products in one, actually). The different components has to be installed on different parts of the infrastructure which needs to meet the system requirements. We'll have a look into details on that.
VMware Mirage Knowledge
- Identify firewall requirements for VMware Mirage
- Install VMware Mirage Management server and console
- Install VMware Mirage Web Manager
- Install VMware Mirage server
- Install VMware Mirage Gateway server
- Install and configure file portal
- Configure the following:
- Branch Reflector
- Role-based delegations
- Driver library and profiles
- SSL
- User State Migration Tool (USMT)
- Storage volumes
Tools
- VMware Mirage Administration Guide
- VMware Mirage Installation Guide
- VMware Mirage Web Manager Guide
- Image Management for View Desktops using VMware Mirage
- VMware Mirage Management console
Note that this post is not a detailed guide on how to install Mirrage as the individual chapters on the blueprint are NOT in order. In case you want to do the simple lab setup I'd avice to follow the VMware reviewer's guide PDF.
For example, it's obvious that you must first install the Mirage server before installing the web manager portal….
Info: VMware Mirage is available for purchase at VMware.
Identify firewall requirements for VMware Mirage
VMware Mirage gateway server (delivered as an OVA) when used, is placed in a DMZ. The firewall configuration needs to allow those three ports.
- Mirage Gateway – default tcp 8000
- Management – default tcp 8080
- SSH – default – tcp 22
Install VMware Mirage Management server and console
Mirage supports SAN, NAS, or local storage.
Mirage has different components and servers, including Management console or web based portal:
• Mirage server – controls Mirage operations and objects, manages destkop images (VCDs), layers, and app. layers.
• Mirage Management server – used for managing Mirage servers. (in case you have more than one, installed in a cluster). It's also an interface between the DB and the Mirage server
• Mirage Console – The Management UI. The admin can manage the solution. It's a separate MSI. (a Snap-in). Allows using built-in wizards for DR, assigning base layer, capturing base layer, Windows OS migration, centralizing endpoints…
• Database for Mirage – Mirage server needs SQL db. (local or remote).
The there is file portal and driver library, components which can reside on the Mirage server or on another server in the domain. And finally the Mirage client which is installed on each endpoint.
System requirements: 2008r2 or higher.
Required AD groups and users:
create a local sec. AD group: l-mirageadmins (members: DOMAIN\mirage)
create a global AD sec. group: g-mirageadmins (members: DOMAIN\mirage; DOMAIN\l-mirageadmins)
create AD user: mirage
To the mirage management server Add the DOMAIN\g-mirageadmins to the local administartors group on the server…

Required components (before install of Mirage management server):
- Install Microsoft .NET 3.5 Framework SP1 on > Control Panel > Turn Windows features on or off > Server Manager > Features > Add feature > Select .NET Framework 3.5.1 feature
- Select “Add Required Role Services” > Add features Wizard > Select Features > Click NEXT > Add features Wizard – Web Server (IIS) > Click NEXT > Add features Wizard > Select Role Services
- Select “Web Server – Common HTTP features” > Select “Application Development – ASP .NET” > Select “Add Required Role Services” > Select all options under “Management Tools”
- Click NEXT > Add features Wizard > Confirm Installation Selections > Click INSTALL > Add features Wizard > Wait for install to finish > Verify Installation results > Click CLOSE
Now log out and log in back as DOMAIN\mirage user (IMPORTANT) to:
- Install SQLExpress
- Install Mirage Management Server
Install SQL database management system (MS SQL Server 2008 R2; Standard, Express, or Enterprise 64-bits)
I just use the lab, so SQLExpress is the way to go for lab scenario…(Supports up to 5000 mirage users). And it's actually a first step to create a Mirage database instance in the SQL database management system. So first download SQLExpress (download from this link) and Launch SQLEXPRWT_x64_ENU.exe… You can also check my free tools page where you can find SQL server management studio direct links.
You can accept the defaults during the installation. Setup the “SQL Server Browser” windows service to Automatic. (After installation this service is disabled and stopped).
- Feature Selection > Select All features > Shared feature directory: c:\Program Files\Microsoft SQL Server\ > Shared feature directory (x86): c:\Program Files (x86)\Microsoft SQL Server\ Click NEXT

- Instance Configuration > Named instance: SQLEXPRESS > Instance ID: SQLEXPRESS > Instance root directory: c:\Program Files\Microsoft SQL Server\ > Click NEXT

Server Configuration > Service Accounts: SQL Server Database Engine:
Account Name: NT AUTHORITY\NETWORK SERVICE
Startup Type: Automatic
SQL Server Browser:
Account Name: NT AUTHORITY\LOCAL SERVICE
Startup Type: Automatic

Database Engine Configuration
Authentication Mode: Windows authentication mode
Specify SQL Server Administrators
Add LAB\l-mirageadmins
Add current user > Click NEXT > Error Reporting > Click NEXT > Installation Process > Wait for install to finish > Complete > Click CLOSE
Installation of Mirage Management Server – Add firewall exception – an inbound rule – to enable the communication of Mirage server with Mirage clients. To open port number 8000 and 8080. Launch the installer and accept the defaults (if you follow this guide, of course).

Use mirage as the AD account for the Mirage service account that will access the storage and the database.

And then the assistant lets you to continue….

You just follow the assistant and you shouldn't have any surprises.

Install the Management console next. For a production environment, the best practice is to use a Windows server solely for the Mirage Console or together with Web Manager.
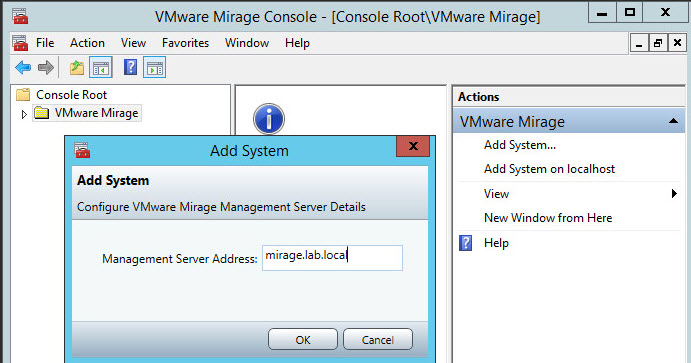
Double-click the Mirage Console icon on the desktop. In the Mirage Console window, right-click VMware Mirage in the root directory and select Add System. Enter the IP address or host name of the Mirage Management server.
You'll be asked for a license. Make sure that you do have a trial on hand or if you're VMware partner you might have an NFR….
If the Mirage Console and the Mirage Management server are on the same computer, use localhost. In the Mirage Console, the status of the Mirage
Management server is Down until you install the server. The status then changes to Up.

Install VMware Mirage Web Manager
mirage.WebManagement.x64.05294.msi in our case is the installer.
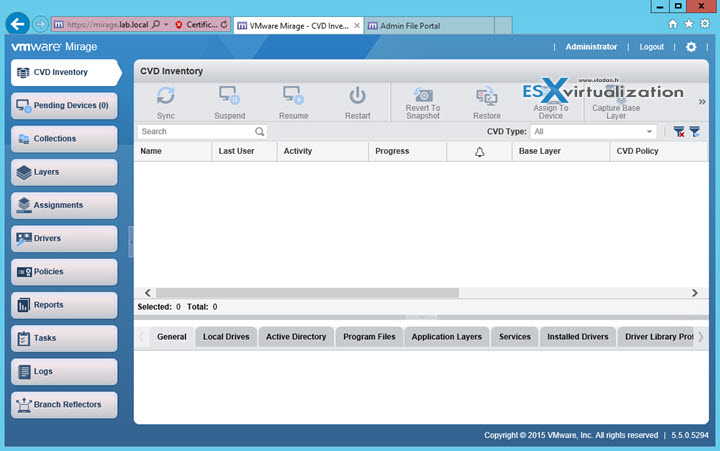
The default HTTP port is 7080, and the default HTTPS port is 7443.
https://your_mirage_server:7443/VMwareMirage
Nice… -:)
Install VMware Mirage server
Mirage server installation will need you to setup certificate. (if you want to use SSL). Install the server certificate and private key in the Windows Certificate
Store. Restart each VMware Mirage server service. Configure the transport settings in the Mirage server options.

Enter the credentials for the Mirage services account that will access the storage and database. If you did not set up a dedicated Mirage services account, enter Local System account.
You'll need to reboot after the end of the installation….
Install VMware Mirage Gateway server
The mirage gateway server is Linux OVA. Its a SLES 11 SP3 linux VM.

Install and configure file portal
Before installing the file portal you must Add IIS role with following components:
Common HTTP Features
- Static Content
- Default Document
- Directory Browsing
- HTTP Errors
- HTTP Redirection
Application Development
- ASP.NET
- .NET Extensibility
- ISAPI Extensions
- ISAPI Filters
Health And Diagnostics
There are no required items for this role service.
Security
- Request Filtering
After IIS installed, you can start the VMware installer (mirage.WebAccess.x64.05294.msi in our case).
The components are quite lightweight… They are two of them…
Web Access – Gives end users access to their files stored in historical endpoint snapshots. IT determines which files are uploaded to the
data center.
Admin Web Access – Gives administrative access to all end-user endpoint snapshots.
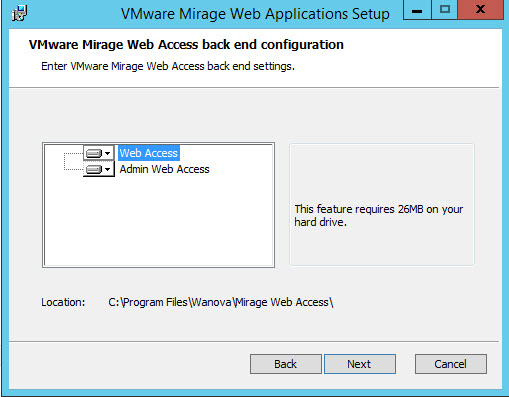
The wizards asks for a server location. In our case it's the same machine.

When installation finished, you will need to enable directory browsing before trying to connect to the portal…
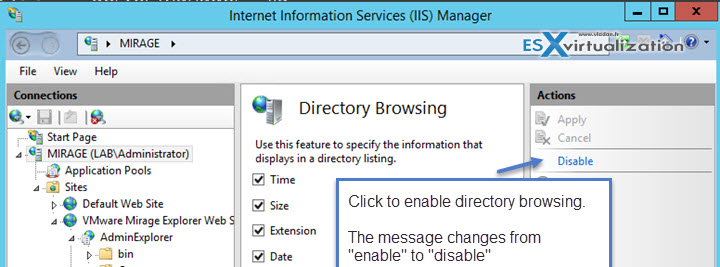
You should end with a portal running like this.
https://server:6080/Explorer – for users…
https://server:6080/AdminExplorer – for admins…

Configure the following:
Branch Reflector – The branch reflector allows to download files from VMware mirage main site only once. The branch reflector downloads base layer images, app layers, driver files, and USMT files from the VMware Mirage server and makes them available for transfer to other VMware Mirage clients in the site. Only files that reside on the branch reflector machine's disk are transferred and files are not requested from the VMware Mirage server at all
To activate:
- In the Mirage Management console tree, expand the Inventory node and select Assigned Devices.
- Right-click an endpoint device and select Branch Reflector > Enable Branch Reflector.
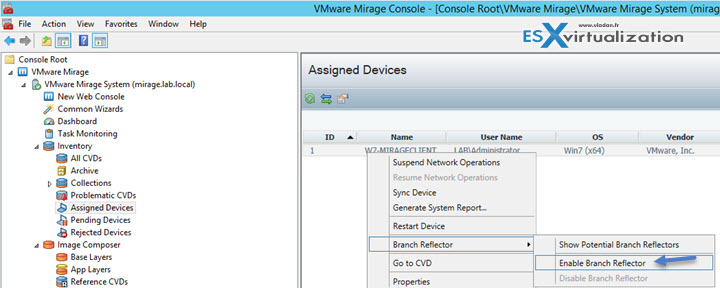
Default values (modifiable) apply to the Maximum Connections, Cache Size, and Additional Networks parameters for newly created branch reflectors.
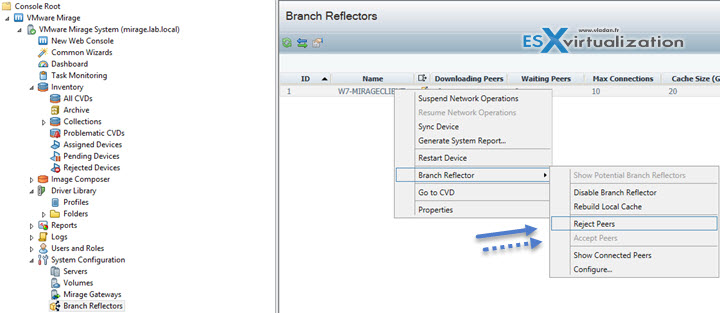
You can use Reject (or accept) peer clients setting for branch reflector. This allows, in case the branch reflector client performs slowly or using excessive bandwidth, to stop provide this service to its peer clients. In the Mirage Management console tree, right-click System Configuration, select Settings, and click the Branch Reflectors tab. Then Right-click the branch reflector device and reject or accept the peer clients.
Role-based delegations – role-based access control (RBAC) to define which users can perform which operations in the system. You can grant a role to one or more Active Directory (AD) groups. The Mirage server identifies users by AD group membership and automatically assigns them roles in the Mirage system. See the exact System Actions for which Role-Based Access can be Defined for a User at page 169 of the Mirage administrator's guide.
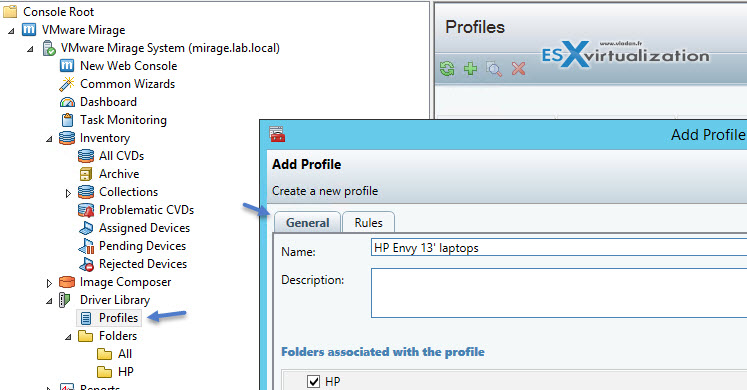
Driver library and profiles – You use the driver library to manage hardware-specific drivers in a separate repository, organized by hardware families. You add drivers with an import wizard and view them in the driver library’s console. You can configure the system to add the necessary driver library to the relevant endpoints based on matching rules between the library and the endpoint configuration.
The Mirage system can have multiple driver folders, multiple driver profiles, and many endpoints. A driver profile can contain drivers from multiple driver folders and multiple driver profiles can use a driver folder. You can apply a driver profile to one, many, or no endpoints.
Create driver folders: In the Mirage Management console tree, expand the Driver Library node > Right-click Folders or any driver folder and select Add folder > Type a folder name and click OK. Those folders can be organized, renamed, removed or you can add drivers to the folder.
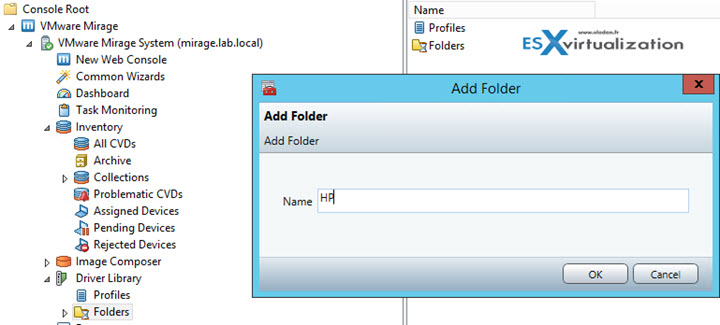
To import drivers into a drivers folder do a right click on the folder > Import drivers. As a requirement you must verify that:
- Mirage Management server has access to the UNC path where the drivers are stored.
- Drivers were extracted from an archive (zip, rar etc..)
Driver profiles – are used to select the driver folders to publish to a particular hardware model or set. Driver profile rules check if a driver applies to a particular hardware, and can select one or more matching driver profiles for a device.
Once rules created they function automatically. If devices that meet these criteria already exist in the Mirage system, you must start a driver profile update on those systems.
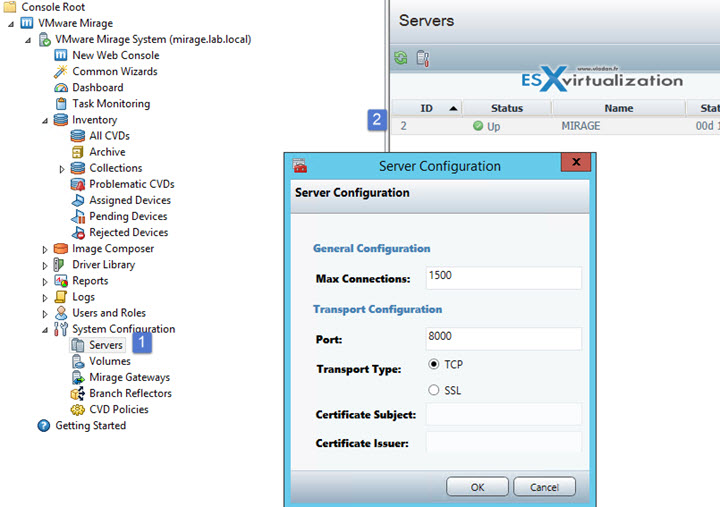
SSL – After you install the SSL Server certificate, you configure the Mirage server maximum CVD connections and transport settings. Expand System configuration > Select servers > right click server > Configure.
Certificate Subject – Typically the FQDN of the Mirage server.
Certificate Issuer – Usually a known entity like VeriSign. Leave this blank if only one certificate is on this server.
User State Migration Tool (USMT) – The migration installs a Windows 7 or Windows 8.1 base layer on each target endpoint while preserving user profile data and settings through the Microsoft User State Migration Tool (USMT v4.0, USMT v5.0 for Windows XP to Windows 7 migration, and USMT v6.3 for Windows 7 to Windows 8.1 migration). USMT (user state migration tool) which is present on the Microsoft's WAIK (1.9Gb).
The migration moves existing content of a target endpoint to the C:\Windows.Old directory, which is then processed by USMT. Application settings and data that are not handled by USMT are kept in the C:\Windows.Old directory. You can manually restore this data, or delete it when you do not need it.
If encryption used the you must reconfigure to and un-encrypt before migration.
You'll need to extract the USMT. The USMT has to be imported into the Mirage Server through the Mirage MMC Console. Select and right click the System Configuration > Settings > USMT TAB. From there, you can seek the USMT folder, for the import.
You can click to enlarge…
Once done, the Windows 7 reference machine has to be “checked as a reference machine“. If you're migrating to Windows 8.1 or Windows 10 you'll have to create a Windows 8.1 or Windows 10 reference machines accordingly.
To to that, right click the Mirage system tray icon (inside of the Windows 7 VM) and select Tools > Check Reference Machine. You'll basically validate that the VM is able to have the Windows 7 migration Base Layer captured.
If the check pass, then right click the Mirage system tray icon and select Tools > Windows 7 Migration Setup. The OS will get prepared for use as a W7 Migration Layer.
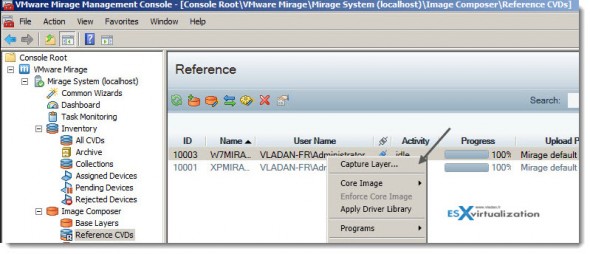
Next Step: In the Mirage MMC, Select the Reference CDV > select the desired CDV and click Capture Layer.
The process takes some time, and should finish with this result…
Storage volumes – Mirage provides multiple storage volume support to help manage volume congestion. Each storage volume can contain base layers, app layers, and CVDs. CVDs are assigned to a storage volume when they are created. The storage volumes must be shared by the servers where Network-attached storage (NAS) permissions must be in place.
You can view certain information about each storage volume, such as volume state, location, description, metrics, and status. You can check the Storage volume parameters in the VMware Mirage administrator's guide (p.64). By right clicking you also have options like unmount, remove volumes etc…
Block volume option (through the right click too) allows to stop populating it with new CVDs if you see that it reaches its capacity. However, You cannot move a CVD or a base layer to a blocked volume. You can move a CVD or a base layer from a blocked volume.
Again, you can also unblock a volume. In this case the volume can, again, accept new CVDs and base layers and existing data can be updated.
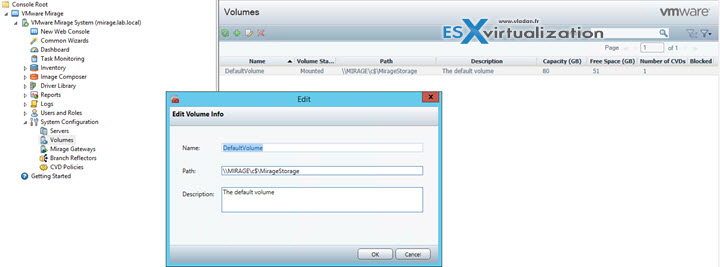
Increase the storage capacity by adding additional storage volumes to the MirageManagement console. Click System Configuration > Volumes to add storage volumes.
You can move CVDs to or from storage volume.
You can configure Mirage system settings for storage volume thresholds and alerts to enable you to trigger events in the events log > System Configuration and select Settings.
All Exam topics will be on dedicated VCP6-DTM Guide Page.
Info: VMware Mirage is available for purchase at VMware.


