
We continue to work on the individual chapters from the VMware Certified Professional – VMware vSphere Foundation Administrator (2V0-16.25) study guide series! This section is part of the upcoming VCP-VVF Study Guide Page, which will be released as a PDF when completed—check it out at https://www.vladan.fr/vcp-vvf-administrator/.
Today, we’re continuing with Objective 4.2 – VVF: Manage, focusing on Given a scenario, configure certificate management within VMware vSphere Foundation. Certificate management in VMware vSphere Foundation (VVF) 9.0 ensures secure communication for vCenter Server, ESXi hosts, and components like vSAN and the Supervisor by managing SSL/TLS certificates. This objective is critical for the 2V0-16.25 exam, testing your ability to replace default certificates with custom or VMware Certificate Authority (VMCA) certificates in real-world scenarios.
Building on our previous posts (Objective 4.2, Part 1 on Identity Management and RBAC, Part 2 on License Management), we’ll provide detailed, verified steps, practical tips, and exam-focused guidance using a realistic scenario, aligned with VMware’s official vSphere 9.0 documentation https://techdocs.broadcom.com/us/en/vmware-cis/vsphere/vsphere/9-0.html. Let’s get into it and configure certificate management!
Why Certificate Management Matters
Certificate management in VVF 9.0 ensures secure, trusted communication between vCenter Server, ESXi hosts, and clients, preventing man-in-the-middle attacks and browser warnings. VVF 9.0 uses the VMware Certificate Authority (VMCA) by default to issue certificates, but you can replace them with custom certificates signed by an external Certificate Authority (CA) for compliance or trust requirements. Objective 4.2, Part 3, tests your ability to manage certificates in scenarios involving security policies or expired certificates. We’ll cover replacing vCenter and ESXi certificates using VMCA and external CA options, ensuring secure operations.
Scenario: Configuring Certificate Management in VVF
Let’s use a typical exam scenario: A medium-sized business has a VVF 9.0 environment with a 4-host cluster (“VVF-Cluster”) running 20 VMs (10 web servers, 5 databases, 5 VDI desktops) on a vSAN datastore (“vSAN-Datastore”), managed by vCenter 9.0 (IP: 192.168.1.20, hosts at 192.168.1.10-13). The environment includes vSphere HA, DRS, a vSphere Distributed Switch (“vDS-VVF”), a Supervisor for Kubernetes workloads in “Microservices-Namespace” (Objective 4.1, Part 3), and a VCF Operations instance (“vcf-operations-vm”, IP 192.168.10.54, Objective 4.2, Part 2). The business’s security policy requires replacing default VMCA certificates with custom certificates signed by an internal Microsoft CA (IP: 192.168.1.50, domain.local) for vCenter and ESXi hosts to ensure trusted connections. You must: configure certificate management by generating and applying custom certificates for vCenter and the 4 hosts, and verify secure communication for vCenter, ESXi, vSAN, and the Supervisor. This scenario tests your ability to configure certificate management for the 2V0-16.25 exam.
Configuring Certificate Management: Step-by-Step
Configuring certificate management in VVF 9.0 involves generating Certificate Signing Requests (CSRs), obtaining custom certificates from an internal CA, and applying them to vCenter and ESXi hosts using the vSphere Client. Below is a detailed, double-checked guide with manual steps for the scenario, aligned with VMware documentation https://techdocs.broadcom.com/us/en/vmware-cis/vsphere/vsphere/9-0/vsphere-security/GUID-ECFD1A29-0534-4118-BA5F-BBCA8A6F6CA3.html.
1. Prepare for Certificate Management
Purpose: Verify prerequisites and prepare the environment for certificate replacement.
Detailed Process:
Verify Internal CA:
Confirm the Microsoft CA (192.168.1.50, domain.local) is accessible from vCenter (192.168.1.20) and ESXi hosts (192.168.1.10-13).
Ensure the CA’s root certificate is trusted by clients (e.g., exported to browsers or domain-joined systems).
Check Current Certificates:
- Log in to vCenter at https://192.168.1.20/ui using SSO credentials (e.g., [email protected]).
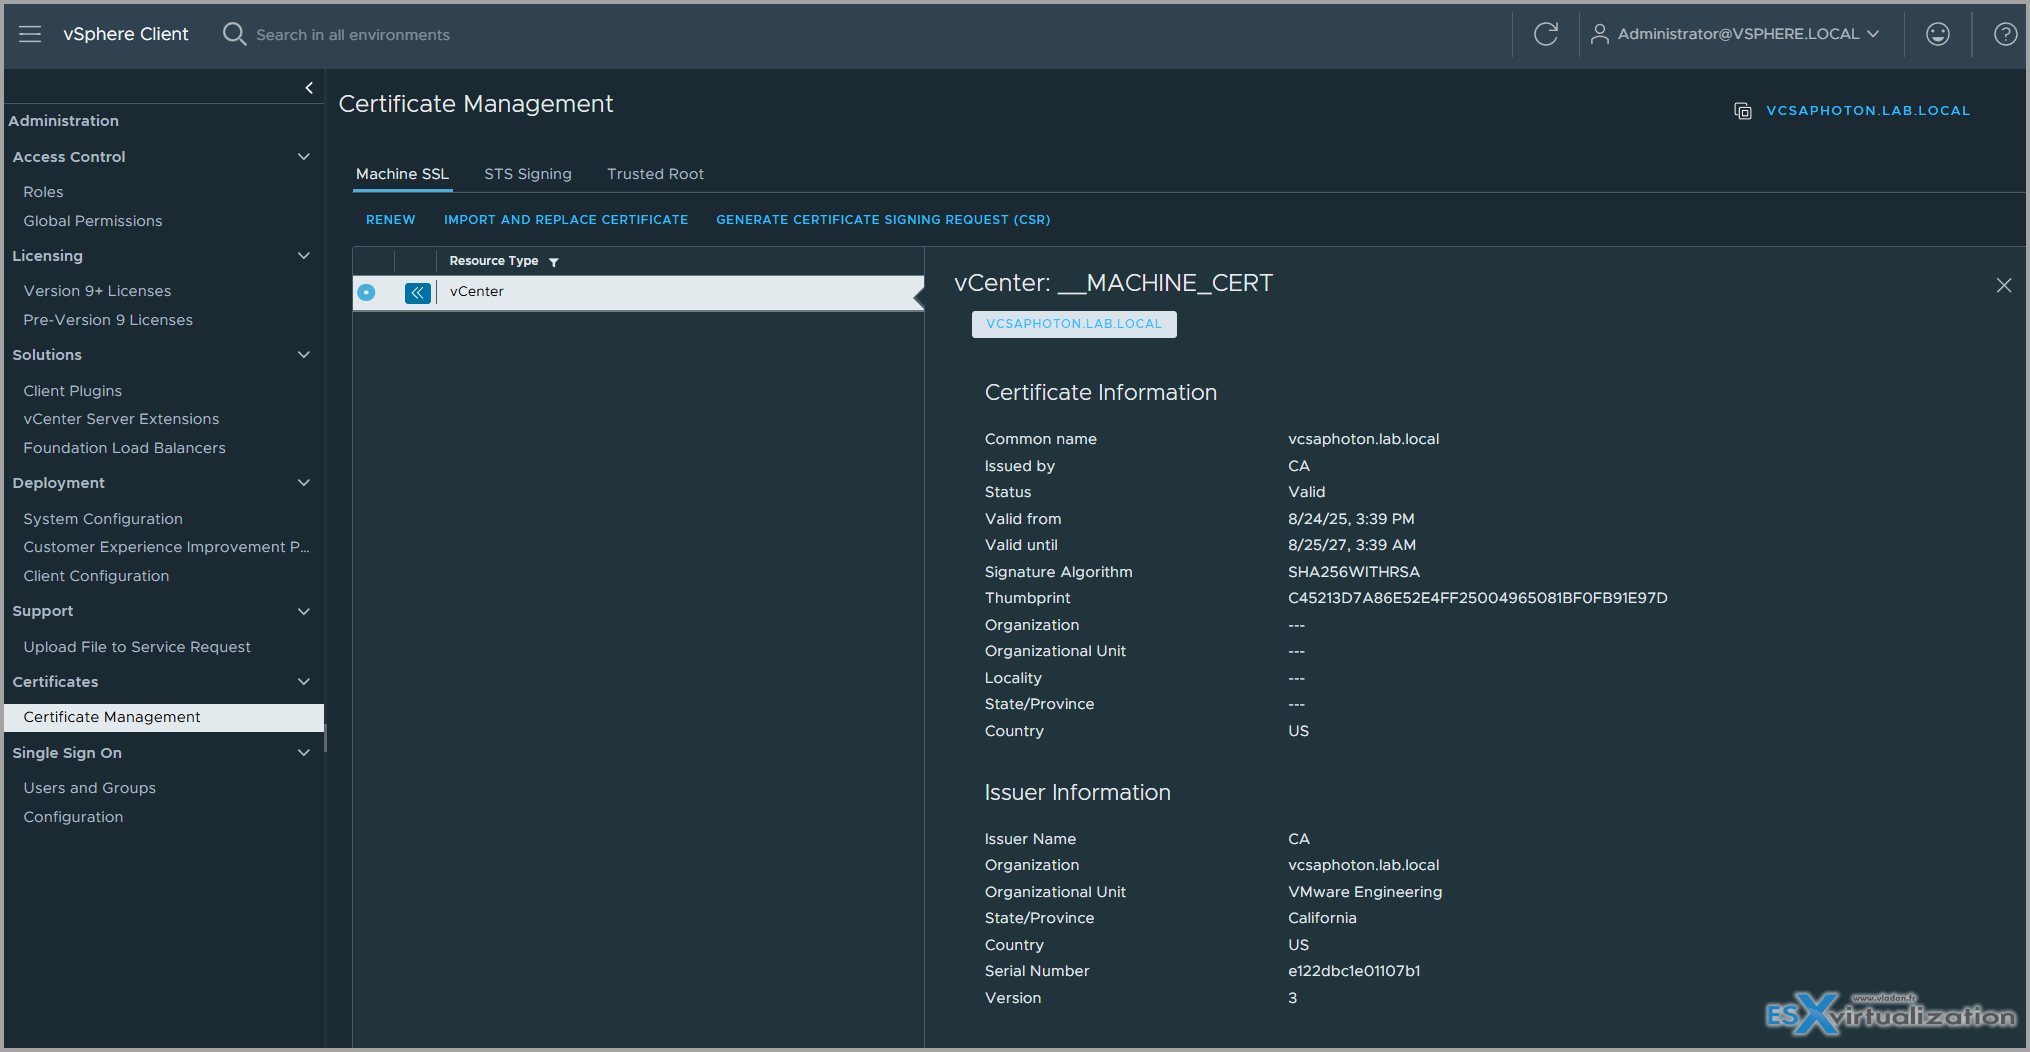
- Navigate to Menu → Administration → Certificates → Certificate Management.
- Confirm vCenter’s Machine SSL certificate is VMCA-signed (default, e.g., “vcenter-vvf.domain.local”).
- For each ESXi host (192.168.1.10-13), access the Host Client (e.g., https://192.168.1.10/ui), go to Manage → Security & Users → Certificates, and verify VMCA-signed certificates.
Back Up Certificates:
- In vCenter, navigate to Administration → Certificates → Certificate Management → Machine SSL Certificate.
- Save the current certificate and key for rollback if needed.
- For ESXi hosts, manually note certificate details (no export option in Host Client).
- Link to VMware Documentation certificate management
Verification:
- Ping 192.168.1.50 from vCenter and hosts to confirm CA connectivity.
- Check Administration → Certificates → Certificate Management to confirm VMCA as the current CA.
Scenario Example: Verify Microsoft CA (192.168.1.50) accessibility, confirm VMCA-signed certificates for vCenter (192.168.1.20) and hosts (192.168.1.10-13), and back up vCenter certificates.
Study Tip: Memorize prerequisites (CA accessibility, certificate backups) and practice checking certificates in VMware Hands-On Labs https://labs.hol.vmware.com/. Understand VMCA’s default role for the exam.
2. Replace vCenter Machine SSL Certificate
Purpose: Replace the vCenter default VMCA certificate with a custom certificate signed by the internal Microsoft CA.
Detailed Process:
Generate a CSR for vCenter:
- In vCenter, navigate to Menu → Administration → Certificates → Certificate Management → Machine SSL Certificate → Actions → Generate CSR.
- Enter details:Common Name (CN): vcenter-vvf.domain.local
- Organization: YourCompany
- Organizational Unit: IT
- Country: US
- Subject Alternative Name (SAN): 192.168.1.20, vcenter-vvf.domain.local
- Download the CSR file (e.g., vcenter-vvf.csr) and private key (e.g., vcenter-vvf.key).
Obtain Certificate from Microsoft CA:
- Access the Microsoft CA web interface (e.g., http://192.168.1.50/certsrv) from a management workstation.
- Submit the CSR (vcenter-vvf.csr) under Request a Certificate → Advanced Certificate Request.
- Select Web Server template and issue the certificate.
- Download the certificate in Base-64 format (e.g., vcenter-vvf.crt) and the CA’s root certificate (root-ca.crt).
Apply the Certificate to vCenter:
- In vCenter, go to Administration → Certificates → Certificate Management → Machine SSL Certificate → Actions → Import.
- Upload:Certificate file: vcenter-vvf.crt
- Private key: vcenter-vvf.key
- CA certificate: root-ca.crt
- Click Import to apply (vCenter services restart automatically, ~5-10 minutes).
Verification:
- Access https://192.168.1.20/ui and confirm no browser certificate warnings.
- Check Administration → Certificates → Certificate Management → Machine SSL Certificate to verify the new certificate (CN: vcenter-vvf.domain.local, Issuer: domain.local CA).
- Confirm Home → Administration → System Configuration shows vCenter as healthy.
Scenario Example: Generate a CSR for vCenter (192.168.1.20), obtain a custom certificate from the Microsoft CA (192.168.1.50), and apply it to ensure trusted connections.
Study Tip: Practice generating CSRs and applying certificates in a lab. Understand the vCenter service restart process for the exam.
3. Replace ESXi Host Certificates
Purpose: Replace default VMCA certificates on the 4 ESXi hosts with custom certificates from the Microsoft CA.
Detailed Process:
Generate CSRs for ESXi Hosts:
- For each host (192.168.1.10-13), access the Host Client (e.g., https://192.168.1.10/ui).
- Navigate to Manage → Security & Users → Certificates → Actions → Generate CSR.
- Enter details:Common Name (CN): esxi-01.domain.local (repeat for esxi-02 to esxi-04)
- Organization: YourCompany
- Organizational Unit: IT
- Country: US
- SAN: 192.168.1.10 (adjust for each host’s IP)
- Download the CSR (e.g., esxi-01.csr) and private key (e.g., esxi-01.key).
Obtain Certificates from Microsoft CA:
- Submit each CSR (esxi-01.csr to esxi-04.csr) to the Microsoft CA (http://192.168.1.50/certsrv).
- Use the Web Server template and download certificates in Base-64 format (e.g., esxi-01.crt to esxi-04.crt) and the root CA certificate (root-ca.crt).
Apply Certificates to ESXi Hosts:
- In vCenter, navigate to Hosts and Clusters → VVF-Cluster → Host (e.g., 192.168.1.10) → Configure → System → Certificate → Actions → Import.
- Upload:Certificate file: esxi-01.crt
- Private key: esxi-01.key
- CA certificate: root-ca.crt
- Click Import (host services restart, ~2-5 minutes per host).
- Repeat for hosts 192.168.1.11-13.
Verification:
- Access each Host Client (e.g., https://192.168.1.10/ui) and confirm no browser warnings.
- Check Host → Configure → System → Certificate to verify the new certificate (e.g., CN: esxi-01.domain.local, Issuer: domain.local CA).
- Confirm Hosts and Clusters → VVF-Cluster → Monitor → Issues shows no certificate errors.
Scenario Example: Generate CSRs for 4 ESXi hosts (192.168.1.10-13), obtain custom certificates from the Microsoft CA, and apply them to ensure secure host communication.
Study Tip: Practice ESXi certificate replacement in a lab, noting
4. Verify Secure Communication
Purpose: Ensure vCenter, ESXi, vSAN, and Supervisor communications are secure with the new certificates.
Detailed Process:
Test vCenter Connectivity:
- Access https://192.168.1.20/ui from a client and verify the certificate (vcenter-vvf.domain.local, issued by domain.local CA) with no warnings.
- Log in as [email protected] and confirm all operations (e.g., VM management, vSAN health).
Test ESXi Connectivity:
- Access each Host Client (https://192.168.1.10-13/ui) and verify certificates (e.g., esxi-01.domain.local).
- Confirm Hosts and Clusters → VVF-Cluster → Hosts shows all hosts as “Connected” with no certificate errors.
Test vSAN and Supervisor:
- Check Cluster → Monitor → vSAN → Skyline Health to confirm secure vSAN communication (no certificate-related errors).
- Deploy a test pod in “Microservices-Namespace” (e.g., kubectl -n Microservices-Namespace run nginx-pod –image=nginx) and verify connectivity via the Supervisor.
Verification:
- Review vCenter → Events for certificate-related logs.
- Check Administration → Certificates → Certificate Management for no expired or untrusted certificates.
- Confirm client browsers trust the domain.local CA (root-ca.crt installed).
Scenario Example: Verify secure connections to vCenter (192.168.1.20), ESXi hosts (192.168.1.10-13), vSAN, and Supervisor with custom certificates, ensuring no browser warnings.
Study Tip: Practice testing certificate trust in a lab. Understand certificate-related errors (e.g., untrusted CA, expired certificates) for the exam.
Exam Scenarios and Tips
Scenarios:Scenario: Users see browser warnings when accessing vCenter. What should you check?
Answer: Verify the vCenter Machine SSL certificate is signed by a trusted CA (e.g., domain.local CA) and includes the correct CN/SAN.
Scenario: An ESXi host shows a certificate error in vCenter. What’s a likely issue?
Answer: The host’s certificate is VMCA-signed or missing the CA’s root certificate. Replace with a custom certificate.
Scenario: vSAN health reports certificate issues. How do you fix it?
Answer: Ensure all ESXi hosts have custom certificates signed by the same CA as vCenter.
Study Tips:
- Practice certificate management in VMware Hands-On Labs https://labs.hol.vmware.com/.
- Memorize: CSR generation, certificate import, VMCA vs. custom CA, and service restart impacts.
- Focus on scenario-based questions involving certificate errors and trust issues.
Resources:
- VCP-VVF Study Guide Page: https://www.vladan.fr/vcp-vvf-administrator/
- VMware vSphere 9.0 Documentation: https://techdocs.broadcom.com/us/en/vmware-cis/vsphere/vsphere/9-0.html
- VMware Documentation certificate management
Sample Exam Questions
Where do you manage vCenter’s Machine SSL certificate?
A. Hosts and Clusters
B. Administration → Certificates → Certificate Management
C. Workload Management
D. vSAN Skyline Health
Answer: B. Administration → Certificates → Certificate Management.
What is required to replace an ESXi host certificate?
A. Reboot the host
B. Generate a CSR and obtain a CA-signed certificate
C. Disable vSAN
D. Recreate the Supervisor
Answer: B. Generate a CSR and obtain a CA-signed certificate.
What ensures client trust in VVF certificates?
A. VMCA default certificates
B. CA root certificate installed on clients
C. vSphere HA enabled
D. Thin provisioning
Answer: B. CA root certificate installed on clients.
Final Words
Configuring certificate management in VVF 9.0 is a critical skill for the 2V0-16.25 exam and secure VVF administration. By replacing default VMCA certificates with custom CA-signed certificates, you ensure trusted communication for vCenter, ESXi, vSAN, and the Supervisor. The upcoming VCP-VVF Study Guide Page, available at https://www.vladan.fr/vcp-vvf-administrator/, will be released as a PDF to support your preparation. Stay tuned for the next part of Objective 4.2! Happy studying, and good luck on your VCP-VVF journey!
Download the study guide here.
More posts from ESX Virtualization:
- 5 New VMware Certifications for VVF and VCF
- VMware Alternative – OpenNebula: Powering Edge Clouds and GPU-Based AI Workloads with Firecracker and KVM
- Proxmox 9 (BETA 1) is out – What’s new?
- Another VMware Alternative Called Harvester – How does it compare to VMware?
- VMware vSphere 9 Standard and Enterprise Plus – Not Anymore?
- VMware vSphere Foundation (VVF 9) and VMware Cloud Foundation (VCF 9) Has been Released
- Vulnerability in your VMs – VMware Tools Update
- VMware ESXi FREE is FREE again!
- No more FREE licenses of VMware vSphere for vExperts – What’s your options?
- VMware Workstation 17.6.2 Pro does not require any license anymore (FREE)
- Migration from VMware to another virtualization platform with Veeam Backup and Replication
- Patching ESXi Without Reboot – ESXi Live Patch – Yes, since ESXi 8.0 U3
- Update ESXi Host to the latest ESXi 8.0U3b without vCenter
- Upgrade your VMware VCSA to the latest VCSA 8 U3b – latest security patches and bug fixes
- VMware vSphere 8.0 U2 Released – ESXi 8.0 U2 and VCSA 8.0 U2 How to update
- What’s the purpose of those 17 virtual hard disks within VMware vCenter Server Appliance (VCSA) 8.0?
- VMware vSphere 8 Update 2 New Upgrade Process for vCenter Server details
- What’s New in VMware Virtual Hardware v21 and vSphere 8 Update 2?
- vSphere 8.0 Page
- ESXi 7.x to 8.x upgrade scenarios
- What is The Difference between VMware vSphere, ESXi and vCenter
- How to Configure VMware High Availability (HA) Cluster
Leave a Reply