FreeNAS is working a bit differently than Openfiler when it comes to configuring iSCSI connection to ESXi host. When I finished building my homelab recently, I at first tested several distributions but finally sticked with FreeNAS which I think has the coolest user interface, and which can be up and running in less than 10 minutes. FreeNAS 8 for iSCSI and connect to ESX (i) . There is an iSCSI configuration which works a bit differently than what I use to experiment with Openfiler. So if you're new to FreeNAS or Learning ESX(i) and if you have experienced a bit in your homelab and installed a FreeNAS 8 with RaidZ spindle you might want to read on.
I'll try to show you how I achieved this iSCSI configuration on my homemade NAS box running Intel Atom 1.6GHZ double core CPU. At first after creating RAID Z volume, which you could see in my previous article, I went the and created NFS share.
For iSCSI there are different configuration possibilities in FreeNAS 8. If you're have some individual disks or(and) RaidZ spindle. If you're having an individual disks like I do, (I have 2 individual SSD's on 2 SATA ports) you can export the whole disk as an iSCSI disk, and so you will create a device extent. But you can't do it for ZFS pool. You have to create a file and then export the file.
On the FreeNAS website, you can see that the file extent is slower than device extent.
A quick quote from FreeNAS documentation:
A device extent allows a raw partition (volume) to be exported via iSCSI. The advantage of device extent is that they are faster than file extents. The disadvantage is that the entire volume is exported. If you only want to share a portion of a volume using iSCSI, you will need to create a file extent instead.
A file extent allows you to export a portion of a volume. When creating a file extent, you specify a file name that iSCSI clients will have access to (similar in concept to a mount point) and the maximum size of that file (storage area). The advantage of file extents is that you can create multiple exports per volume. The disadvantage is that they are slower than device extents.
This makes me think, in my case, I better configure my individual SSD's as an iSCSI targets and the raid Z volume as an NFS …. -:) to get the most out of my SSD's and use the RaidZ spindle for more/less some storage, since those 4 SATA drives with 7200 RPM won't deliver much IOPS anyway.
Ok Let's go and configure one disk as an iSCSI Target. Not so difficult.
The steps:
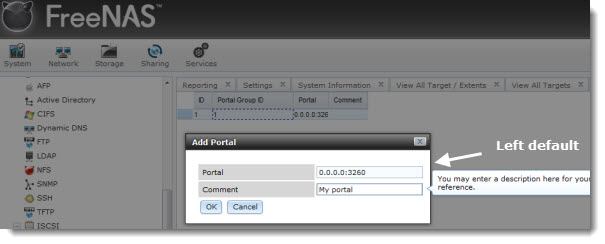
01. Portal group creation.
Go to the Portals > Add Portal.
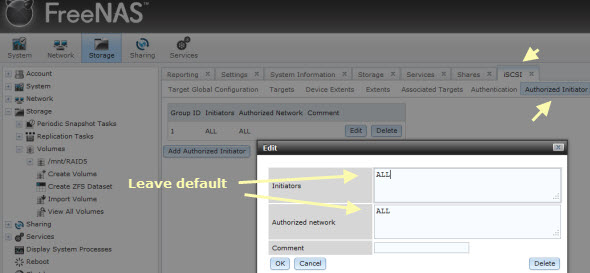
02. iSCSI initiator.
Go to the menu Initiators > Add Initiator.
The next step is to create an iSCSI target.
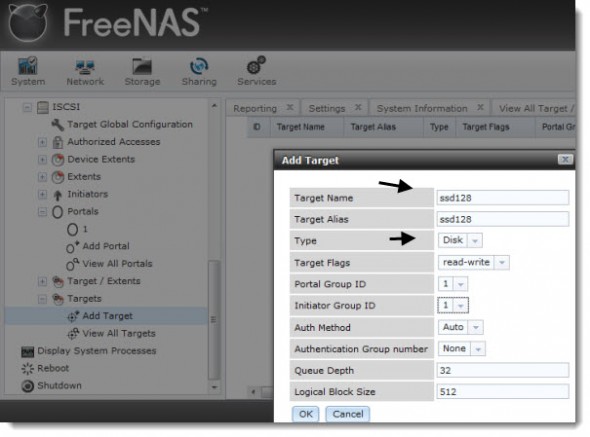
03. Create an iSCSI Target.
Menu Targets > Add Target.
Once the target created, you must create an extent. As I mentioned before, the device extent is apparently faster, so I go for it and create a device extent. The downside is that the whole disk is exported. Does not really matter in my case, since the disks size is only 128 Gigs.
04. Device Extent.
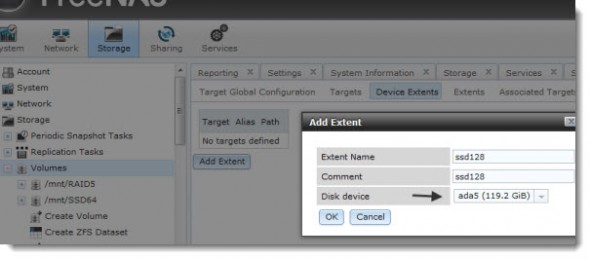
To add a device extent, go to Services > ISCSI > Device Extents > Add Device Extent
In the example below I'm creating a device extent for the whole SSD which has got a 128 Gigs of total storage capacity.
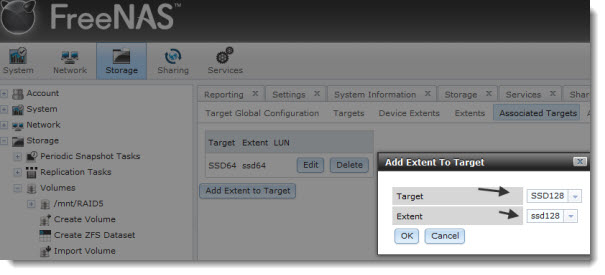
05. Target/Extent Association.
After the Extent created, the next step is the Target-Extent association. Once this done, one last step is to activate the iSCSI service.
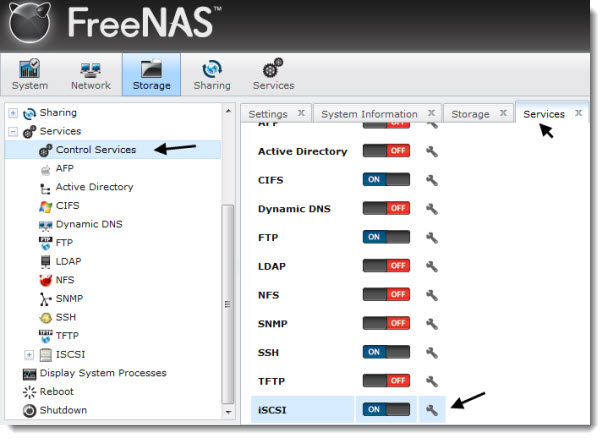
06.Activate the iSCSI service.
The iSCSI service can be activated in this menu.
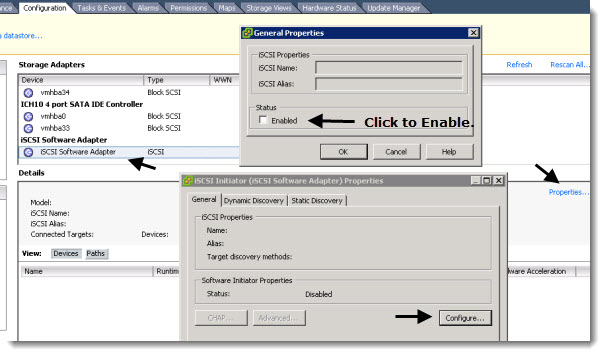
07. Connection from the VMware ESXi Server.
That's it for the FreeNAS part, concerning that single SSD disk. The next step are on the VMware vSphere console. Connect to your individual ESX(i) server or through vCenter. This part is actually the same as described in the Openfiler's configuration.
Go to the Configuration >Storage Adapters and enable the iSCSI storage Adapter first.
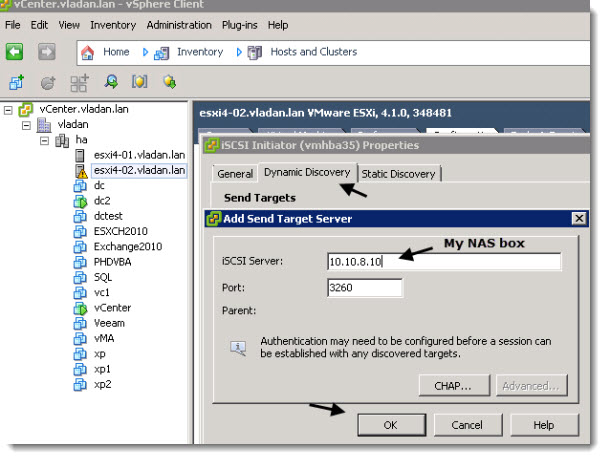
Then Enter the IP adress of your NAS device – it's 10.10.8.10 in my case – as on the image below…
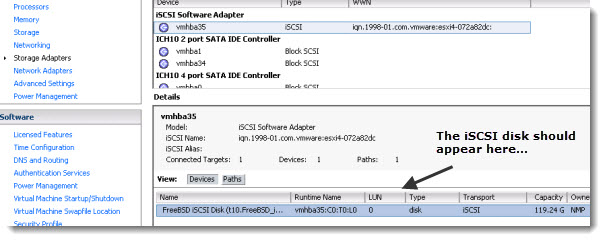
Once validated, you'll get a prompt to rescan your iSCSI adapters. You can do so. You should be able to see the iSCSI Disk as on the image below.
08. The last step is to create a Datastore through the VMware vSphere Client.
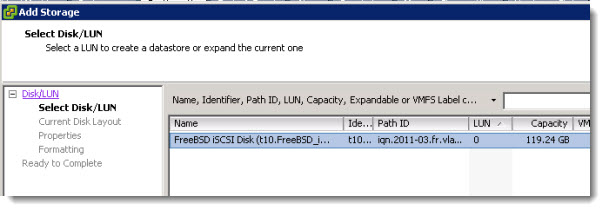
Go to the Storage Menu > Add Storage > Choose Disk/Lun, create a new partition and format the newly created partition with VMSF file system.
You're done.
You should see the newly created Datastore in the VMware vSphere Client's user interface.

This article is part of the Home made Do It Yourself NAS series.
Last note: I was able to connect both single disks with “device extent” configuration and being exported as different targets, but I did not manage to Add the RaidZ volume At the Same time. So I went and shared that volume as an NFS share….
- How to build a low cost NAS for VMware Lab – introduction
- How to build low cost shared storage for vSphere lab – assembling the parts
- VMware Home Lab: building NAS at home to keep the costs down – installing FreeNAS
- Performance tests with FreeNAS 7.2 in my homelab
- Installation Openfiler 2.99 and configuring NFS share
- Installing FreeNAS 8 and taking it for a spin
- My homelab – The Network design with Cisco SG 300 – a Layer 3 switch for €199.
- Video of my VMware vSphere HomeLAB
- How to configure FreeNAS 8 for iSCSI and connect to ESX(i) – this post
- Haswell ESXi Whitebox
You can also find some Free Whitepapers to download on my Free Resources page.

This…does…not…WORK!
Everything goes according to plan, and then I get to step 8, and wouldn’t you know it, vmware says 0 0 0 for connected adapters on the software side! It’s the same stupid problem I get in the real world too, what the heck is the program’s problem here?
Works pretty friggin good for me. And I’ve only been using esxi with Vcenter for about 2 weeks and FreeNAS for about 2 hours. Vladan, you are the man!
At first you should be able to ping the NAS box by using the command vmkping. By using Putty you can connect to your ESXi Server and try to ping the NAS.
If that works and you correctly setup the iSCSI target on your NAS box, you should be able to find the iSCSI target through the vSphere client user interface.
I have the same problem as Ben. what steps should I take if I am unable to ping the NAS?
I just want to add that I am able to add the iSCSI data store ok to a windows machine on the same. I’m only having issues when adding it to vmware.
Make sure that you’re on the same network and/or VLAN. Check the connections, activate the iSCSI initiator (not active by default). Then check ESXi Firewall as well.
Oh, one question. The article was written BEFORE the vSphere 5 release. Are you using ESXi 4.1 or ESXi 5.0 as a hypervisor?
Hope it helps…
Hello, Vladan.
I’ve using ESXi 5.0 and do not connect iSCSI storage.
how i can connect FreeNAS with vSphere 5.0?
Vadya.
Hi Vadya,
Perhaps make sure you are using the new release from earlier in the week(FreeNAS 8.0.1-RC2).
The release note states “-The iSCSI target daemon (istgt) has been updated to address interoperability
issues with VMWare ESXi 5.0 (r7530, r7652, r7817)”.
I hope this helps, Scott
Hello, Scott!
Thank you, it’s really works.
Vadya.
You may be running into compatibility problems with ESXi 5, downloading RC2 now.
http://www.freenas.org/about/news/item/freenas-801-rc2
It worked 🙂 thnx
Good it worked for me. Can you also point me a direction if I like to create an isolated volume for guest OS using MS iSCSI initiator? I’m thinking of if the volume can be assigned a IP for guest OS to connect as well as restricted access besides that particular guest.
I would appreciate if you can answer!
You do it the same way, just you won’t be able to access this volume at the same time by VMware ESXi server, since the volume will be formatted as an NTFS.
best
Vladan
Hi,
Thanks for this post ! However, I’ve got a problem. I’ve got a 8TB Raid10 array and when I would like to add a extent, there isn’t “disk device”. But the 8TB volume is mount in da0 because I saw it in CLI or in storage drive menu. Is someone can help me ? Thanks a lot, Marc.
for me the problem is “Device extents”. i cant get it to list any. the device list is empty and its very frustrating!
Just wanted to say thanks as this was very easy to follow and worked excellent with Freenas8 and ESXi 4.1. Took me literally 3 minutes to have this up and running.
Hi Vladan
Did you continue using Freenas for your lab set-up, or have you changed to something else.
I am also curious whether the USB thumb drive is being written to by Freenas V8 – and whether the write cycles might shorten the life of the USB Stick.
Great posts by the way
In fact, yes, I stick with the Freenas 8 (upgraded to 8.0.1) as for now. Yes, and it’s still installed onto the USB stick (2 gigs) which is inside of the box…
Thanks
I have a lab running on Win7 64 bit all inside of individual VMplayer VM’s. For the most part, it works pretty well, but the NAS was super slow. At first I tried running freenas 7.x using NFS but it was extremely slow (CPU was 100% when transferring data). It was copying data at less than 10baseT half duplex speeds. Then the same thing using freenas 8.02, but the performance was the same.
Next I tried a physical machine with freenas 8.02 using NFS. Much improved (20-30MB/s), but still too slow. Then I tried ISCSI using CHAP and seeing if I could get Win7 connected to it. I did and the performance was twice as fast as when using NFS. That’s good enough for a lab.
I could not however, get ESXi to connect to the ISCSI target using CHAP. So I ended up disabling it….followed your guide. All is working well. Thanks.
After further observation and thought…I noticed I am still getting 100% CPU utilization…even with an external ISCSI target. Guess nesting VM’s in ESXi is not such a great idea after all. Time to build a second white box.
Thank you mate, you made my day. Thank you
for your effort and sharing your knowledge with us.
@vladan,
What kind of performance numbers are you seeing with this configuration? Particularly I would be interested in the Read/Write speeds.
Your post helped me a lot setting up iscsi on FreeNAS 8 along with ESXi, but I did noticed one thing. I have 2 80Gb drives in soft Raid1 setup on my FreeNAS and when I tried to Add Device Extent on the FreeNAS in the iSCSI setings I could not select a disk. My Raid1 setup was not in the list. As soon as I deleted the Raid volume I could add device extent because I could see the two drives. So iscsi doesn’t work with soft raid in FreeNAS 8 or I’m doing something wrong?
Thanks in advance.
Before you add device extent you have to ‘create volume’, then ‘create zfs volume’ and after that can create extent and everything will be working fine.
its working perfet on my test vm..ableto acces from redhat iscsi initiators..
Hello Vladan, I´m sorry if my post is unpleasant, but I really don´t know what to do.
This is my situation:
I got two scenarios, one of testing and one of production.
Both scenarios has 2 IBM servers (testing 2 x IBM x346 and production, 1 IBM x3400 and 1 IBM x3200) all four only has local disk for storage. All has ESXi 4.1 U2 installed on.
On both scenarios I got some VMs and one of them has FreeNAS (8.0.3 on testing and now 8.0.4 on production) installed on.
On both scenarios I configure the FreeNAS and ESXi following your instructions.
On both scenarios I configure ghettoVCB to backup VMs and send the backups to the shared storage from FreeNAS.
On testing scenario, everything going fine and after one week of test, I implement the solution on production and it never work.
The ESXi lost and reestablish the connection all the time, the speed sucks, and so on.
This is a part of the log from ESXi:
3/15/2012 9:26:54 AM – esxi02.local – Successfully restored access to volume 4f61cb8c-b99bbea0-297c-00145e5d7158 (backup) following connectivity issues.
3/15/2012 9:26:49 AM – esxi02.local – Lost access to volume 4f61cb8c-b99bbea0-297c-00145e5d7158 (backup) due to connectivity issues. Recovery attempt is in progress and outcome will be reported shortly.
3/15/2012 9:26:23 AM – esxi02.local – Successfully restored access to volume 4f61cb8c-b99bbea0-297c-00145e5d7158 (backup) following connectivity issues.
3/15/2012 9:26:19 AM – esxi02.local – Lost access to volume 4f61cb8c-b99bbea0-297c-00145e5d7158 (backup) due to connectivity issues. Recovery attempt is in progress and outcome will be reported shortly.
This is part of the messages from FreeNAS:
Mar 15 05:25:52 freenas istgt[1718]: Login from iqn.1998-01.com.vmware:esxi02-4dea8d88 (192.168.70.10) on iqn.2011-03.example.org.istgt:backup LU1 (192.168.70.15:3260,1), ISID=23d000002, TSIH=12, CID=0, HeaderDigest=off, DataDigest=off
Mar 15 05:26:19 freenas istgt[1718]: istgt_lu_disk.c:5137:istgt_lu_disk_queue_start: ***WARNING*** transfer abort CmdSN=2178
Mar 15 05:26:19 freenas istgt[1718]: istgt_lu.c:2798:luworker: ***WARNING*** LU1: lu_disk_queue_start() abortedMar 15 05:26:19 freenas istgt[1718]: istgt_iscsi.c: 777:istgt_iscsi_write_pdu_internal: ***ERROR*** iscsi_write() failed (errno=32)
Mar 15 05:26:19 freenas istgt[1718]: istgt_iscsi.c:3508:istgt_iscsi_task_response: ***ERROR*** iscsi_write_pdu() failedMar 15 05:26:19 freenas istgt[1718]: istgt_iscsi.c:4957:sender: ***ERROR*** iscsi_task_response() failed on iqn.2011-03.example.org.istgt:backup,t,0x0001(iqn.1998-01.com.vmware:esxi02-4dea8d88,i,0x00023d000002)
What do you think about this?
Thanks a lot.
tequesta
I’m not sure that FreeNAS is supported to run in a VM. Certainly not in prod. Should be working in LAB environments as a Shared Storage though. You’re adding an additional layer with the destination of those backups inside the FreeNAS VM… From the logs I can see some connectivity issues, that’s all.
Thanks Vladan. I will continue trying some changes. If I put it to function, I post here my experiences.
thanks its works
regards from mexico
Mexico city? Wow… cool. I hope that you enjoying to read my blog.
Best regards,
Vladan
Hi,
I have two old DL385 and freenas 8 on the board Jetway JNF81 with 2gb ram und 4x 500gb sataII. My experence with fileextend and deviceextend on iscsi was different.
best write with fileextend 38mb/s for 422mb file or 15mb/s for 2171mb file
second write with deviceextend 20mb/s for 422mb file or 2,5mb/s for 2171mb file
bad write with nfs 3,3mb/s for 422mb or 2171mb file
to messure the speed I copied the file from a local ssd on the esxi to the target below. The bigger file was a vmdk with 8388mb and 2171mb data on it. The other file was a iso file with 422mb.
configuration of freenas
raidz2 over all 4hds 900gb space (just for testing)
2 zfs Dataset -> 1 for NFS und 1for iscsi fileextend
1 zfs Volume -> 1 for iscsi deviceextend
I think the poor speed of the bigger files depends on the ram. I will expand it to 8gb.
Next Raid will be raidz instead of raidz2.
Excellent Article. Had an issue starting the iSCSI service afterwards and needed to remove the iSCSI Initiator value in step 2 to get it started. Then retraced these steps for s successful deployment.
Keep volume sizes under 2GB or ESXi 4.x will throw an error when trying to create the datastore.
Super Article 😉
I am tossing together a small lab like virtual environment and trying to setup FreeNAS as a VM setup with harddisk allocations from my system but I get stuck at step 4 where after the volume is done and I’m setting up the iSCSI I can not get the extent to see a device. Maybe because I’m trying to do this all within a virtual bumble and maybe the freenas needs to be a physical box of some sort? The FreeNAS is setup in VM workstation and the ESXi hosts as well for right now.
Meant to say Virtual bubble, been working on this setup for to long…
Hi,
I’ve done the same setup with freenas 9.3, added the iscsi target in vSphere, but when going to create the Datastore it’s not appearing the iSCSI Lun. I’m using vSphere 5.5 u2
Any ideea?
Hello Vladan
hope u see this post. I did it with ESX 5.5 and Freenas 9.3 and it worked immediately.
So i just would say thank you very much, you just made my day.
Glad you liked it. Even old article can sometimes help -:)