
Lately I was working on the redesign of my lab at home and I purchased a Cisco L3 capable switch. In my quest for a VMware vSphere homelab, I recently purchased my first Cisco switch. You could see it in my recent post called My switch adventures where I bought the wrong switch because of similarities in the device's model numbers. If you're seeking cheap L3 switch make sure you read it. The Cisco SG 300 – 10 port, a gigabit port model is layer 3 switch. It’s a switch for the SMB market with the capability to enable Layer 3 functionality via the CLI. By default the switch comes in L2 mode and the L2 to L3 change can be done only through the CLI, not through the GUI. When in L3 mode, you can assign up to 32 static routes and up to 32 IP interfaces, this means 31 routed VLANs (1 route per VLAN plus default GW) providing inter routing VLAN functionality.
This was the feature which I wanted. Creating VLANs activates the routing leaving only to configure my ESXi hosts for them. (I have 2 physical ESXi hosts and small homemade NAS device which you could read about in my article about how it’s been built for about a half of the price of commercial NAS device).
Update: The switch was replaced by his bigger brother – the SG300-28. Check the latest lab builds at https://www.vladan.fr/lab
The ESXi hosts have 3 NICs each. The motherboard’s built-in NIC is not recognized and I didn’t want to bother to hack the ISO to try to make it work. But there are built-in NIC cards which works (or) the drivers works, but they're not in the original VMware ISO, so you ‘ll have to “hack” the ISO in order your built-in NIC card to be recognized. 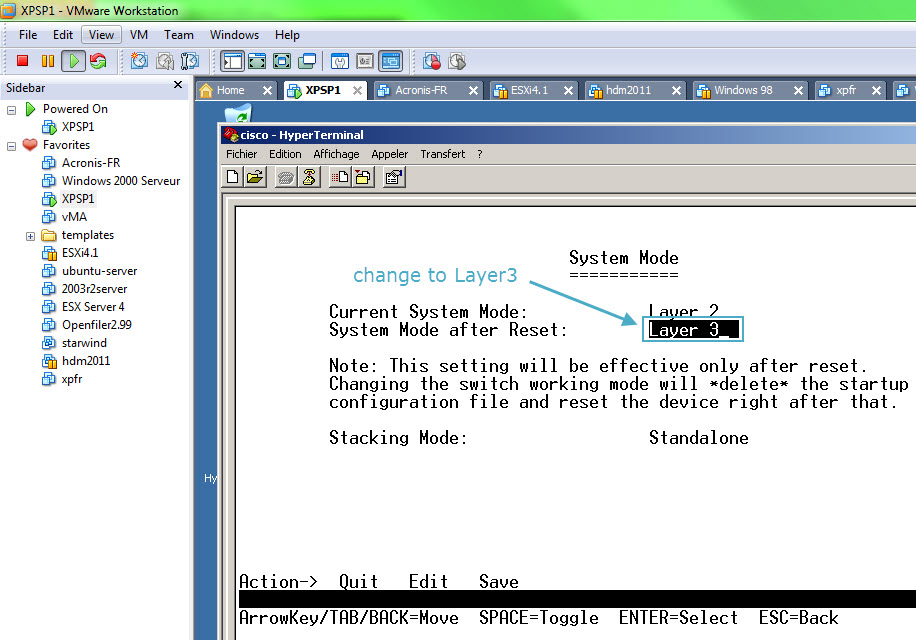 So, the first thing to do is to connect the console cable to the serial port on the switch. I did not have a Hyper terminal on my W7 so I went an fired up one of my Windows XP VMs through a VMware Workstation and connected through the COM port with a serial cable. The default login/password combination is cisco/cisco.
Note that when you put the switch from L2 to L3 all other configuration is lost, so don't bother trying to configure anything else before changing to L3 mode. After the restart of the switch, while still in CLI you can configure the login/password and IP address of the default VLAN which is VLAN1. The rest of the operations can be done through the GUI. The GUI is nice done. Clean and sharp. Read the rest of the setup on next page.
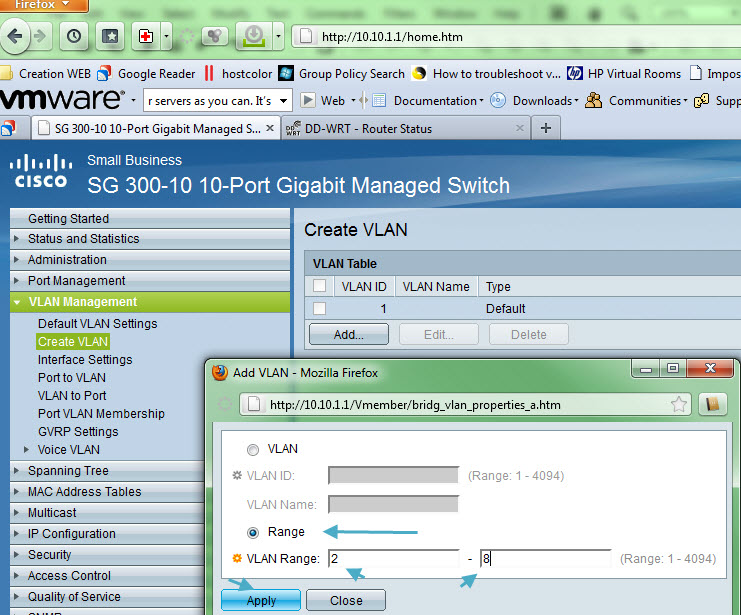
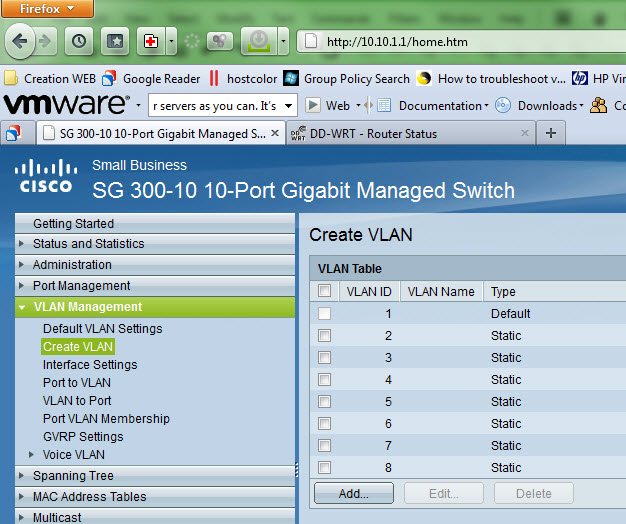
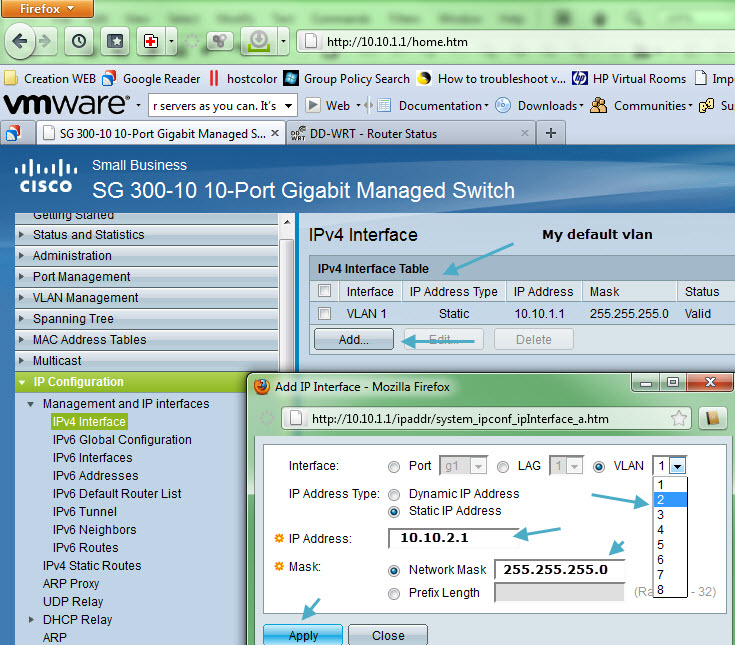
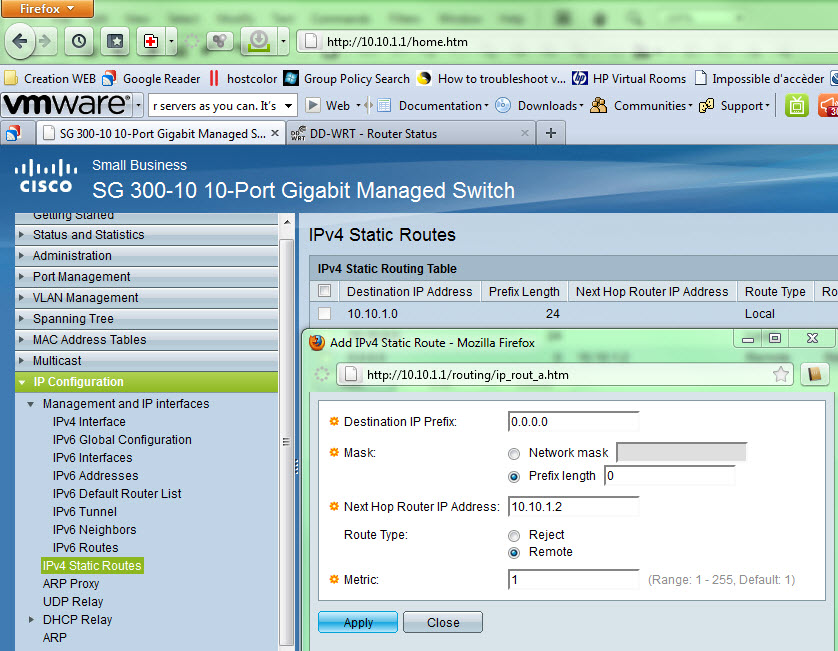
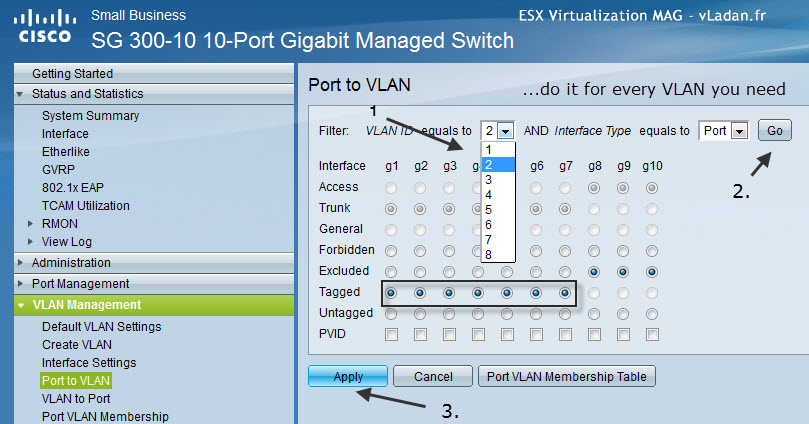
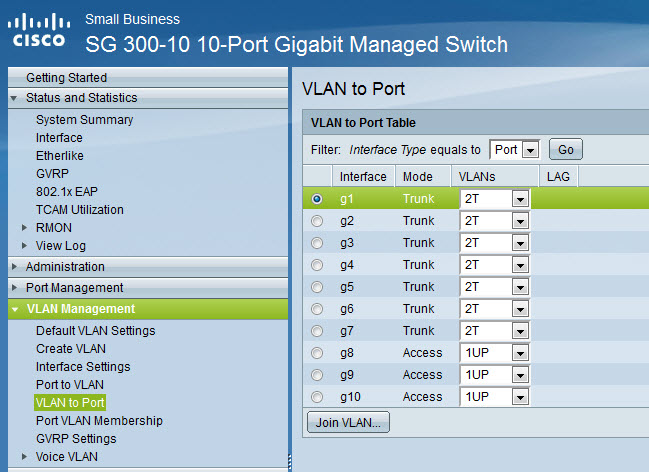
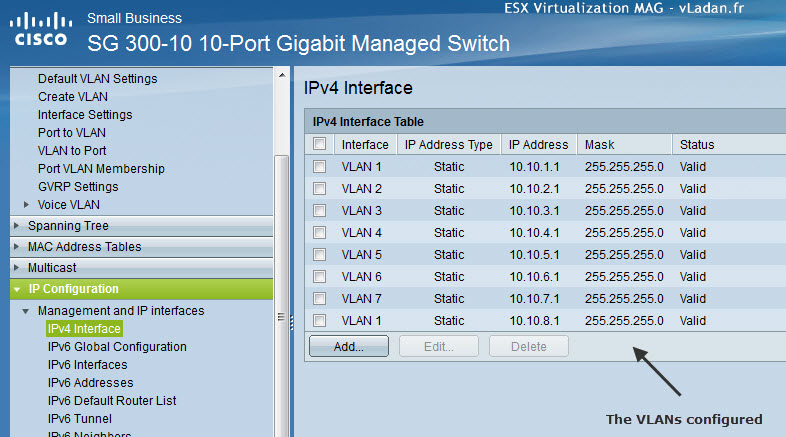
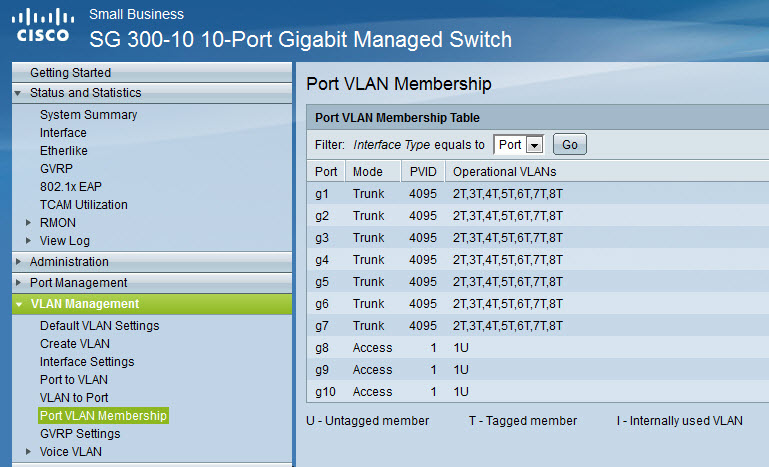
The creation of VLANs through the GUI on the Cisco SG300 is not difficult, assigning the IP address to each VLAN too. But the hard part is the creating of static routes on the VLANs. Those routes should be created (populated) automatically when you go to the menu “Port to VLAN” and change the radio buttons. Without an understanding of networking terminology the GUI can be a bit tricky and I was struggling to get the routes to populate (there is a way to manually create those routes). I restarted several times from scratch 🙂 The screenshots below walk through the process of creating a VLAN and associated IP interface.
 |
 |
 |
 |
 |
 |
Be sure that you save your work before you reboot the switch. On the Cisco's interface there is little link and when not saved configuration is detected, there is a little red cross inside a circle. I did not see this sign and after reboot the conf was lost several times… -:(. I was learning the hard way… But wait it's not over.
I was facing a problem. My internet access is going through my ISP router which I rent from my ISP. The device is not my property and I don’t have a CLI or GUI access to be able to create a routes back for my newly created VLANs. You need to create a route back from your router for each VLAN used on the Cisco, otherwise VMs will not be able to communicate outside the SG300. I’m not a routing expert, but with the help of Andy Grant, he gave me the idea to place another router in between the ISP box and the Cisco SG 300 to configure the route back on that device. This is not normally required if you have access to your home router and it provides static routing functionality. I had a router which was not used in my lab at the moment. A Linksys WRT 54 GL. I went and flashed the device with the DD-WRT firmware and configured the routes back with Andy’s help. I also needed to configure this router in “mode gateway” and not “router”. This is something I discovered when testing, but DD-WRT is well documented on that as
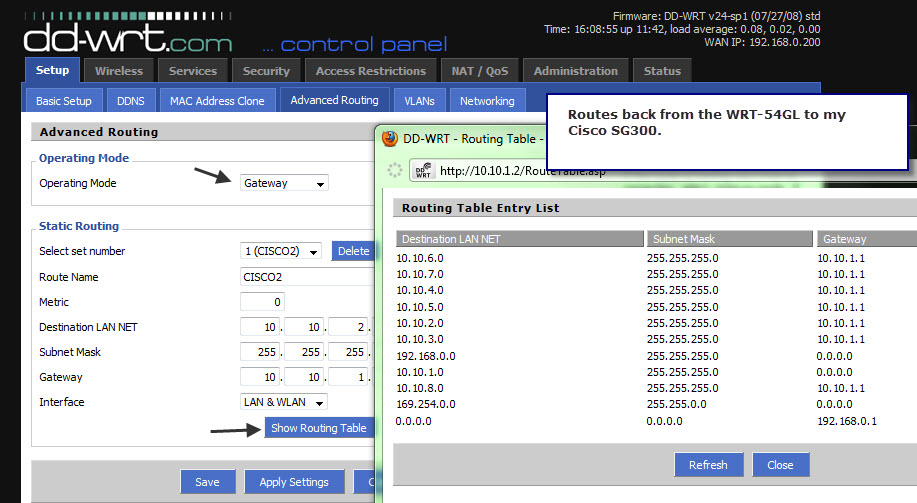
well, and also on creating a static routes too.
So now I had 2 routers in my lab, with the traffic going from my ISP box on the 192.168.1.X network back through the Linksys WRT 54GL  to my Cisco SG 300 at 10.10.1.x lan. Perfect. I was ready to go and start configure my 2 ESXi hosts and I put the network layout like this. I’m not saying that this is the perfect network desing, but it’s the one I did for my homelab needs.
Note from Andy: We created the link between the SG300 and the router as an access port to provide a configuration that a broader user-base could use. I had 3 NICs available in each ESXi host and I knew that my NAS box had only one NIC (no redundancy there… on the NAS side). So I dedicated one nic on each ESXi host to the iSCSI storage traffic.
I put the storage traffic on VLAN 8. The other 2 LAN cards on each ESXi host are used with VLANs for:
– Management Network, VM network, FT, vMotion
I have the first NIC in Active mode configured for Management Network. The second NIC is configured for Management Network NIC too, but in standby mode with failover set to no. The First NIC is in standby mode for VM network traffic, for redundancy. The second NIC is in active mode for VM network traffic.
All those networks are separated in VLANs to achieve the best performance and isolation. So that is the story of my home lab network upgrade, it took me some time and some sweat too…, but with help of Andy I could manage to go deeper in routing and Cisco in general. In fact, the experience you get by building your own homelab is enormous. If you haven't read the How to build a cheap Do it Yourself NAS system, you might want to have a look at this series of articles, where I'm building a Home made NAS system for a bit more than €300.
- How to build a low cost NAS for VMware Lab – introduction
- How to build low cost shared storage for vSphere lab – assembling the parts
- VMware Home Lab: building NAS at home to keep the costs down – installing FreeNAS
- Performance tests with FreeNAS 7.2 in my homelab
- Installation Openfiler 2.99 and configuring NFS share
- Installing FreeNAS 8 and taking it for a spin
- My homelab – The Network design with Cisco SG 300 – a Layer 3 switch for €199. – this post
- Video of my VMware vSphere HomeLAB
- How to configure FreeNAS 8 for iSCSI and connect to ESX(i)
- Haswell ESXi Whitebox
Nice article! I too have looked at this switch as a nice addition to the home lab. The other thing to note is this switch also supports LLDP and CDP so those little squares next to the NICs on the Networking config screen work too. Also they are fanless so no noise. Right now I’m using a couple Dell 2708s and work OK but my next choice would be 1 or 2 of these. The key reason is they are L3, have 4MB in port buffering, and have CDP.
One difference between your setup and mine is I’m using vSwitch0 for everything including iSCSI and so far have not had an issue with 2 physical nics. The other nics in the box are for a dvSwitch. Also I’m using Nexenta as the SAN. I’m waiting for FreeNAS (BSD) to get ZFS a little more ‘in’ however, both are nice solutions. As an alternative anyone looking for a nice NAS already made and on VMware HCL are the small EMC/Iomega and Netgear devices in order of preference.
Yes , I definitely love the fanless option too. The Cisco CDP is to explore… -:). In one of my future articles.
Best
Vladan
I don’t believe CDP is supported in the v1.0.0.27 firmware. Rumor has it that CDP will show up in the next firmware release.
And if it is there now, I cannot find the option to enable it 🙂 LLDP is most definitely there but without official vSphere support it does us little good 🙁
Check this
http://www.cisco.com/en/US/prod/collateral/switches/ps5718/ps10898/data_sheet_c78-610061.html
I remember installing a couple and the ‘squares’ worked. Under ‘Discovery’, also supports Bonjour, why… I don’t know, don’t personally have one, YET 🙂
Hi Craig
You are correct that the specs do list CDP, but I surely cannot find the option to enable it, plus if you crawl the Cisco Support forums there are posts confirming this by Cisco personnel.
https://supportforums.cisco.com/message/3340724#3340724
https://supportforums.cisco.com/message/3313229#3313229
Hi,
Good post especially when you chosen switch that i bought not long ago myself 🙂
I bought it for £153.59 from http://www.ilgs.co.uk/products.asp?partno=SRW2008-K9-G5
Looking forward for more in depth reads 🙂
Marcin
Hi Guys !
Very good article, …can’t wait for vSphere 5, my lab is tuned to vmware.com on ssh, telnet, http, https, …. 🙂
Great job Vladan !!!
Quand je passe sur la Réunion, on va se boire un jus d’ananas Promis !
🙂
Great article. Reading it pretty much summed up my config. Right now however, I have a Cisco Catalyst 2621xm VLAN trunking to a Linksys SRW2024. I’m thinking (not entirely convinced!) of upgrading to the model you have (24 port version) so I only use one switch/router/etc. Hopefully I’ll get the same results as you.
Cheers!
Thanks for this nice article. I’m quite new into the VLAN and routing thangs, thus I did not fully get your concept here. What is in your case the benefit of having static routes? What are the 7 subnets for?
We’ve got here in our little team a Dell R5400 with ESXi 4.1, Bufallo TeraStation III, Dell switch for engineers and recently we bought the SG300-20 to separate the storage network. vSwitch0 for VMs with 1 NIC, vSwitch1 for storage with 2 NICs and linking, vSwitch2 with 1 NIC for corporate access to web services. Virtual router to deal between the corporate net and the VM network. All engineers with their notebooks are connected to the Dell switch. The Dell switch is connected to the vSwitch0.
Here in my lab I’m still struggling with my network performance! When a virtual machine is being suspended or when there is higher access to the Buffalo, the whole network becomes slow.
Unfortunately, there is not clear information in the net in terms of LACP/Etherlink/Port Trunking/Link Aggregation together with VLAN and ESXi. The big question marks are: route based on IP hash vs. source port?, trunk vs. access, tagged vs. untagged, etc. … The examples in the VMWare KB cover EST, VST and VGT, but they refer to the professional switch series with IOS.
Is there any chance to get little support for my set-up? Is there any chance to get in contact? Thanks very much!
I’m in a similar situation: trying to configure LACP between the SG300-20 (firmware 1.4.1.3) and vSphere 6.0. I have everything setup and everything looks good from both the switch and vSphere perspective but I can’t ping a VM on one of the member dv port groups. The same VM works fine if I move it to a standard port group on the same VLAN.
Vladan/Andy:
Do you have LACP working for your environment? If so, what is your configuration?
Thanks.
I’m not using LACP. The switch was sold and I’m on 10Gb now..
Thanks so much for this post. I just received my SG300 and was having a rough time getting it to work. I totally forgot that I needed to create the routes back. I have a WRT54G that I use as my wireless router, so luckily I was able to create the routes on that without the need of DD-WRT. I got it all setup, plugged my laptop into port 2 and configured it with VLAN 2 (10.10.2.0/24), and then was like #@%^&*&*
, it’s not working. I realized quickly what it was. I assigned port 2 as a tagged trunk. My laptop does not send traffic tagged, so I switched it to an access port and everything worked like a charm. Thanks again for a great post.
Glad you had success with the setup…-:)
Vladan
I dont understand why you use the linksys router. If the switch is in Layer 3 why you use it? you could put the routes there. or am i wrong? thanks and greetings.
I did not have an access to my ISP box to create the routes back to my virtual infra….
Great post. In hindsight, do you wish you would have gone with the 20 port SG 300-20 instead? I’m contemplating a switch for my home lab (not yet purchased), and really like the SG 300 series being L3, and fanless, but I’m concerned with the port count. a few hosts with say, 4 NICs, a Dual port Synology NAS, that I’m already tapped out of ports, let alone any uplinking, etc. If I went with 3 NICs on each host, I suppose I could get away with the SG 300-10. Do you find 3 NICs per host adequate?
Hi Vladan,
This was a very helpful article. One of the things I like most about this switch is the CLI. And cost of course 🙂 Now, if I could only get my vm’s talking to the internet.
I’m using the free version of Starwinds for my shared storage. I needed something that could be quickly setup and that just worked. It fit the bill perfectly. When time permits it’s on to Oracle Solaris and ZFS, again.
Also, I just wanted to say thanks for your articles! They have been most helpful. Keep up the good work!
br,
Greg
Hi Vladan,
Thank you so much for sharing your homelab design. You are one the rare person on the web providing clear and easy implemtation.
As a newcomer in the VMware world I’ve decide to buy the same equipment as you mention on your post, the only difference is the switch I bought the SG300-20 ports instead and Got the router WRT54GL and easily flash it with
DD-WRT.
But I’m a bit stock with the router configuration settings you mentioned as the inter vlan communication is not working for me.
Could please help me out to solve this by sharing with screenshot your router wrt54gl configuration settings.
Merci d’avance.
Saliou
Hi Saliou,
The config has evolved since and me too I got the SG300-24 switch as a replacement for the SG300-10 and the WRT54 got replaced by EA6900 (5Ghz wifi). I know, it’s not obvious, needs routes back to the SG300. I’ll send you a shot to your mail.
Vladan
Hi Vladan,
Can you explain how do you send the routes back from the EA6900 to your sg300?
Regards
RS
On the Advanced routing tab I have RIP enabled and static routes added for each VLAN…
Thanks,
Does that router has that functionality or did had to go with DDWRT ??
Can you send me your config file ?
Regards
Rui
send an email to contact (at) vladan.fr and I’ll see what I can do…
Dear Vladan,
Thanx for your guide, it seems so good for most of IT guys out there. Can you please fix the link of 141-150×150.jpg and 16-150×150.jpg because they do not work ? there are 3 images, the first open ok , the other two does not work 🙁
Thank you
Hi Panos. Thanks for the heads up! All fixed. Hope it helps for your learning…
Hi Vladan,
Very good article. Just one question is the switch model SRW2008-K9-G5? I found it locally for about 190 euros and I would to buy it for it’s layer 3 capabilities.
Best regards and thanks,
Hi Zet,
Thanks. It’s an old post (perhaps still valuable). You must get the SG300-10 from Cisco (not from Linksys). There was an old abreviation (coding) of the switch and I picked up the wrong switch back in 2009. Don’t do the same mistake…. http://www.vladan.fr/my-switch-adventures/
Very useful walk-through and i have a pretty similar setup to your original post. Quick question on your ddwrt setup. Did you create VLAN3 on your ddwrt router? Was there any commuinication from your home network to your lab?
Thanks in advance!
I wondered if you might consider adding a link on your site to enable visitors to report errors, omissions, updates and spelling related issues and suggestions.
PS. Great site, I find your content well written, well considered and very relevant. Thanks for all your efforts!
They’re already doing this….. through comments. It’s more convenient, non? Thanks for your input and thank having you as a reader!
Excellent blog, Vladan – I’m about to to start studying for my vSphere 6 Foundations exam, and have decided to plump for the Cisco SG300-28 (managed to buy 2nd-hand via ebay) and the Linksys WRT54GL (also purchased 2nd-hand) router you mentioned (to be flashed with DDR-WT), as I have the same issue (ISP supplied modem/router which I don’t really want to touch/configure).
My VMware 6 lab at the moment consists of a single server hosting both ESXi 6.0 and vSphere 6.0 (I have an identical one which I haven’t yet configured), so it’ll be fun and games reconfiguring it all when the router and switch arrives!
Are there any lab recommendations for separating the PSC and vCenter Server roles in an vMotion/DSRM/HA scenario with only 2 servers?
Again, many thanks – and I’ll let you know how I get on with the Cisco and Linksys! 🙂
Well, the lab is a lab. If anything breaks, it does not really matter. It’s good to do the install/config at least once (the separate PSC and vCenter), in a lab. But perhaps for a long run you’ll be fine with “All-in-one” as it might “eats” a little bit fewer resources. Perhaps now there are better routers around. I know many folks from the Virtualization community that switching to Ubiquity, but personally haven’t tested just yet. Remember, it is an old post … -:). Not all things I mention there are still in the lab..-:). Good learning..
Very true – there’s nothing currently configured in my lab that I don’t mind one bit about reinstalling/reconfiguring – that’s the fun part of it! 🙂
I’ll opt for the combined PSC/vCenter (although VMware obviously don’t recommend it at all!) – in the future, I might grab an additional server and opt for the PSC on a standalone machine with 2 x vCenters, but budget’s a little bit tight at the moment!
Yes, I’ve seen your latest lab – very impressive – maybe I’ll switch to 10Gb switches next year! 🙂
I have the CISCO 300-20 switch and have created the VLANs there without issue. I am struggling to get the router from my ISP into the mix so that I can get them all to communicate. I have two intel nucs connected as the ESXi hosts and will put them on my management vlan101 and want to have them connect. when I test the management network, it failed. I have access to the router from my ISP if I need to do anything.
I am not very strong on the CISCO switch or networking configurations, so need some assistance here.
I have the following VLANS configure
101 – VMW_Management – 10.10.1.0/24
102 – VMW_vMotion – 10.10.2.0/24
103 – VMW_Storage – 10.10.3.0/24
104 – VMW_VXLAN – 10.10.4.0 /24
My questions are:
1) what do I put as the DNS entry ?
– is it the 10.10.1.1 for my VLAN101
– is it the address that is listed on my router from the ISP?
2) What do I put as the default gateway?
3) Do I need to do the IPV4 routes as you did?
I did not have a possibility to create a route back to my switch from my ISP’s router. I have another router in between the ISP box and my LAN.
I’ll try. Not sure if that’s accurate for your environment:
1. As DNS you should put your ISP box
2. Same as above – the ISP router
3. Unless you’re exactly on the same network as your ISP, you have to create a route. (at least it’s what I did to have a connectivity).
Hope it helps.