You can test VMware VSAN configuration even if you don't have 3 physical servers. By simply creating 3 virtual ESXi hosts (VMs) which run on the same box it's possible to test VSAN. Each virtual ESXi needs to have at least one spinning disk and one SSD disk. You can also use a computer running VMware Workstation.
In a real world (but in a nested world too), VSAN needs hosts with mixed storage – spinning disks and SSD disks. At least one of each in each host. A hardware listed on VMware HCL. In addition, for better performance, VMware recommends having 10Gb NICs as uplinks for the vmkernel adapter participating in the VSAN clusters.
The ESXi hosts that we'll be creating as VMs, will think that one of their disks is an SSD disk. This is possible by adding a single row with one parameter to the advanced configuration of the ESXi 5.5 VM – through vSphere web client. There are many tutorials on the internet how to install virtual ESXi and how to test if your system is capable of.
What's needed for Nested VSAN?
You'll need at least one “beefed” ESXi host with lots of RAM and some local SSD storage. You can use 5.1 or 5.5 version for the underlying system. I'm using my Haswell white box which I built recently, which has 32Gb of RAM. Where playing with VSAN can be fun, I don't expect any performance out of it, as everything runs nested and I'm using only consumer parts.
But I'm looking for a low cost and not noisy Infiniband Switch, as currently part of my cluster runs with 20Gb Infiniband NICs for the backend storage network. But at the moment there is no Infiniband switch ( hint for sponsors ???), so I just run a simple triangle architecture with my Nexenta shared storage white box. (no SAN either ???). I've stumbled for quite a few switches on eBay here and here. Switches with a price tag around $300 which is acceptable for my home lab, but I'm currently carefully studying the noise as it seems to be quite a concern. See this thread at Mellanox forum.
First – prepare your “infrastructure”
01. Deploy vCenter 5.5 as a VM – (VCSA is faster to deploy). You can follow my video vCenter Server 5.5 Linux Appliance – Install/config . We will be using this vCSA for creating our VSAN cluster. (Note: login: root pass: vmware)
02. Create ESXi 5.5 VM
- You'll need to use the vSphere Web client. New VM with ESXi 5.1 or greater or ESXi 5.5 or greater as an option, depending if you're using vCenter 5.1 or vCenter 5.5.
- Chose Other and Other (64-bit)
- Change the CPU >Chose 2 CPU and also change RAM to 4Gb
- Change the first disk to something small (2Gb – Thin provisioned), it's just for the ESXi install.
- Add Second Disk (the “fake SSD”, let's say 10Gb (again – Thin) – go to VM options > Advanced Settings and Add Row with this:
scsi0:1.virtualSSD = 1
This is for the ESXi to think that the disk is an SSD. (NOTE: The SCSI0:1 is means that it's the second disk. If you want to tag for an SSD another disk, you must change the second number.)
- Add Third Disk (capacity you like – I took 20Gb Thin)
Here is a screenshot showing the second disk which will get tagged as an SSD with the SCSI0:1.virtualSSD = 1 value, that you see in the screenshot above.
Second – Once validate the creation of the VMDK, you'll need to change the template of the VM to VMware ESXi. (remember we took Other x64bit). But this time you must use the Windows legacy vSphere client for that, as in the Web client it's grayed out!
Now, create a clone of this VM (or template), and create 2 more VMs like this, before we start the installation process of ESXi 5.5. So you should end up with 3 nested ESXi 5.5 VMs with 3 disks each (1st for the ESXi 5.5 system installation – 2Gb, 2nd disk is marked as an SSD – 10Gb, 3rd disk is for the actual persistent storage used by VSAN)
- Now, attach an ISO of ESXi 5.5 which you have previously uploaded to a datastore and check the “connected” checkbox > start the installation of ESXi 5.5. If you don't connect the iso you'll end up the VM trying to boot over a network and this is not that we want to do.
- Click Enter to continue and F11 to launch the installer > Install to the small 2Gb disk we configured at the beginning.
It's not really clear at the moment, how is VSAN going to be licensed as there is a new place to enter a license number… Part of vSphere Enterprise Plus? Perhaps. Or completely separate product? Anyway, VSAN 1.0 is just a first release… so I would not think that many clients will jump in and run VSAN in production when in v1.0 release. But many home labs and clients which run testing environments with VSAN, if they have 3 spare hosts – requirement. And that's the plan for me as well, getting 3 hosts and a decent backend storage network.
But while many folks starting with virtualization just can't afford to have 3 hosts at home for a home lab, the nested way is the only way to test the VMware VSAN.
Well, strangely enough. In my case, I'm ending up with a nested ESXi 5.5 VM with all 3 disks which show up as SSD! While it's certainly amazing, it's not what we need for our VSAN cluster… -:). Is it because I've originally installed the VMs on local datastore which is an SATA attached SSD drive? Perhaps.
Oh well, I'm learning here. So let's try to re-tag the advanced configuration file by passing through the web client again.
I'm having success, and after starting again my nested ESXi hosts, this time it shows the SSD for the 10Gb disk as planned. Here is the screenshot from the advanced configuration file. I'm sure that I'm not the only one to whom this happens so I hope it helps out someone else too. The sources I'm referring to did not mention this alternative. Now that our problem with tagging local disks is over, and I learned my lesson, we can step further on the real setup of the VSAN cluster. Let's see if there are any more adventures that we can encounter.
So we learned here that we can force the disks to show as SSDs or as non-SSDs.
How to setup VSAN Cluster?
Login to your vCenter 5.5 through web client and if you have not done yet, Create a datacenter and add your hosts. Then, the there is basically two ways of continuing forward:
01. You can create an empty cluster > activate the VSAN > Add your hosts at the datacenter level first (not to the cluster yet) > Add vmkernel adapter for VSAN to each of those hosts > Add those hosts to the VSAN cluster.
02. You Add your hosts to the datacenter > Add vmkernel adapter for VSAN to each of those hosts > Create a VSAN cluster > Add hosts to the VSAN cluster.
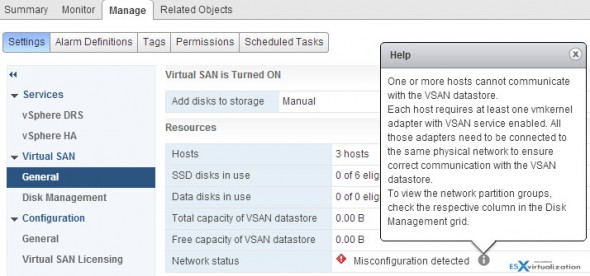
If you try to burn some of those phases, you'll end up with a screen like this. Network Status does not have a green check mark. You can also encounter this problem if you try to use DHCP assigned IP address for the vmkernel adapter you've created for the VSAN traffic (my case – apparently, one of those vmkernel ports did not pick up an IP address)…
Create VSAN Cluster
To create a VSAN cluster, Select your Datacenter > Actions > New cluster > check the VSAN box. There is an option to add storage to the cluster next to the check box where are two options. Automatic or Manual. I chose manual as I don't want all my disks to participate in the VSAN cluster (remember that we have a small 2Gb disk where on one partition there is the ESXi installation). So I went the manual way, to see further.
Create a vmkernel port for VSAN traffic
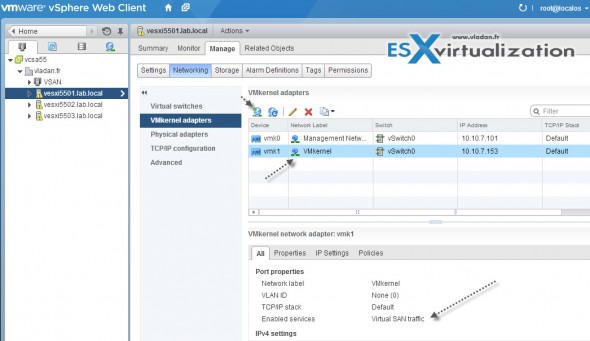
- Select ESXi host > Manage TAB > Networking > Add
> Check VSAN traffic checkbox
You'll end up with the screen like this, where down there you see the VSAN traffic is enabled for this vmkernel port.
Now when this is done for each of those 3 hosts you can add them to the VSAN cluster > Drag and drop !! Yes, it's supported now in the vSphere Web client. You can also select the VSAN cluster > Actions > Move Host into Cluster
Hey, where is my storage?
When I added hosts to the VSAN cluster, the VSAN cluster has been created. Fine. But with zero capacity. Normal, as we choose the Manual way of adding disks.
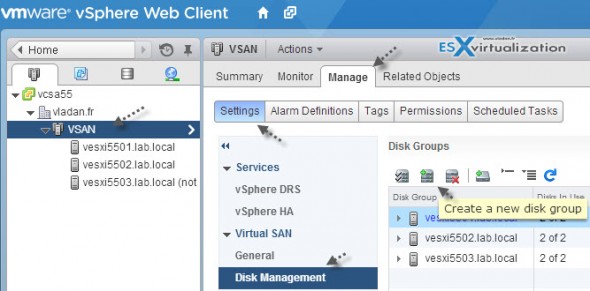
Go and select your VSAN cluster >Manage tab > Settings > Disk management > Select one host > Create New Disk Group
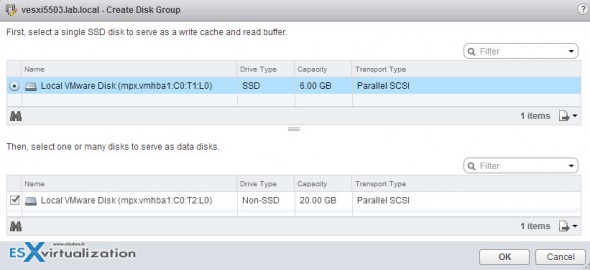
You'll be presented with a screen which looks like this, where you can select the check box and create a new group where you select those disks which will be part of this group. In my case one SSD disk and one normal disk:
This should create a disk group, which will be used by VSAN. You have to repeat this task for each of the other hosts participating in the VSAN cluster.
If you facing some issues and the group isn't created check the recent tasks details. You might find out that your VSAN license has expired….
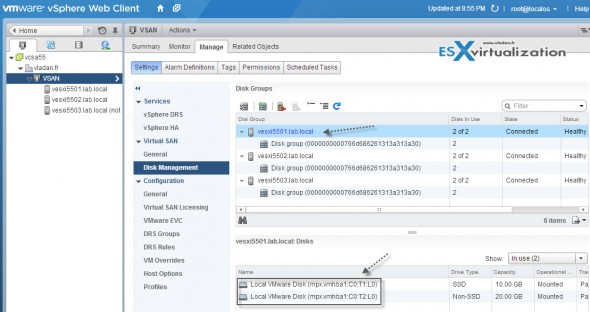
Repeat the steps for each host which participate in the cluster to finally obtain this screen.
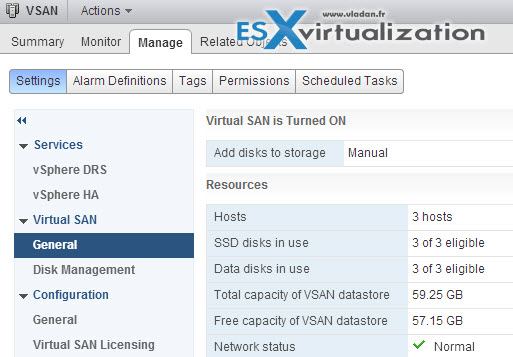
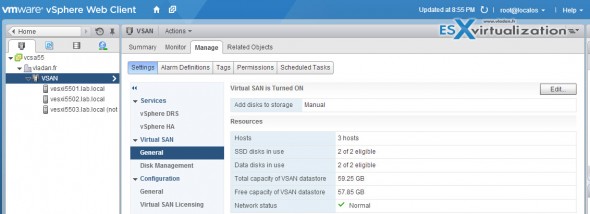
The final recap screen you should see a screen like this.
Here are the articles of other fellow bloggers which took the time for a write-up. I did my own write-up and I could see potential problems that could occur during such a setup. I hope that my experience will serve to others.
Not that my disks showed up as Non-SSD but exactly the opposite! All of them were marked as SSD disks! Also, I could see the importance of recent tasks (on the right-top side) where I was able to detect that my hosts were not licensed for VSAN.
VSAN is definitely a nice piece of software. It's a real Software Defined Storage!



Bonjour,
Comment tester la version 5.5.
J ‘aif ait une demande avec la beta de vsan mais pas de réponse. 🙁
The VSAN beta wasn’t released yet. Should be out shortly.
Hi great post, i am having the same issue with red check mark in network status, any idea, ¿ thanks
I set this up on vsphere 7. Created 3 esxi vms on a nuc with 64GB memory.
Configured Vsan and everything looks good but the minute i spin up a vm on any of the esxi hosts in the VSAN, my esxi vm goes offline. Any ideas?