
Since vSphere 5.1 U1 it's possible to install vCenter Server on Windows Server 2012. Also a Microsoft SQL 2012 is supported as an external database. The software requirements of the latest vSphere has been outlined in my post which discuss the new features of VMware vSphere 5.1 Update 1.
Since the vSphere 5.1, the architecture of vCenter has changed and another DB is present – SSO (single sign on DB). So there are now three databases present:
- VMware vSphere 5.1 Single Sign-On DB
- VMware vSphere vCenter server DB
- VMware Update Manager DB
All those DB can be installed on a separate Microsoft SQL Server 2012 (this post) or on the same VM as vCenter server (with simple install or individually). SQL 2008R2 Express is still the DB bundled with the latest version of vSphere.
As a side note, the vCSA (vCenter as Linux VM) has still the same limitations in terms of functions and scalability, but I'm sure it will be getting better… The deployment is really simple and easy, also the upgrades. So if you don't need Linked vCenter functionality or don't have requirement for more than 5 host or 50 VMs, the embedded DB with the vCSA is 10′ deployment…
Now lets come back to our project. You should check the Product Interoperability Matrixes first. We will be preparing two Windows Server 2012 VMs. One for vCenter and one for SQL. I skip here the installation of the base OS, setting fixed IP address and proper DNS configuration, as I suppose that anyone know how to do it. It's possible that you've seen different kind of setup for Windows Server 2012, as I'm not claiming to be the only one out there writing about it. But as I progress through the study/installs in my lab, I like documenting the steps, mostly for my own purpose e. If it can help others, that's even better.
The vCenter Server VM requirements:
- 64-bit system DSN to connect to its database (installed from the same media as SQL Server 2012 – just install the “management tools”)
- I recommend getting the latest patches from Microsoft before going further.
The SQL Server 2012 VM:
- .NET 4.5 is normally installed by default after a fresh installation of Windows Server 2012. If not, add this as a feature through the server manager.
- Run the SQL Configuration Checker (use Run as an Administrator option) which shows you the missing requirements before you install the SQL server. Note that
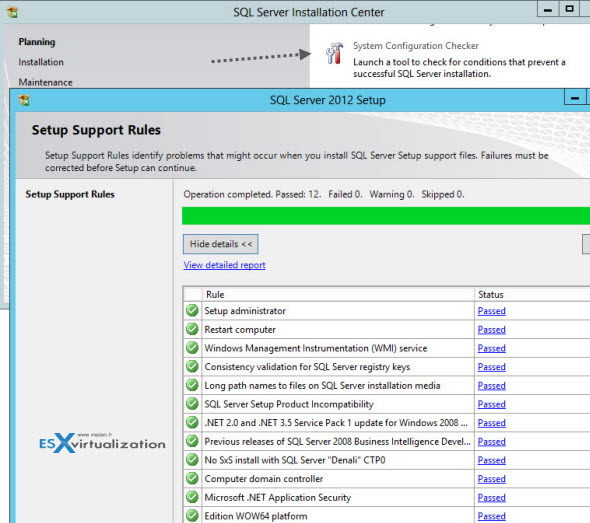
If you see a warning saying that the Windows firewall needs to open some ports, there is no need to do it now, and you can continue with the installation process.
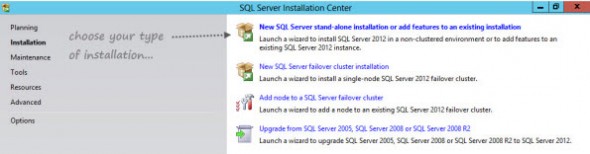
When clicking the Installation link, choose your own option depending which type of installation you're doing. In our case we just do fresh install (no upgrade).
- On the next screen you'll have to enter the product key (or you can use the 180 days trial) – the second option.
- Accepting the license terms don't need a screenshot either..
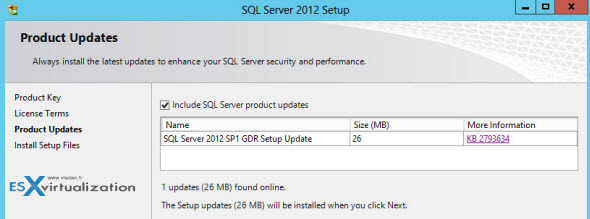
- You have the option to include SQL server products updates (my case) which are directly downloaded from the Microsoft update site. I took that option.
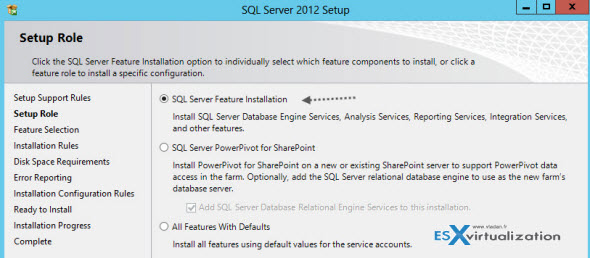
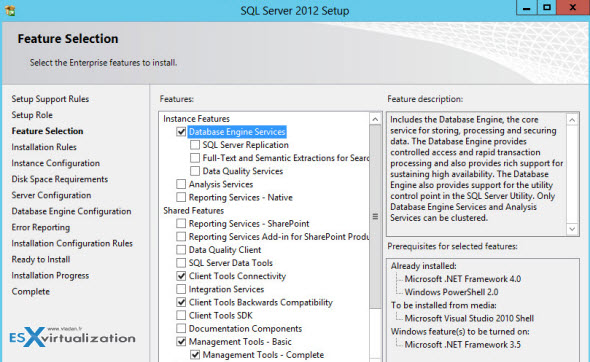
- Chose the SQL server feature installation which allow you to install the SQL server database engine services along with the analysis, reporting and integration services.
- On the next page you can choose the features that you will want to install and use. You'll definitely need the Database Engine Services. And from the shared features Management Tools Basic and complete, Client tools connectivity. I picked also client tools backwards compatibility option (update: finally, it's not needed). You can always come back, re-execute the installer to add/remove those features later. What I usually do is to keep the shared directory on the system drive (default option) even if you can also change the installation folder there.
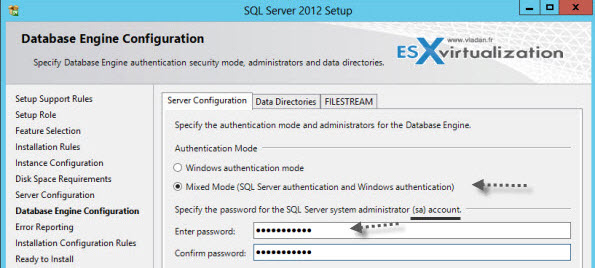
- On the next page, there is a choice between the Windows authentication mode and Mixed mode (SQL server and Windows authentication).
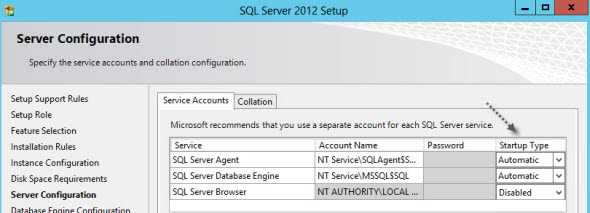
I've setup the SQL Server agent with automatic startup, as well checked the SQL Server Database engine (not changed), but disabled the SQL Server Browser.
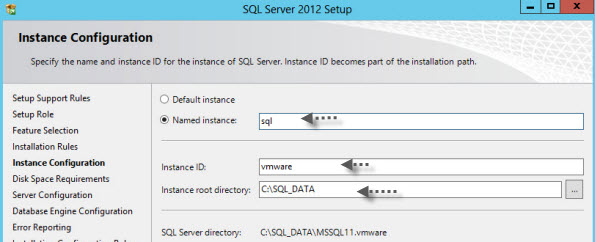
Concerning the directories, I just create a separate folder on the C drive. It might not be the best practice as you might would want to install the DB data to separate drive(s) but I'll stick with that for now.
Next following the setup pages, there is “Specify SQL Server administrators” part where you can add any other users which will have access to the SQL Server. By clicking the next button, after a validation page (or two), you'll start the installation process… and the finish should look like this…
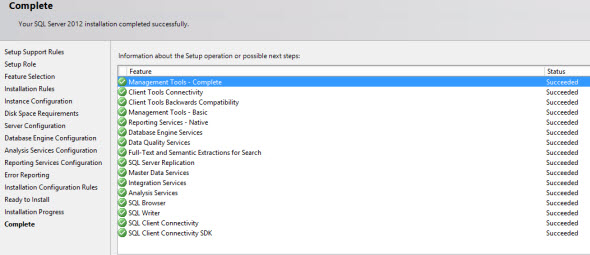
That clores the Installation part for the SQL server. But it's not finished yet, as we need to configure few things and create our DBs for vCenter server, SSO and VUM. The steps for Configuring Microsoft SQL Server Databases are documented in the official VMware documentation page.
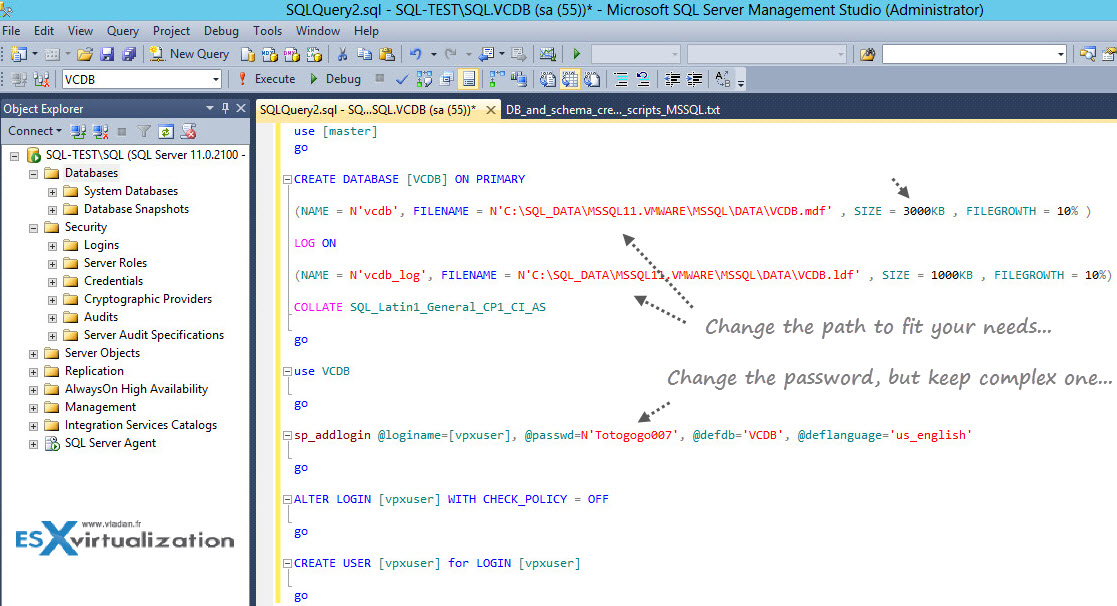
- First, we need to connect by using the Microsoft SQL Server Management studio with the “SA” account. We will be using a script which is available from the VMware vSphere 5.1 documentation page. You just need to change the path where you want to store your database and the vpxd user's password. See the screenshot from my lab. (click to enlarge).
Location of the scripts is on the vCenter Installation ISO – in this path:
/<installation directory>/vCenter-Server/dbschema/DB_and_schema_creation_scripts_MSSQL.txt.
Creating vCenter Server database.
First script – the example is located here – is to create SQL server database and user for vCenter server.
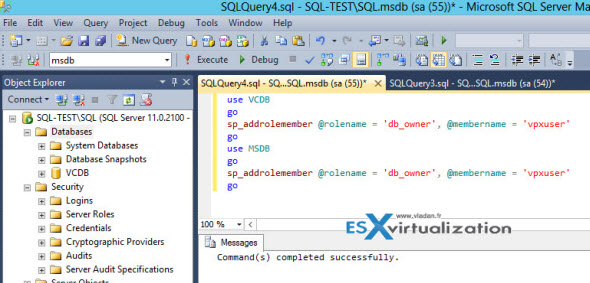
The second script – the example is located here – is to create a vCenter Server User by using the dbo schema and db_owner database role.
use VCDB
go
sp_addrolemember @rolename = 'db_owner', @membername = 'vpxuser'
go
use MSDB
go
sp_addrolemember @rolename = 'db_owner', @membername = 'vpxuser'
go
The result should looks like this:
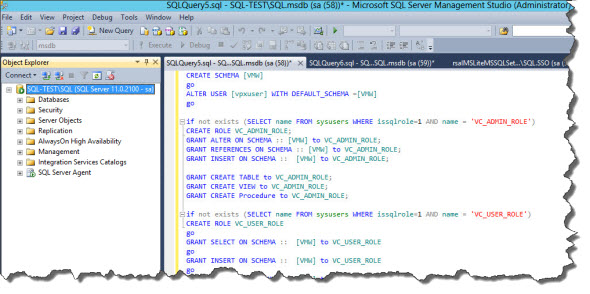
Third Script – located here – Create MS SQL server DB schema and Roles. You should get clean output with no errors.
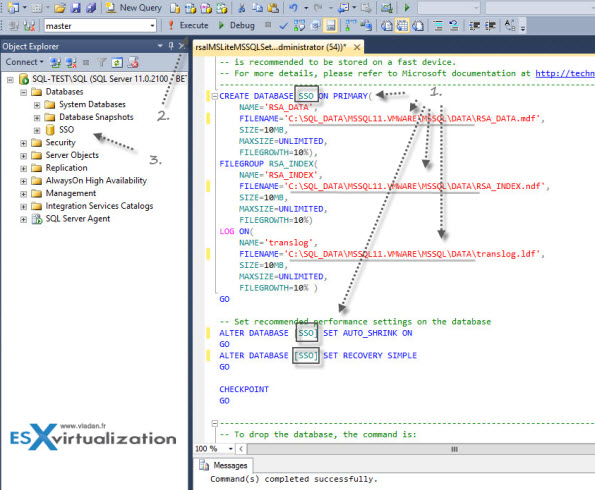
Creating vCenter SSO (single sign on) database.
The database creation scripts are located at this location when you mount the vCenter installation DVD:
Single Sign OnDBScriptsSSOServerschemamssql
There are two scripts which we will need: rsaIMSLiteMSSQLSetupTablespaces.sql and also rsaIMSLiteMSSQLSetupUsers.sql.
First, open the first script and modify the necessary name of the Database (I renamed the default “RSA” to “SSO”) and the paths to where the database data will be located.
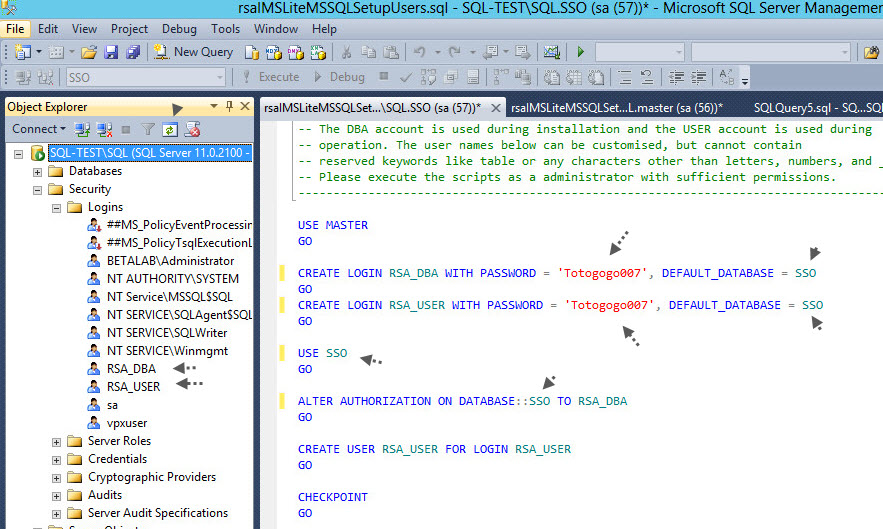
Then similarly, change the second script (rsaIMSLiteMSSQLSetupUsers.sql )to fit your needs.
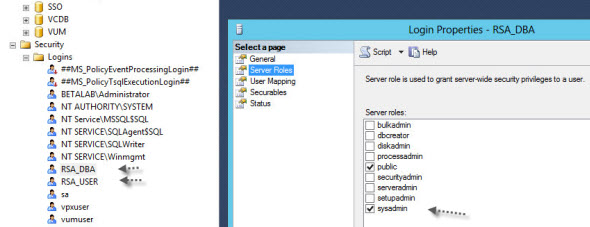
Make sure that the RSA_DBA user and vpxuser do have sysadmin roles in the user mappings.
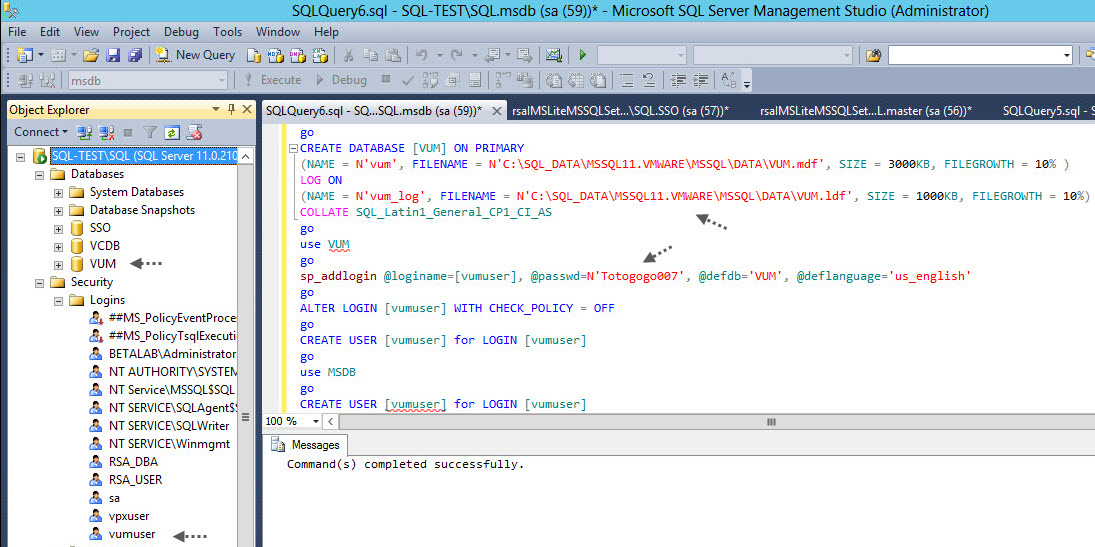
Creating vCenter Update Manager Database
The same punition, we need a database for VUM. Remember, that it's 32bit DSN that we will need to create when we will configure the DSN connection to this database, later on. To create the VUM database, use this script (change to fit your needs concerning the path and the user's password. This is my lab output):
goCREATEDATABASE[VUM]ONPRIMARY(NAME= N'vum', FILENAME = N'C:SQL_DATAMSSQL11.VMWAREMSSQLDATAVUM.mdf',SIZE= 3000KB, FILEGROWTH = 10% )LOGON(NAME= N'vum_log', FILENAME = N'C:SQL_DATAMSSQL11.VMWAREMSSQLDATAVUM.ldf',SIZE= 1000KB, FILEGROWTH = 10%)COLLATESQL_Latin1_General_CP1_CI_ASgouse VUMgosp_addlogin @loginame=[vumuser], @passwd=N'Your_super_Password', @defdb='VUM', @deflanguage='us_english'goALTERLOGIN [vumuser]WITHCHECK_POLICY =OFFgoCREATEUSER[vumuser]forLOGIN [vumuser]gouse MSDBgoCREATEUSER[vumuser]forLOGIN [vumuser]go
Now, make sure that all 3 databases are setup to Recovery Model – Simple. If not, you'll receive a warning message during the installation saying that the full recovery model will eventually consume all available disk space.
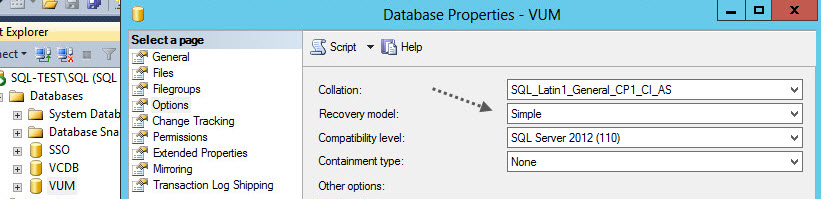
You have created 3 essentials databases that are needed before you start installing vCenter server.
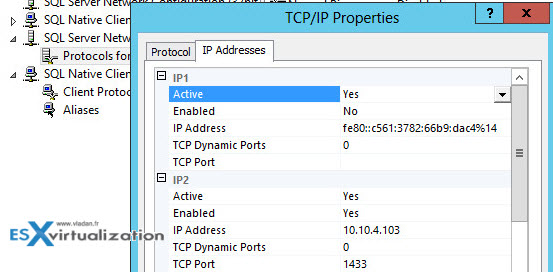
At this point, we need to make sure that the TCP/IP settings are configure the right way in order to connect remotely to the SQL server. Go to the start menu and start the SQL server configuration manager. Make sure that the TCP/IP protocol is set to enabled Yes and that the IP address tab, where the appropriate interface's TCP Dynapic Ports is set to 0.
Now, go over to the vCenter VM. The vCenter VM needs a SQL driver for the SQL ODBC connection. To install it on the vCenter VM, just mount the SQL server installation ISO as we need to install the exact same version of the driver as used for the SQL server installation.
Do exactly the same steps as we did on the SQL server VM, but as for the installation options choose the Management Tools – Basic only.

Find the second part where we'll configure ODBC, install SSO, vCenter Server and other components.
really nice guide I was thinking it was pretty light SQL installation demostration but it cover all topics cool guide
by the way why did you choose “client tools backwards compatibility”? I don’t select it but I want to know what I am missing
thanks
Thanks. No particular reason, forget about those. After checking the MSDN site, there isn’t any reason for that.
Follow with the installation on next page – > lead to nothing
Now corrected. The page has no more page breaks, and there is a follow up post… Thanks a lot…