
Thin provisioned disks grow up with the time. When you work with a thin disk provisionned VM, you are copying new files into a VM, then deleting them, again and again, this process grow the thin disks over time. If you delete files from within the VM wanting to gain the space back, it just don't work. The VMDK grows, but don't shrink. While from within the quest OS in the VM you see that you're getting more space, from the vSphere client the disk shows the same size. Natively from within vSphere client it is not possible to shrink VMDK disk files.
With VMware Converter standalone the process will actually do a clone of the original VM. But you'll need enough space on your storage somewhere and enough time outside of business hours, because the process operates when the VM is shut down. In my test that you'll be able to follow through the screenshots below, it took 36 min to do the V2V conversion process.
The steps How-to Reduce VMDK size by using VMware Converter Standalone:
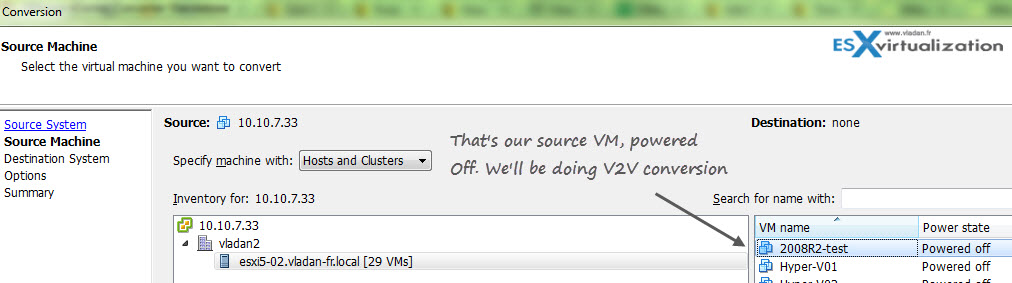
Power down your VM > fire up the VMware Converter Standalone software > connect to your vCenter which manages the VM that VMDKs needs to be shrinked > click next.
Note: All the images which mignt not looks too sharp are clickable and have sharp details when opens without reloading the page. It's done with WordPress plugin called FancyBox for WordPress.
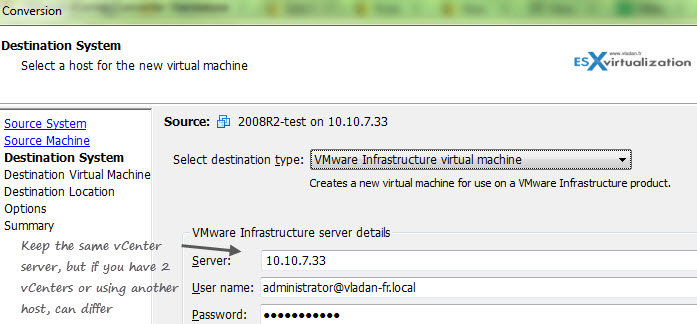
After selecting the source VM on the next screen you'll need to select the destination. It can be the same vCenter server (if you managing your infrastructure with vCenter).
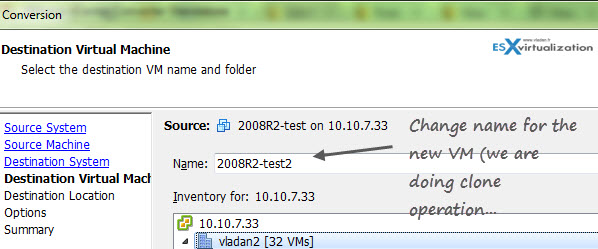
Validate by clicking next and on the next screen you'll need to name the VM. Use different name than the source VM.
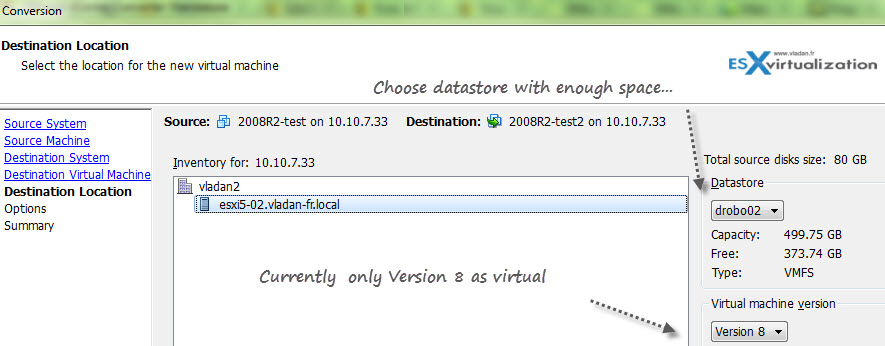
Choose Datastore with enough space. As you can see, the curent version of VMware Converter standalone can only handle VMs with Virtual Hardware version 8. The possibility to convert directly to vmx-09 will certainly be added in future release of VMware Converter.
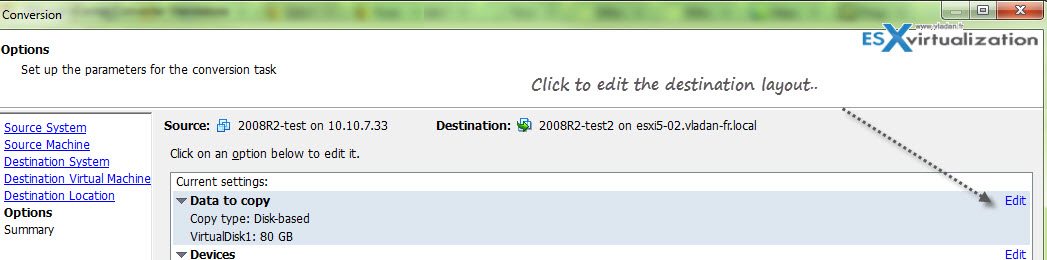
On the next screen wee need to click the Edit link, where behind we'll select other options, like volumes to convert etc…..
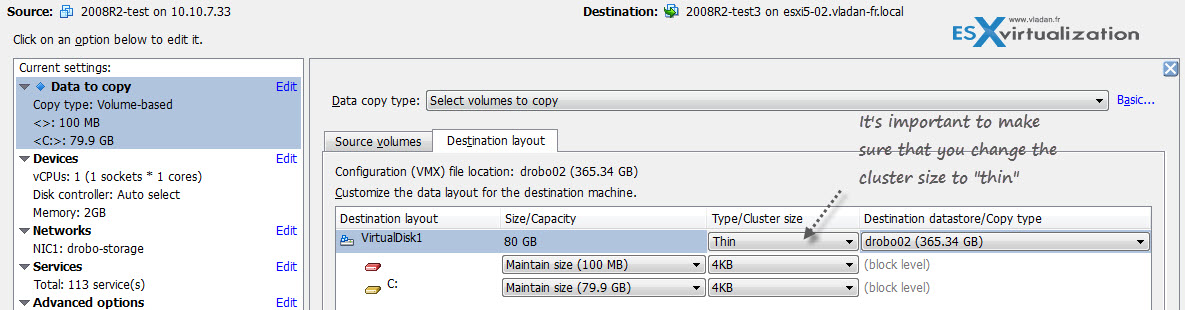
So we are here on this page, where we select the volumes that we want to copy , we can resize them, make thin or thick. In my case I chosed thin and kept the initial size – 80Gb thin provisionned.

Next screen enables us to select the destination datastore and when clicked on the Advanced, we can choose the

Important option is to choose from the drop down menu – thin – for the cluster size on the Destination layout TAB. Leave the options for Ignore Page file and hibernation file, and also the Create optimized partition layout checked.
Then, 36 minutes later, the conversion process finished the job, so as you can see it's quite long. Well, that's the price to pay…..

So in my little, but very detailed how-to shrink VMDK disk, you could see that the process can be easily done by using Free software. The risk is almost none since the VM is actually cloned, so no worry about that. The only think to is really the time spent, because the process can be lengthy for VMs which do have large thin provisioned disks.
 In my lab case I ended up with the cloned VM having the size of the thin disk to be 8.4 Gb, which is even more than I expected.
Shrinking Thin disks isn't automatic operation, but the converter software can handle several jobs at the same time. The process of creating the job through VMware Converter is very fast and it's securing that you're not altering the original VM in any way. There might be other small inconvenients, like MAC address changes.
There are other ways to reclaim disk space. For example by using sdelete command line tool + storage vmotion. This works too with with some limitations. You need at leas one datastore with VMFS 3.x….
This little tutorial is mean to help rather people which are in front of a problem, which needs to be resolved fast. Experienced vSphere admins might use other, more advanced techniques for managing VMDK disk files (or not using thin disks at all), or using NFS instead of block level storage for their VMs. I've spend way more time on creating the screenshots for you than the job being done -:). If you like this post don't forget to share !
Hi
Thanks for the tutorial…
However the only thing that I see accomplished here is changing the disk format to “THIN”!!!!!!!!
After all you kept the initial size. I have seen this fail at times, very close to the end of P2V process when initial size was reduced.
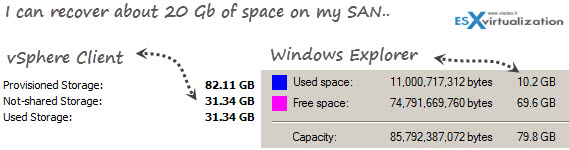
The initial size of the VMDK was 31 Gb. After the V2V it got shrinked to 8.4 Gb. You can see the initial size of the VM on the very first image in this tutorial.
The original disk was thin provisioned, as well as the disk at the destination.
Thank you for this! One thing I don’t get: So I’ve created a clone of my VM, now smaller. How do I get replace my fat production VM with the newly created thin VM?
Depends on how many delta files there are. If you do this out of office hours, then there isn’t a problem to stop the “fat” VM to be able to start the “thin” VM. Right?
Right. I was thinking that the new thin VM would have the new name we gave it (servername with a ‘-2’ appended to it or something similar.) But the new thin instance is a clone, so when you turn it up, it has the same DNS name as the original thick server. Thanks for the help!
Yes. Just make sure that the cloned VM when started does have the correct network informations. Normally the network stack has to be re-configured…
Thank you, very helpful!
Why is not possible do it on Linux-VM? Power on VM return “Convert powered-on VM is not possible”. When is off I dont have option “optimize layout”. Have you some tip for it? Thank you Pavel
Aligning partitions, I’m pretty sure every common linux-distro not older than 2 years does this automatically. As for the Powered-on VMs I think you must install the converter agent inside the VM first (or you can clone the VM > then convert)…. I did not tested.
Thanks for your comment.
Vladan
Good tutorial and I have accomplished the same thing with sdelete + punchzeor before but I am wondering how I can change the allocated size of the disk. i.e. someone has allocated 1.5TB to a disk which is actually using 200GB. I was wondering how I can change that to say 500GB so that the guest (windows) also sees a 500GB HD and not a 1.5TB one.
Hello,
this does not work for me.
I don’t have the option “Select the volumes to copy” but only “Copy all disks maintain layout”. With that option I can resize the disks.
Please help !
I think you must click the “advanced” (8th image from the top) link to see that.