
If you manage Windows machines—whether in a small business environment, home lab, or as part of your daily IT consulting work – you know how frustrating it can be when something breaks after a bad update, driver install, or software change. Microsoft has been improving recovery options for years, and the new Point-in-Time Restore in Windows 11 takes System Restore to the next level. It's faster, more reliable for recent issues, and designed for quick recovery without deep technical expertise.
I've been testing this in my lab on both physical hardware and virtual machines (VMware Workstation and Hyper-V), and I have to say – it delivers on the promise of getting you back to a working state in minutes rather than hours. In this post, I'll cover what it is, how it differs from classic System Restore, how to enable and configure it, how to use it, storage considerations, limitations, and my real-world thoughts after testing. Let's dive in.
What is Point-in-Time Restore in Windows 11?
Point-in-Time Restore lets you roll back your entire Windows 11 PC to an exact earlier state captured in a restore point. These points include the OS, installed apps, settings, registry, drivers, and even local user files (though cloud-synced data like OneDrive remains untouched).
It builds on the Volume Shadow Copy Service (VSS), the same technology behind traditional System Restore and backups. The big shift is the focus on recent problems. Restore points are short-term only—kept for a maximum of 72 hours—and created on a schedule (default every 24 hours, configurable).This makes it ideal for recovering from:
- Problematic Windows Updates
- Faulty driver installations
- Software conflicts that appeared recently
- User errors or malware that hit in the last few days
Unlike full system image backups (which I still strongly recommend for complete DR), this is lightweight, automatic, and quick.
Point-in-Time Restore vs. Classic System RestoreMany people will ask: Isn’t this just System Restore rebranded? Not quite. Here is a clear comparison based on my testing and Microsoft’s documentation:
- Configuration: Point-in-Time uses the modern Settings app (System > Recovery). Classic System Restore is still available in Control Panel > System Protection.
- Triggers: Point-in-Time is primarily scheduled/automatic. Classic can be manual or event-triggered (for example, before updates).
- Retention: Maximum 72 hours for Point-in-Time (very focused on recent recovery). Classic points can last indefinitely until disk space runs low.
- Scope: Point-in-Time aims for a more complete full-system state rollback. Classic varies more with apps and user data.
- Management: Better suited for modern scenarios.
In practice, I keep both enabled. Use Point-in-Time for quick daily recoveries and classic System Restore (or full image backups) for longer-term safety.How to Enable and Configure Point-in-Time RestoreThe feature is rolling out and may not be enabled by default on all systems (especially those with smaller disks under 200 GB). Here is how I set it up:
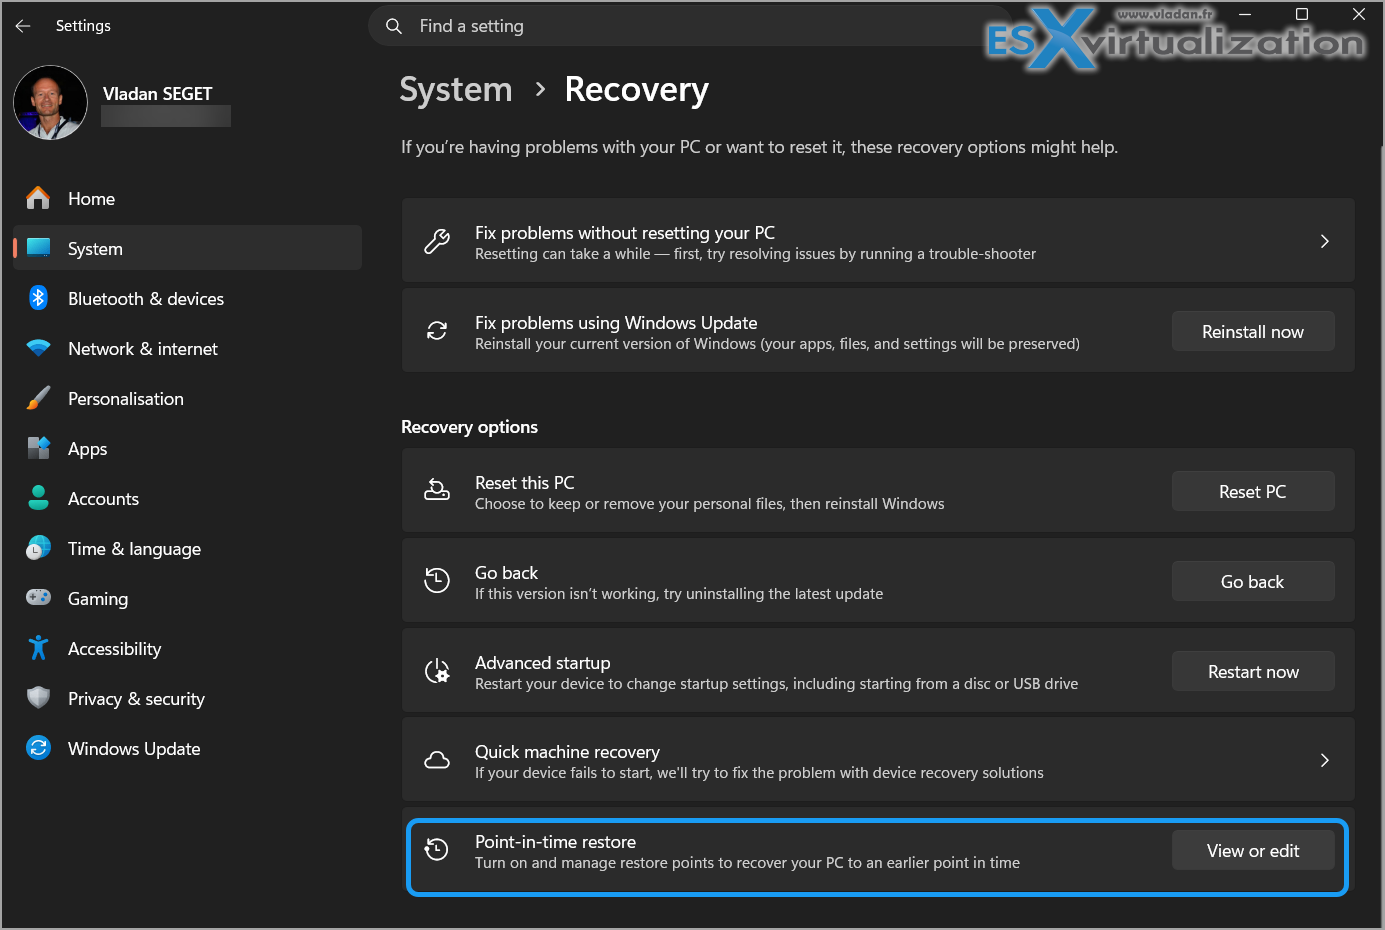
- Go to Settings > System > Recovery.
- Look for Point-in-time restore and click it.
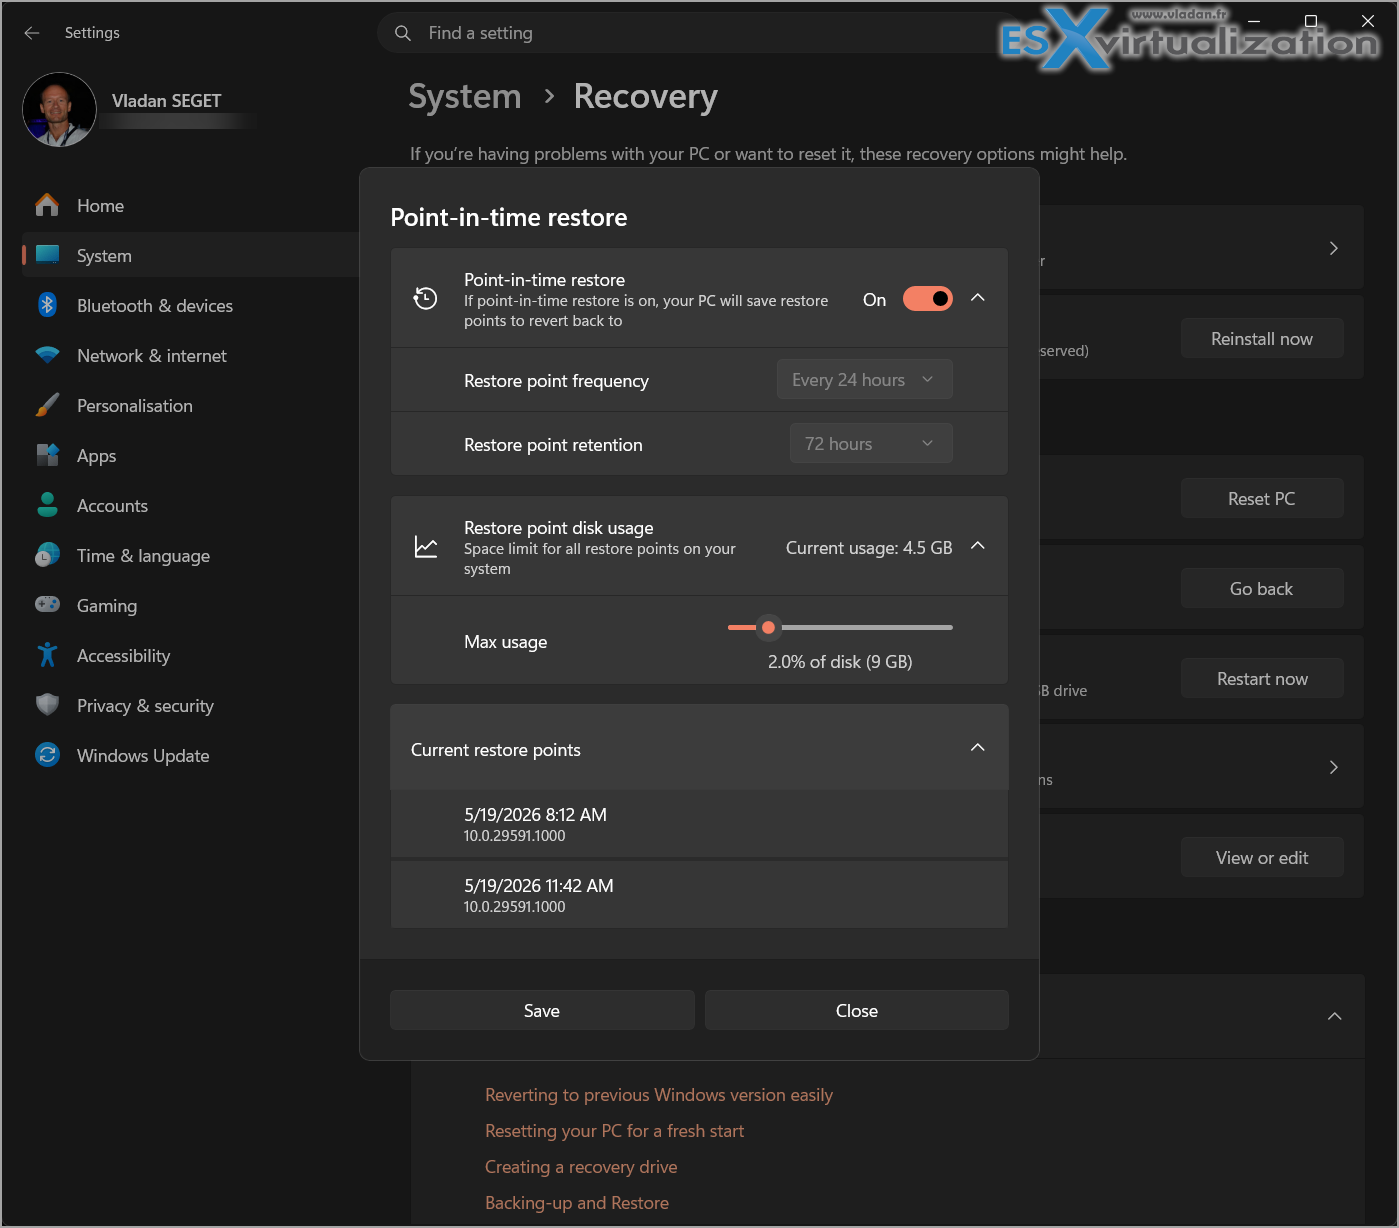
- Toggle the feature On.
- Configure the options:
- Restore point frequency: Default 24 hours. Options include 4, 8, 12, or 24 hours.
- Retention: Up to 72 hours.
- Maximum usage limit: Starts at around 2% of your disk. You can adjust it (minimum around 2 GB, with a reasonable maximum depending on disk size).
In my lab VM with a 500 GB virtual disk, the defaults worked fine. On physical machines, monitor disk usage—VSS shares space with other tools.Pro tip from testing: On devices with less than 200 GB total disk, you will likely need to enable it manually. Always ensure you have plenty of free space (at least as much as the allocated VSS limit) before relying on it.You can also manage VSS from the command line with vssadmin if you are scripting or prefer the old-school way.
Performing a Restore – Step by Step
Restoration in the current implementation happens from the Windows Recovery Environment (WinRE) only. You cannot trigger it directly from the desktop yet.Here is the process I followed:
- Boot into WinRE (hold Shift while clicking Restart from the login screen, or use Settings > Recovery > Advanced startup).
- Choose Troubleshoot > Point-in-time restore.
- Enter your BitLocker recovery key if the drive is encrypted (have this ready!).
- Select the desired restore point (they show timestamps and basic info).
- Review the warnings (data loss for changes after the point is real—anything post-restore point is gone).
- Confirm and let it restore. The system reboots into the restored state.
In my tests, the process was noticeably faster than a full classic System Restore on the same hardware – often completing in under 15-30 minutes depending on disk size and changes.
Important: Never power off during the restore. It can leave the system in a bad state.
Storage, Risks, and Limitations
Storage is a key consideration. Restore points are not pre-allocated; VSS uses free space up to your maximum limit. On a busy system with multiple VSS users (backups, etc.), older points get deleted first.Risks I noted:
- Local changes after the point are permanently lost (back up important files first).
- Potential issues with Outlook .ost files (easy fix: delete and let it resync).
- EFS-encrypted files or certain edition changes can cause problems.
- Only the main OS volume is restored on multi-volume setups.
- Requires BitLocker key and sufficient free space.
Limitations: It is still evolving, restore only from WinRE in the current version, and it is not a replacement for proper image backups (Veeam Agent, Macrium Reflect, etc.).
My Thoughts After Testing
Point-in-Time Restore is a welcome addition for everyday Windows 11 users and IT pros who need fast rollback without full reimaging. It shines in scenarios where you catch issues quickly – within a couple of days.
In my VMware lab, I intentionally broke things (bad drivers, registry tweaks) and recovered cleanly multiple times. It works well alongside traditional tools such as Veeam agent for Windows which is free btw.
For production machines, combine it with regular full image backups and cloud sync for user data.
Microsoft is clearly pushing toward more reliable, user-friendly recovery as Windows evolves with frequent updates. This feature fits that direction nicely.If you are on Windows 11 (especially recent builds), check if it is available in Recovery settings and enable it. Test it in a non-critical environment first.
Current Status (as of May 2026)
- The feature started rolling out to Windows Insiders in late 2025 (initially in Dev and Beta channels, later in Experimental/Canary builds).
- It is still marked as Preview in official Microsoft documentation. Defaults, UX, and management options may change before full release.
- It is not broadly available in stable Windows 11 releases (24H2, 25H2, or later public builds) for general users.
- On Insider builds, it can appear gradually (controlled feature rollout), and some users enable it via tools like ViVeTool.
When Will It Be Available?
Microsoft has not announced an exact GA date. Based on the timeline:
- It was previewed in the first half of 2026 for Insiders.
- Broader availability (to stable channels) is expected later in 2026, likely tied to a future Moment update or the next major Windows 11 release, but nothing is confirmed yet.
For production machines, I recommend sticking with classic System Restore + full image backups (e.g., Macrium Reflect or Veeam Agent) until it reaches GA and matures.
If you want to test it now, join the Windows Insider Program (Dev or Beta channel recommended) and check Settings > System > Recovery. On disks ≥200 GB it may enable automatically in supported Insider builds; otherwise, toggle it on manually.
More posts from ESX Virtualization:
- Veeam Backup and Replication Upgrade on Windows – Yes we can
- Securing Your Backups On-Premises: How StarWind VTL Fits Perfectly with Veeam and the 3-2-1 Rule
- Winux OS – Why I like it?
- VMware Alternative – OpenNebula: Powering Edge Clouds and GPU-Based AI Workloads with Firecracker and KVM
- Another VMware Alternative Called Harvester – How does it compare to VMware?
- VMware vSphere 9 Standard and Enterprise Plus – Not Anymore?
- VMware vSphere Foundation (VVF 9) and VMware Cloud Foundation (VCF 9) Has been Released
- Vulnerability in your VMs – VMware Tools Update
- VMware ESXi FREE is FREE again!
- No more FREE licenses of VMware vSphere for vExperts – What’s your options?
- VMware Workstation 17.6.2 Pro does not require any license anymore (FREE)
- Two New VMware Certified Professional Certifications for VMware administrators: VCP-VVF and VCP-VCF
- Patching ESXi Without Reboot – ESXi Live Patch – Yes, since ESXi 8.0 U3
- Update ESXi Host to the latest ESXi 8.0U3b without vCenter
- Upgrade your VMware VCSA to the latest VCSA 8 U3b – latest security patches and bug fixes
- VMware vSphere 8.0 U2 Released – ESXi 8.0 U2 and VCSA 8.0 U2 How to update
- What’s the purpose of those 17 virtual hard disks within VMware vCenter Server Appliance (VCSA) 8.0?
- VMware vSphere 8 Update 2 New Upgrade Process for vCenter Server details
- What’s New in VMware Virtual Hardware v21 and vSphere 8 Update 2?
- vSphere 8.0 Page
- ESXi 7.x to 8.x upgrade scenarios
- VMware vCenter Server 7.03 U3g – Download and patch
- Upgrade VMware ESXi to 7.0 U3 via command line
- VMware vCenter Server 7.0 U3e released – another maintenance release fixing vSphere with Tanzu
- What is The Difference between VMware vSphere, ESXi and vCenter
- How to Configure VMware High Availability (HA) Cluster
Stay tuned through RSS, and social media channels (Twitter, FB, YouTube)
Leave a Reply