
We have set up our VMware Mirage lab in a series of posts recently. While we could do a simple “All-in-One” box installation, we decided to deploy (almost) full VMware Mirage stack with several management servers, separate Mirage server, and separate File server. You can follow the Mirage series on a dedicated blog page – VMware Mirage. VMware Mirage allows what's called Centralized desktop backup. Today, we will perform a step-by-step procedure which will teach us How to backup a Desktop with VMware Mirage.
If you have followed VMware Mirage little bit, since 2012, you already know that you'll need to have the VMware Mirage stack up and running (VMware Mirage Management Server, Mirage Server, Web Management, some storage, AD/DNS…).
Centralized Desktop Backup – VMware Mirage gives you centralized storage of desktop images. VMware Mirage manages the desktop image using a layered approach. VMware Mirage can manage either physical computers or virtual machines within physical computers.
Compared to other backup products VMware Mirage works through layers. Its restore capability allows reverting back to a snapshot taken a few hours ago just before the endpoint was hit by a virus or a ransomware. The number of snapshots and the frequency is configurable on a per-cluster basis only, so those settings will be determined on how VMware Mirage behaves within your environment.
Otherwise, once you did this configuration, it's kind of “set it and forget it”, it works automatically and you don't have to worry about schedules of individual desktops or laptops etc. We will list in details what needs to be done in order to create a backup of a desktop/laptop/VM computer. ( An endpoint ).
How to backup a Desktop with VMware Mirage – The Steps
Step 0: Make sure that you have your VMware Mirage cluster up and running.
If not, proceed with those steps:
- VMware Mirage and Architecture Preparation Steps
- How To Install VMware Mirage Management Server, VMware Mirage File Portal, And Web Manager
- How To Install VMware Mirage Server
Step 1: The next step is to install VMware Mirage Client onto the endpoint (Laptop, desktop or VM running within vSphere/hyper-V environment). Yes, you can actually leverage VMware Mirage within a Hyper-V environment as all you have to do is to install the Mirage agent within a Hyper-V VM.
The Mirage client has a role in managing uploads and downloads between the data center desktop image and the endpoint. The Mirage roles:
- Uploading endpoint changes to the data center desktop image
- Downloading IT layer updates to the endpoint
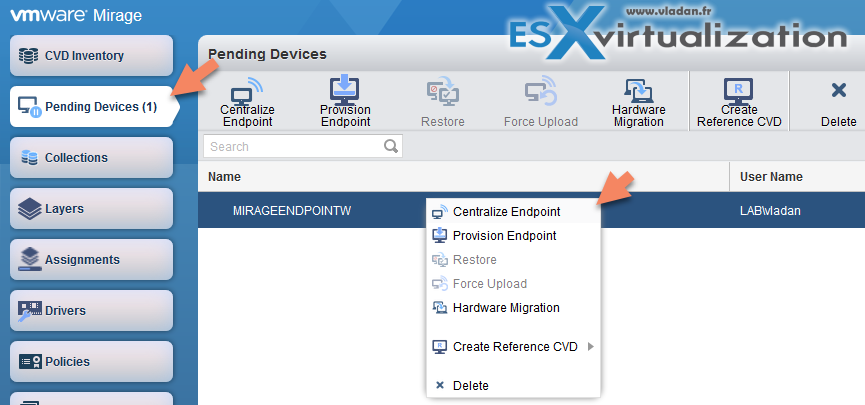
Step 2: Go and connect to the VMware Mirage Web Management Console (Web manager).
You should find your desktop (Endpoint) within the “Pending Devices” section. If not, make sure that you configured correctly your firewall between your Mirage cluster and the endpoint.
Step 3: Click the Centralize Endpoint button, or do a Right-Click on the endpoint (our case) > Centralize Endpoint. This will start an assistant which will walk you through.
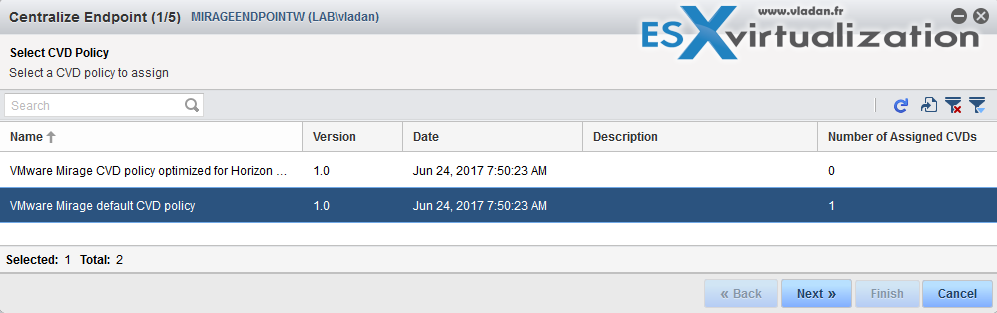
Then you'll have a window with CVD policy choice. Pick the default CVD policy for now.
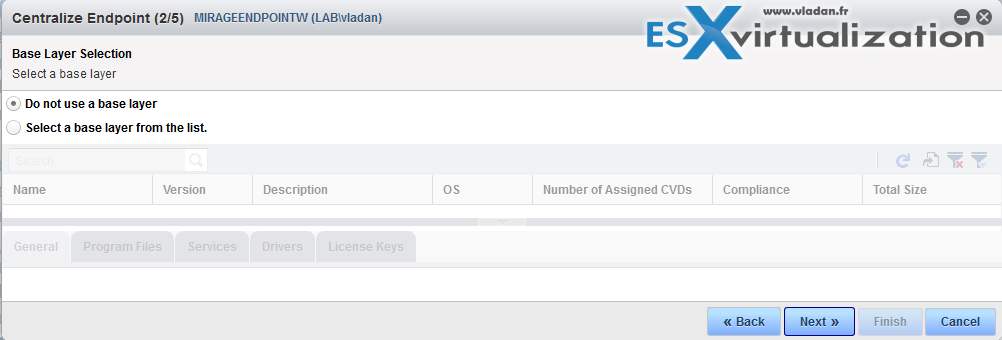
Then question about base layer. For now, let's stay simple, “Do not use base layer” is our choice….
Next screen allows us to pick a volume. If you have configured several Mirage volumes where you storing the files, yoiu can pick one of those. We just have a single volume 800Gb.

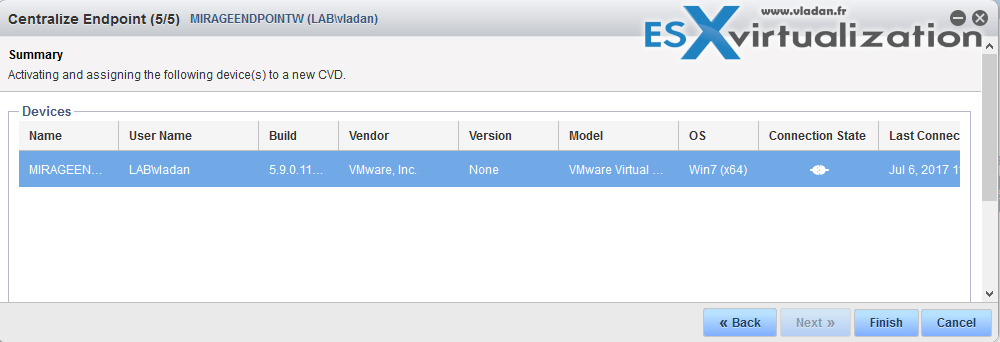
Next screen just validates what we doing and confirms that 1 endpoint meets the image assignment.

And finally, we can click on the Finish button to have our first backup launched.
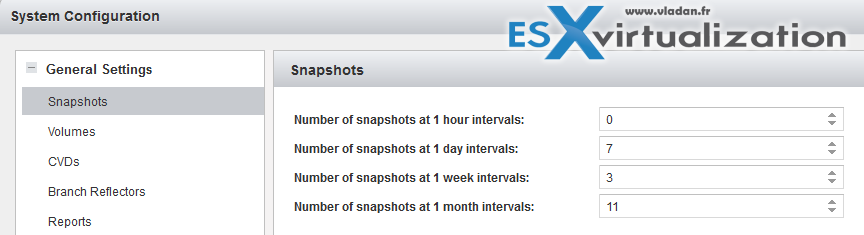
The central configuration option which manages how often the backups are taken is accessible through the main configuration page which can be found on the Top-right corner (gear) > General Settings > Snapshots.
How about restores?
After we have backed up (“centralized”) our system, our VM, into an image we will be able to initiate or test a restore. The restore process may vary depending on what you want to do. If you want just to “rewind” back in time few hours, you can simply do a Revert to snapshot. And we'll demonstrate it in a minute.
If you want to completely restore an endpoint you might need to create a bootable USB stick which contains a Win PE environment including the VMware Mirage client. The article for that case was not written just yet, but stay tuned. It will follow.
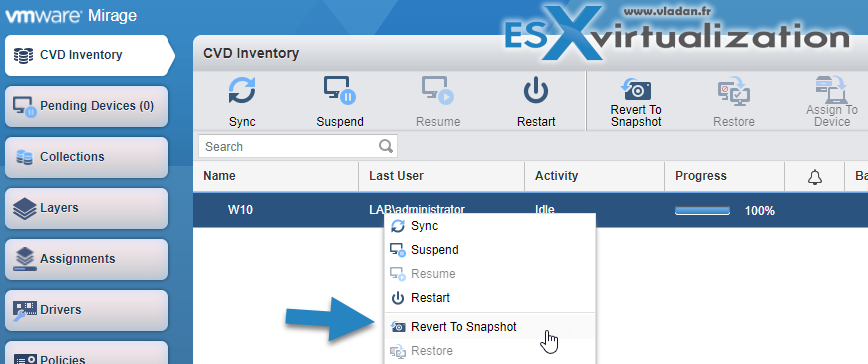
So the case when a user asks you to restore to yesterday's state? Will you be able to do that? Yes, for each Mirage Managed desktop you will. All you need to do is to go to the Web Management Console > CVD Inventory > Select your Desktop, Right-click > Revert to snapshot.
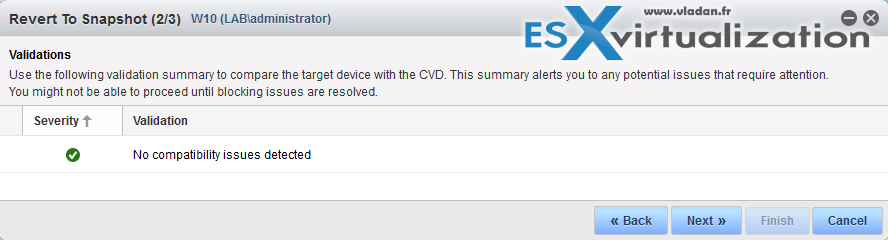
You'll get a window where you'll be able to choose from the available snapshots….

As you can see, there is a little checkbox whether you want to restore system files only. This really depends on your corporate policy. Usually, the files users are working on, are stored on corporate file servers. So they should not store any files within the endpoint. So it really depends on the use case.
Know that you have a possibility to restore the whole desktop (including user's files) but also to restore only the system files. In case of a disaster such as some virus or ransomware, you might have to just restore the whole system (by booting from within a Win PE USB stick).
It depends if the ransomware lets you boot the system or not. If for example, you can boot into Windows you can initiate restore after the system has booted. Mirage restores the files from the snapshot you have chosen and it replaces the infected file by the ones from the last snapshot.
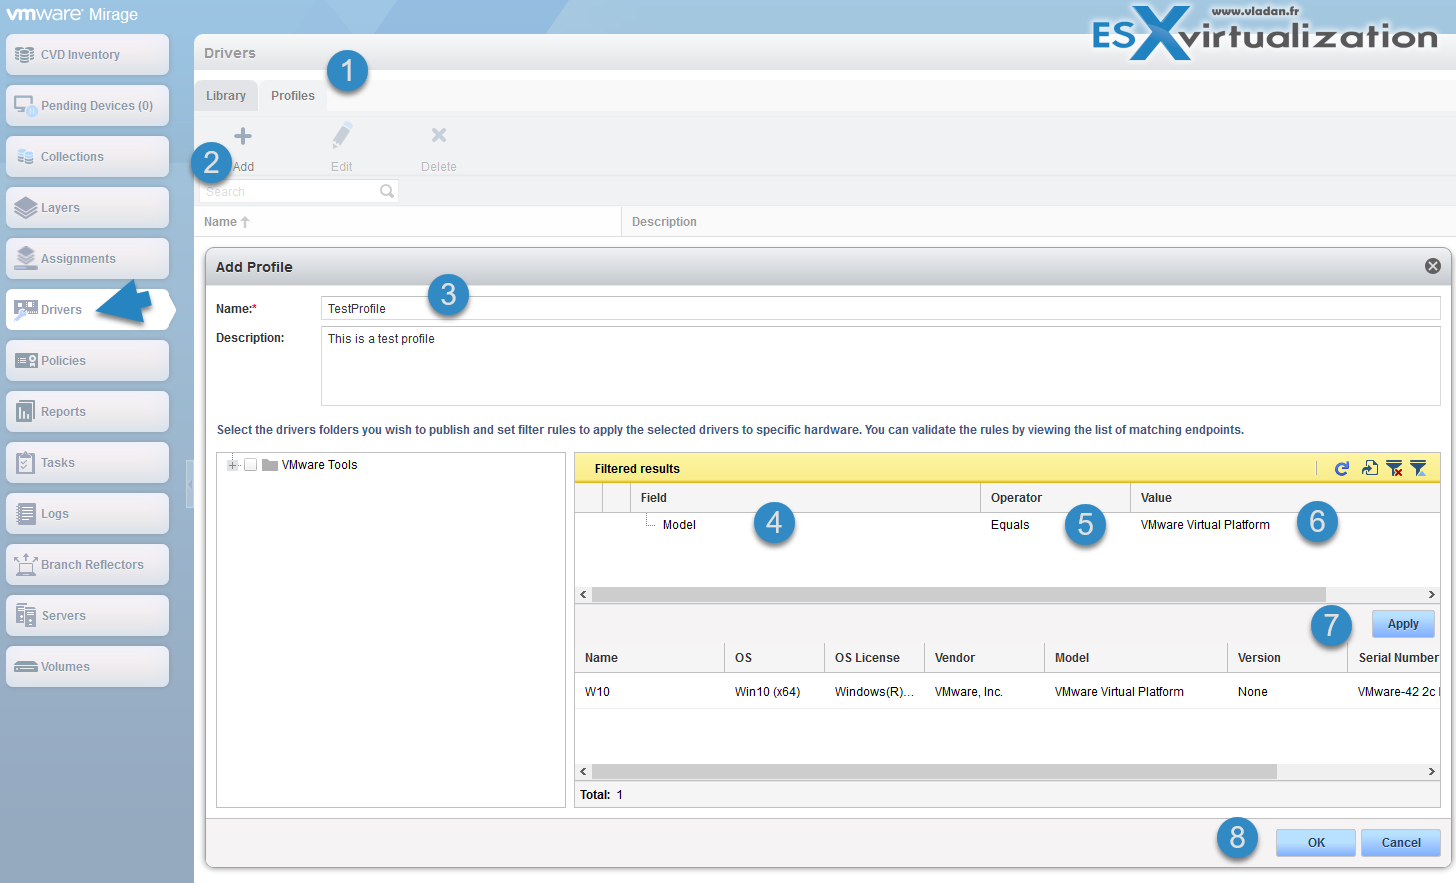
So we have to close the assistant and go back to Drivers > Profiles > Add profile. I just picked the “Model” field > “Equals” > “VMware Virtual Platform” as value since I'm only including my test VM. If you're in a real situation with real hardware you need to adjust the profile to your environment.
That's where the Drivers library completely makes sense. If you haven't read the What Is VMware Mirage Drivers Library article I'd highly recommend you to do so.
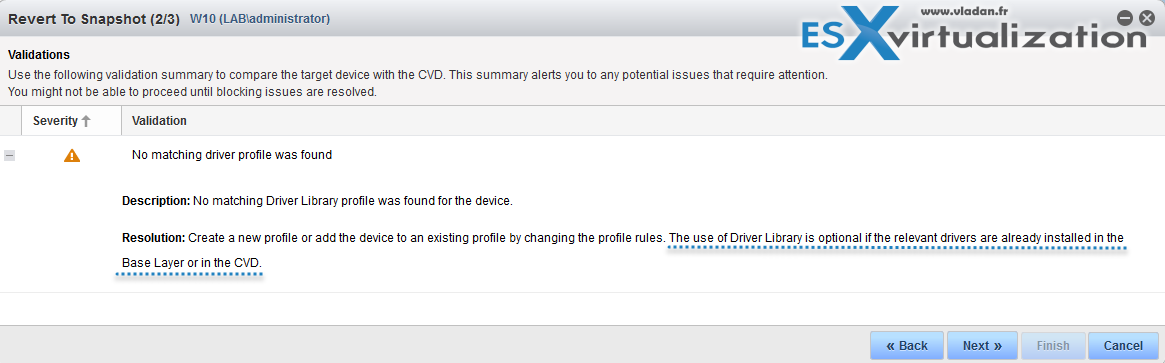
The next step just validates the situation.
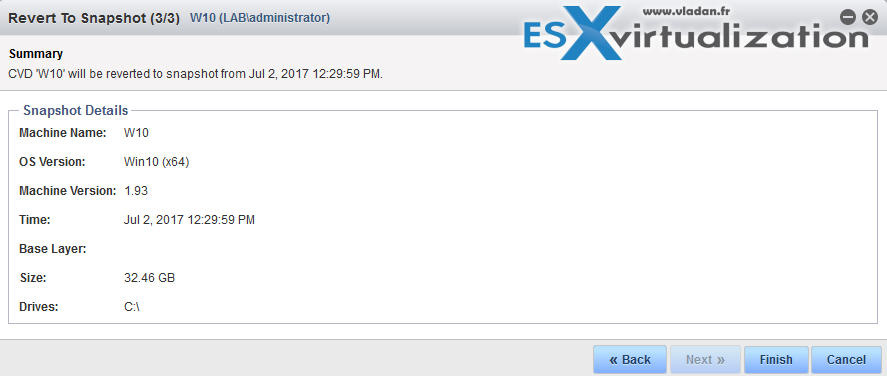
And final recap screen. (Sorry I'm including all screens within this detailed how-to).
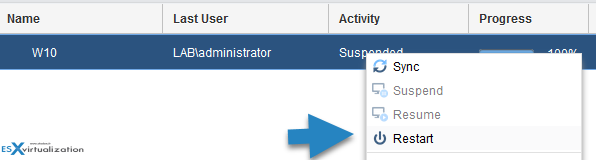
Once done, you can right-click > restart the endpoint.
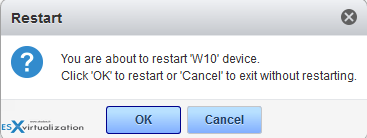
A confirmation screen will pop up…
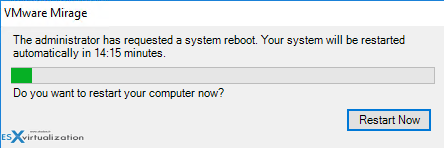
If we look within the endpoint right now, we can see that we have a pop-up window asking us to restart. As you can see, the end user has 15 minutes to react…..
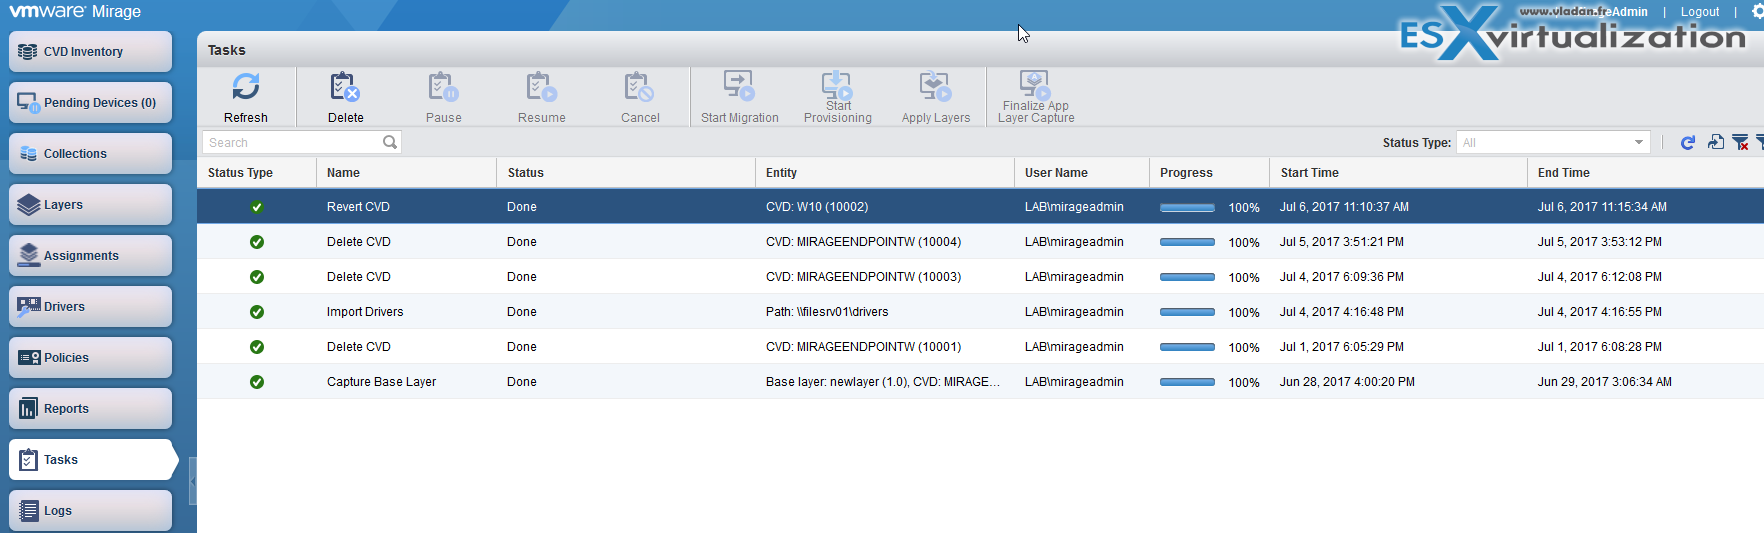
We can check the Task window to see what has been done within our Mirage cluster overall if we want to.
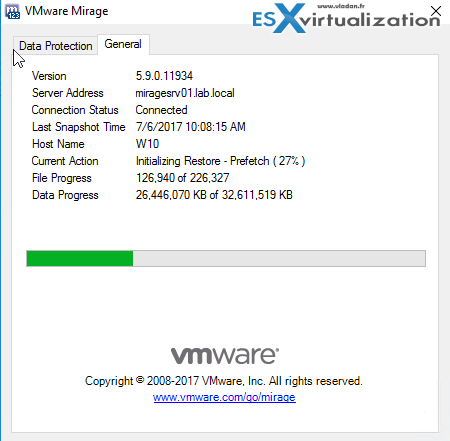
On the dashboard, we can see that the status of the endpoint change from Pending reboot to Initializing Restore – Prefetch.

Then we are curious to see what's happening inside the endpoint. This is the message we're getting….
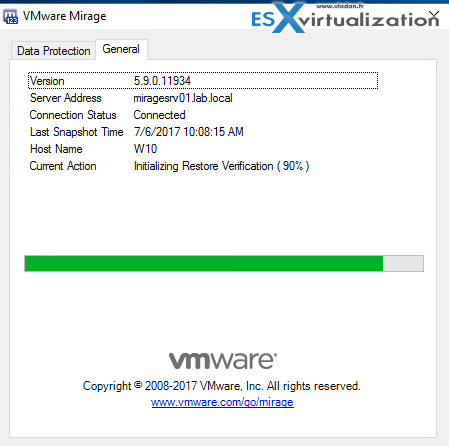
And restore verification.
And finalizing the restore….
And the user needs to be OK with rebooting at the end.
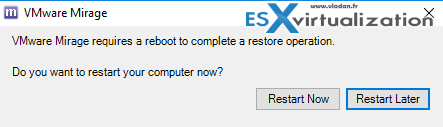
When we have a look at the boot process, we can see that during the reboot process, the screen shows brief messages like this…
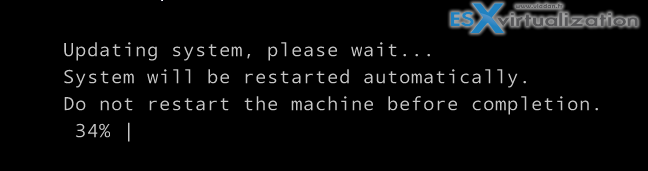
And this…

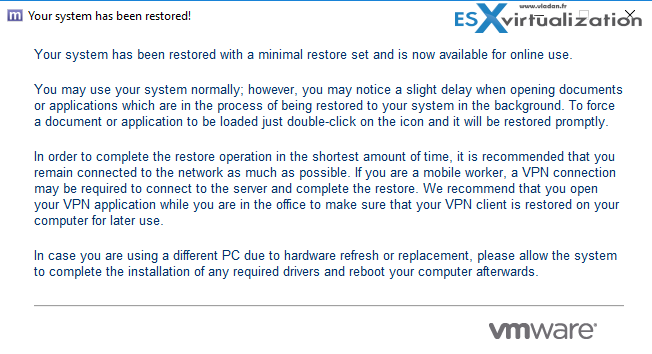
And after login in a big message from VMware Mirage concerning application files..
VMware Mirage Guide
Server Installation and Configuration
- What is VMware Mirage?
- VMware Mirage Server Infrastructure
- VMware Mirage and Architecture Preparation Steps
- How To Install VMware Mirage Management Server, VMware Mirage File Portal, And Web Manager
- How To Install VMware Mirage Server
Image Management (through Mirage console)
- What is VMware Mirage Driver Library?
- How to Create a Reference CVD for Base Layer Capture?
- How to Capture a VMware Mirage Base Layer?
- How to Capture an App Layer?
VMware Endpoint Management
- VMware Mirage Client Installation and Configuration
- How to Centralize a VMware Mirage Endpoint (to create a backup) – This Post
- Create VMware Mirage Bootable USB Stick
- How to Provision a New Endpoint with VMware Mirage Base Layer?
- How to Apply a VMware Mirage App Layer?
- How to Enable Branch Reflector on a device or endpoint?
- How to Migrate Windows 7 to Windows 10 using VMware Mirage?
- How to restore Individual File for VMware Mirage Client system
VMware Mirage Licensing and pricing
VMware Mirage has a simple licensing system. You can buy it either as:
- Standalone VMware Mirage product
- Horizon View Advanced or Horizon Enterprise. (ex. 100 licenses of Horizon Advanced entitles you for 100 Mirage Users).
VMware Mirage standalone sells in a package of 10 licenses. (or 100 licenses). So if you buy 1 copy and it allows you to manage 10 endpoints. There is also an option only to license the Windows migration feature. In this case, you’re buying a 6-month term license focused on subscription.
Wrap UP:
We have restored our endpoint to a previous state through a VMware Mirage assistant, remotely. Users can continue working on their machines while their machine is being restored in the background to a previous snapshot. Only after the user receives a prompt to reboot the machine to complete the restore process, so only a quite short lapse of time the machine is unavailable to the user.
Of course, if the system was not bootable, then you'll have to restore fully via bootable USB, but this we will demonstrate in another post.
Part of it will be also the process where we will use VMware Mirage tools to create this bootable USB stick allowing us to do a full restore.
Stay tuned through RSS, and social media channels (Twitter, FB, YouTube)