
Lost important files from a virtual machine and are not sure how to get them back? Virtual disk recovery may seem complicated, but it doesn’t have to be. With this virtual machine data recovery guide, you can easily understand what to do and which steps to follow to successfully get your files back.
What Affects Virtual Machine Data Recovery?
Several factors determine whether deleted files can still be recovered from a virtual machine:
- New data written inside the VM. Continuing to use the affected VM can overwrite deleted data with system logs, temporary files, updates, downloads, and other new information. Stop using the VM as soon as you notice that important files are missing.
- TRIM and discard commands. Some virtual machine configurations can pass information about deleted blocks to the underlying storage. Once those blocks are cleared or reused, recovery software may no longer be able to retrieve their original contents.
- Activity on the host drive. This becomes especially important if the virtual disk itself was deleted. New files written to the host HDD or SSD may overwrite parts of a deleted VMDK, VHDX, VDI, or other VM files and reduce the chances of successful recovery.
- Virtual disk encryption. If the VM uses an encrypted virtual disk, you will still need the correct password or recovery key to access its contents. Recovering the virtual disk file does not remove its encryption.
- Condition of the host storage. A failing HDD or SSD can make virtual machine data recovery more difficult. If the drive reports read errors, disconnects, or becomes unusually slow, avoid repeated recovery attempts and create a byte-to-byte image before working with the data.
Methods to Recover Deleted Files from Virtual Machine
There are several ways to recover files from virtual machine, depending on your situation. If the files were recently deleted inside the guest OS, check the Recycle Bin first. If they were permanently deleted, use data recovery software to scan the virtual disk. If you have a backup or snapshot created before the data was lost, restore the files from there. And if the VM no longer boots but its virtual disk is still intact, mount the disk on the host and copy the files you need.
Method 1. Recover Files from Virtual Machine Recycle Bin
If the file was deleted inside the guest operating system, it may still be available in the Recycle Bin. This is the fastest and easiest way to recover recently deleted files.
For a Windows virtual machine:
- Start the virtual machine.
- Open Recycle Bin from the desktop.
- Find the deleted file or folder.
- Right-click it and select Restore.
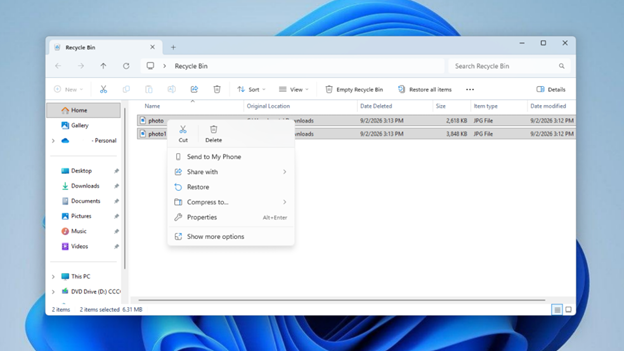
- Open the original folder and make sure the file is back.
If your virtual machine runs Linux, open the Trash, find the deleted item, right-click it, and select Restore from Trash or a similar option, depending on the distribution and desktop environment. On a macOS virtual machine, open Trash, right-click the file, and select Put Back.
Method 2. Recover Files From Virtual Machine with Data Recovery Software
If files were permanently deleted and you have no suitable backup or snapshot, you can scan the virtual disk itself.
Do not install recovery software inside the affected VM. Installation and normal operating system activity create additional writes to its virtual storage and may overwrite the deleted data. Keep the VM powered off and perform recovery from the host instead.
For this, I recommend using Disk Drill recovery software. It is safe to use and has a simple, clear interface that makes the recovery process easy to follow. I also find its preview feature particularly convenient, as you can check files before recovering them. Disk Drill delivers great recovery performance and supports many popular disk image formats, including VMDK, DSK, BIN, DAT, RAW, DD, DMG, IMG, ISO, VHD, and VHDX.
VMware file recovery with Disk Drill:
- Shut down the affected virtual machine and keep it powered off.
2. Install and open Disk Drill on the host computer, not inside the VM.
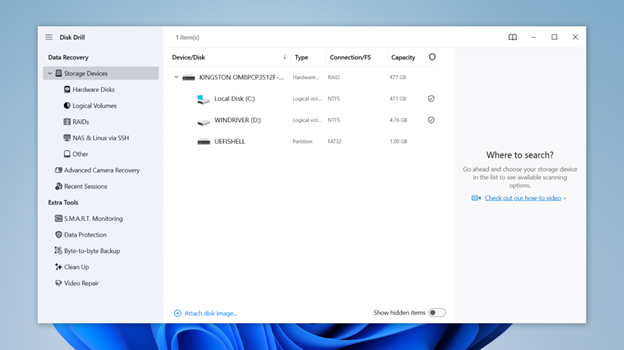
3. Open Storage Devices and click Attach disk image.
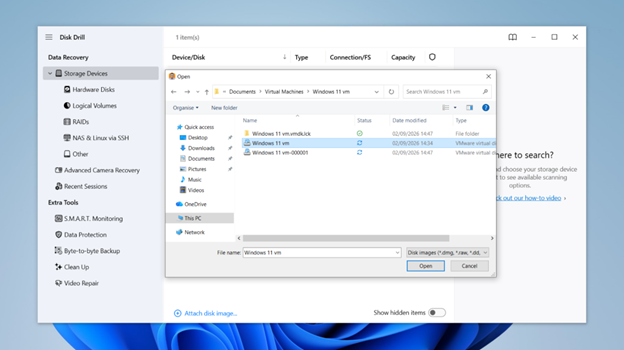
- Locate the virtual disk that contains the deleted files and select it.
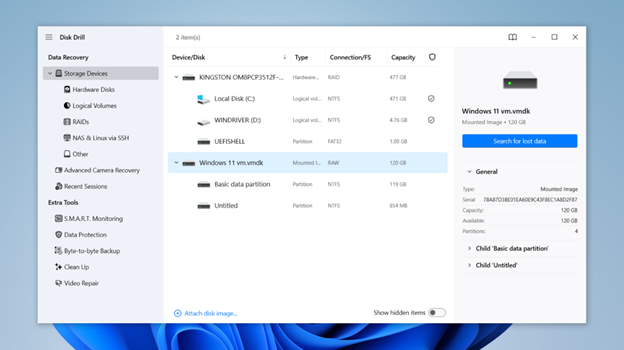
5.Wait for the attached virtual disk to appear in the device list.
6. Select it and click Search for lost data. If prompted, use Universal Scan.
7. Wait for the scan to complete and click Review found items.
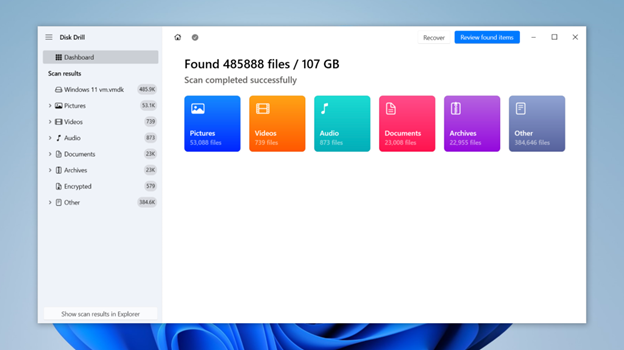
8. Use the search field and file-type filters to find the deleted files.
9. Preview important files to check their contents before recovery.
10. Select the files you want to restore and click Recover.
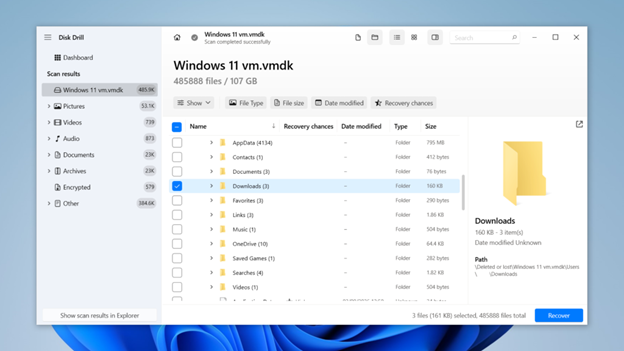
11. Choose a safe destination for VMDK file recovery, such as your computer, an external drive, or another storage device. Then click Next.
12. Open the recovered files and verify that they work correctly.
Method 3. Restore Files from a Backup or Snapshot
If the deleted files are available in an older backup or VMware snapshot, you can restore them from there. The right approach depends on what you have available.
Option 1. Restore the VM from a host backup
If the folder containing your virtual machine was included in a backup on the host computer, you can restore an earlier version of the VM from there. For example, Windows File History can preserve previous versions of the VM folder and its files.
- Shut down the virtual machine.
- Open File Explorer on the host computer and find the folder where the VM is stored.
- Right-click the folder and select Properties.
- Open the Previous Versions tab.
- Select a version created before the files were deleted.
- Click Open first if you want to check its contents, or Restore to restore that version.
Before restoring an older version, make a copy of the current VM folder. Restoring the backup can replace the current VM files and cause changes made after that backup to be lost.
Option 2. Revert to a VMware snapshot
VMware snapshots preserve the state of a virtual machine at a specific point in time. If the deleted files existed when a snapshot was created, reverting to that state can make them accessible again.
Before you proceed, make a copy of the current VM folder. Reverting to an older snapshot changes the current state of the virtual machine, so files and other changes made afterward will be lost.
In VMware Workstation Pro:
- Open VMware and select the affected virtual machine.
- Go to VM > Snapshot > Snapshot Manager.
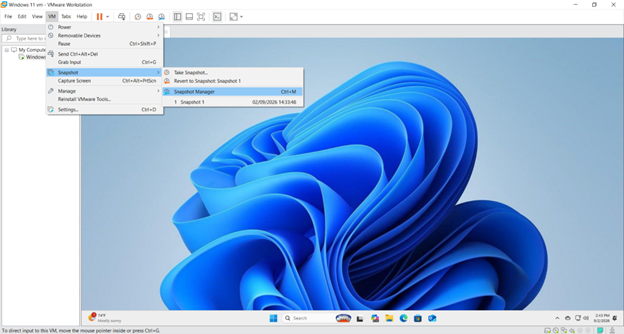
- Review the available snapshots and their creation dates.
- Select a snapshot from a time when the deleted files still existed.
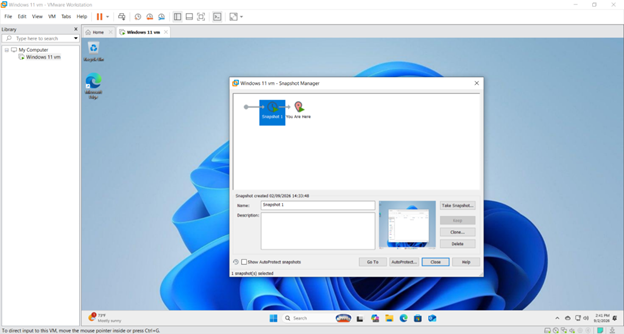
5. Click Go To to revert the virtual machine to the selected snapshot.
6. Start the VM and check whether the files are available.
7. Copy the recovered files to a separate safe location.
Method 4. Mount the Virtual Disk and Copy Files
Sometimes the files are not deleted at all. The virtual machine may simply refuse to boot while its virtual disk remains intact. In this situation, you can mount the virtual disk on the host and access its files without starting the original VM.
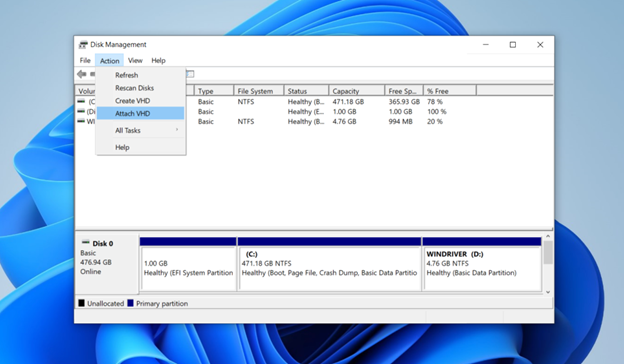
Windows provides built-in support for VHD and VHDX files through Disk Management.
- Make a copy of the virtual disk and work with that copy.
- Press Windows + X and select Disk Management.
- Open Action > Attach VHD.
- Click Browse in the Attach Virtual Hard Disk dialog.
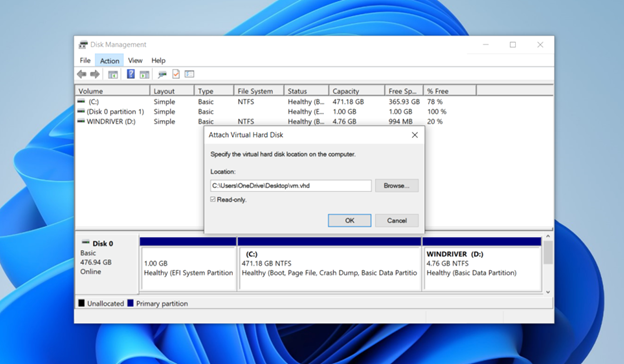
5. Select the VHD or VHDX disk image.
6. Enable Read-only to prevent changes to the virtual disk.
7. Click OK.
8. Check whether Windows assigned a drive letter to the mounted volume. If not, right-click the partition, select Change Drive Letter and Paths, and assign an available letter. Repeat this for other partitions you want to access.
9. Open File Explorer and select the mounted drive.
10. Find the files you need and copy them to a safe location outside the virtual disk.
This method has an important limitation: mounting does not restore permanently deleted files. It works when the data still exists but you cannot access it through the original VM.
How to Keep Your Virtual Machine Data Safe
You cannot prevent every storage problem, but a few precautions can significantly reduce the risk of losing important VM files. Beyond the immediate steps for restoration, understanding why VMs need recovery in the first place helps you appreciate the preventive measures that follow:
- Create regular backups. Back up both important files inside the guest OS and the complete virtual machine when necessary. Keep at least one backup on storage separate from the physical drive that contains the active VM.
- Do not rely only on snapshots. Use snapshots or checkpoints for short-term rollback, but keep separate backups as well. Snapshots depend on the VM and its virtual disk structure, so they should not be your only copy of important data.
- Keep important files outside the VM. Store an additional copy of critical data on another physical drive, NAS, backup server, or cloud storage. This gives you another way to retrieve files if the virtual disk becomes inaccessible.
- Use reliable storage. Keep virtual machines on healthy, dependable storage and monitor drives for errors or signs of failure. If a host drive starts disconnecting, slowing down significantly, or reporting errors, move or back up important VM data before the situation gets worse.
- Protect the VM and host from malware. Keep the host OS, guest OS, virtualization software, and security tools up to date. Malware or ransomware can affect individual guest files as well as virtual disks, snapshots, and backups.
- Handle virtual disks carefully. Shut down the VM before manually moving or modifying its virtual disk files, and avoid deleting or renaming VMDK, VHDX, VDI, snapshot, or related VM files unless you know what they are used for.
- Avoid DIY recovery when you are unsure. Incorrect attempts to repair, format, modify, or repeatedly scan damaged storage can make the situation worse. If the VM contains irreplaceable data and you are not confident about the recovery process, it is safer to contact a professional data recovery service before making further changes. This can help avoid actions that could make the data permanently unrecoverable.
Final Thoughts
The best way to recover deleted files from a virtual machine depends on what you actually lost. For a recently deleted file, check the guest OS Recycle Bin. If it is no longer there, look for a backup or an older snapshot. When those options are unavailable, keep the VM powered off and scan its virtual disk from the host.
Above all, avoid unnecessary writes after data loss. Preserving the affected virtual disk or host drive gives you the best starting point for successful virtual machine data recovery.




Leave a Reply