
If you're Ansible user, you might wonder whether there would be a way to have GUI (graphical user interface) instead of just CLI. In this post we'll show you a tool called Semaphore which is installed side-by-side with Ansible, and that does exactly that. Check Semaphore – FREE GUI for Ansible.
Ansible is a powerful and popular open source tool for automating IT tasks, such as configuring systems, deploying software, and orchestrating workflows. However, some users may prefer a graphical user interface (GUI) over the command line, especially for managing complex or large-scale projects. That's where Semaphore comes in.
Semaphore is a modern and responsive web UI for Ansible, written in pure Go and available for Windows, macOS, and Linux. Semaphore is also open source, with a concise and high-quality code base. Semaphore supports MySQL, PostgreSQL, and BoltDB as database options, and allows you to run Ansible playbooks, tasks, and inventories with ease.
In this blog post, we will show you how to install and use Semaphore on Ubuntu Linux, and demonstrate some of its features and benefits.
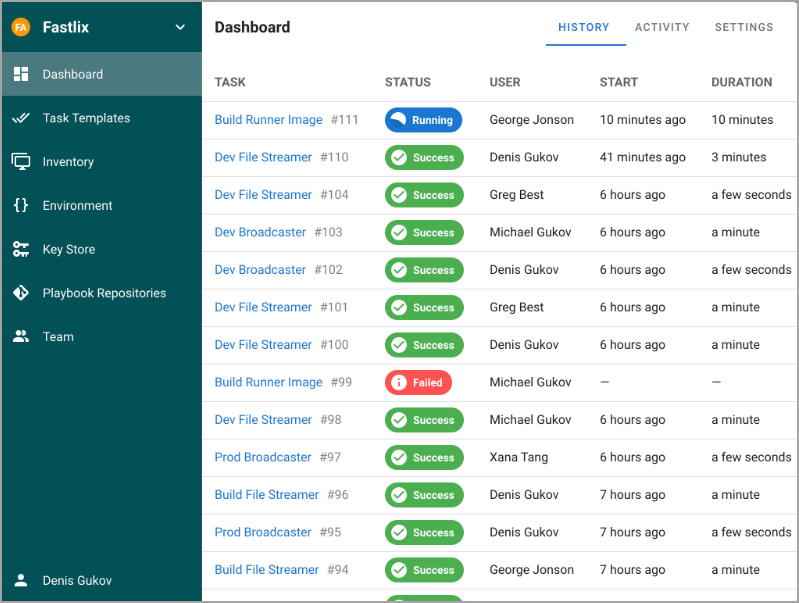
Screenshot from https://www.semui.co/ site.
How to Install Semaphore on Ubuntu
To install Semaphore on Ubuntu, you will need to have Ansible installed and working first. Also, there is the official documentation on to do that here. Once you have Ansible ready, you can proceed with the following steps:
Step 0: Update system and install git
sudo apt update

sudo apt install git curl wget software-properties-common
Check the git install with:
git --version

Step 1: Install Ansible on Ubuntu/Debian
sudo apt-add-repository ppa:ansible/ansible

sudo apt update

sudo apt install ansible -y
Confirm the Ansible install with:
ansible --version

Step 2: Install MariaDB as the database server for Semaphore.
You can use other databases, but we will use MariaDB for this example. To install MariaDB, run the following commands:
curl -LsS https://downloads.mariadb.com/MariaDB/mariadb_repo_setup | sudo bash -s --
when the repo is added, you can go ahead and install the client and server packages:
sudo apt install mariadb-server mariadb-client
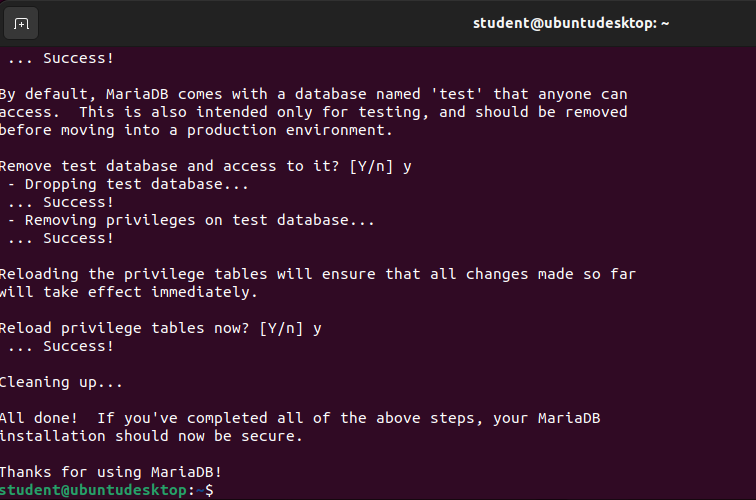
Secure Maria db with this:
sudo mariadb-secure-installation
Answer n to the first question and y to the remaining. You will also be prompted to create and verify a root user password.
Switch to unix_socket authentication [Y/n] n

Change the root password? [Y/n] y

Remove anonymous users? [Y/n] y

Disallow root login remotely? [Y/n] y

Remove test database and access to it? [Y/n] y

Reload privilege tables now? [Y/n] y
Step 3. Download and install Semaphore.
We’ll first set a variable for the version with the command:

VER=$(curl -s https://api.github.com/repos/ansible-semaphore/semaphore/releases/latest|grep tag_name | cut -d '"' -f 4|sed 's/v//g')
and then use that variable to download the correct version with the command:
wget https://github.com/ansible-semaphore/semaphore/releases/download/v${VER}/semaphore_${VER}_linux_amd64.deb

Install Semaphore
sudo apt install ./semaphore_${VER}_linux_amd64.deb
Done -:)
Step 4. Configure Semaphore.
To generate the configure file, run semaphore such that it will prompt you to configure everything. The command for this is:
sudo semaphore setup
The first section of the configuration looks like this:
Hello! You will now be guided through a setup to:
1. Set up configuration for a MySQL/MariaDB database
2. Set up a path for your playbooks (auto-created)
3. Run database Migrations
4. Set up initial semaphore user & password
What database to use:
1 – MySQL
2 – BoltDB
3 – PostgreSQL
Make sure to select MySQL for your database and then configure it accordingly. You can accept the default for everything, but you will have to type the MariaDB root user password you created earlier.
When you get to the Hostname section (which looks like db Hostname (default 127.0.0.1:3306):), make sure to type it in the form:
http://SERVER:3000
Few more steps – Create a Systemd File
We need to create a systemd file so the Semaphore service can be controlled. Create the file with the command:
sudo nano /etc/systemd/system/semaphore.service
In that file, paste the following:
[Unit]
Description=Semaphore Ansible UI
Documentation=https://github.com/ansible-semaphore/semaphore
Wants=network-online.target
After=network-online.target
[Service]
Type=simple
ExecReload=/bin/kill -HUP $MAINPID
ExecStart=/usr/bin/semaphore server –config /etc/semaphore/config.json
SyslogIdentifier=semaphore
Restart=always
[Install]
WantedBy=multi-user.target
Save and close the file.
Reload the systemd daemon with:
sudo systemctl daemon-reload
Start and enable the Semaphore service with:
sudo systemctl enable --now semaphore
How to Use Semaphore
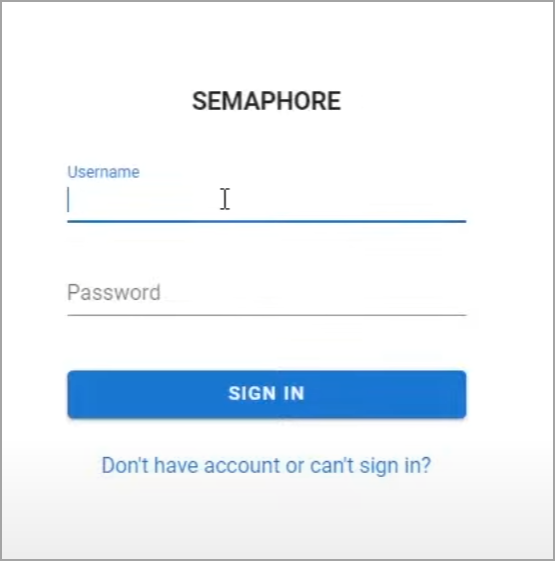
To use Semaphore, you will need to access its web interface from your browser. By default, Semaphore runs on port 3000, so you can visit http://localhost:3000 if you are on the same machine, or http://<your-server-ip>:3000 if you are on a different machine. You will need to log in with the admin email and password that you set during the configuration.
Once you are logged in, you will see the dashboard, where you can create and manage your projects, playbooks, tasks, inventories, and users. You can also view the logs and notifications of your activities.
To create a new project, click on the + button on the top right corner, and give your project a name and a description. You will also need to provide a repository URL, where Semaphore will clone your Ansible playbooks and files. You can use any Git-based repository, such as GitHub, GitLab, or Bitbucket. You can also specify a branch, an SSH key, and a webhook URL if you want.
After creating a project, you can add playbooks, tasks, and inventories to it. A playbook is a YAML file that defines the Ansible roles and tasks to run on your hosts. A task is a specific execution of a playbook, with optional variables and environment variables. An inventory is a file that defines the hosts and groups that Ansible will operate on.
- To add a playbook – click on the Playbooks tab, and then click on the + button. You will see a list of playbook files from your repository. Select the one you want to use, and give it a name and a description.
- To add a task, click on the Tasks tab, and then click on the + button. You will need to select a playbook, an inventory, and a user to run the task. You can also provide extra variables and environment variables if you need to.
- To add an inventory, click on the Inventory tab, and then click on the + button. You will need to provide a name, a type, and a file or a dynamic script for your inventory.
- To run a task, click on the Run button next to the task name. You will see a progress bar and a log output of the task execution. You can also stop, pause, or resume a task if you need to.
- To manage users, click on the Users tab, and then click on the + button. You will need to provide an email, a name, and a password for the user. You can also assign the user to different projects and give them different access levels.
Video:
Here is a short video from https://snapcraft.io/semaphore
Benefits of Semaphore
Semaphore is a free and modern UI for Ansible that can help you automate your IT tasks more efficiently and effectively. Some of the benefits of Semaphore are:
- Nice web interface that works well on smartphones and tablets.
- It has an intuitive and easy-to-use user experience that requires the fewest steps to accomplish any tasks.
- Secure and robust deployment and configuration, with access control, logs, and notifications features.
- Flexible and scalable development stack, with pure Go, Docker, and multiple database options.
- Open source and actively developed project, with a large and supportive community.
Final Words
If you're looking for free GUI for Ansible, Semaphore might be the way. In this blog post, we have shown you how to install and use Semaphore, a free Ansible GUI, on Ubuntu Linux. We have also demonstrated some of its features and benefits, and how it can help you automate your IT tasks more easily and effectively. If you are interested in Semaphore, you can visit its website, GitHub page, or documentation for more information. You can also join its Telegram group or Discord server to chat with other users and developers.
Check https://www.semui.co/ for more -:)
More posts from ESX Virtualization:
- VMware vSphere 8.0 U2 Released – ESXi 8.0 U2 and VCSA 8.0 U2 How to update
- What’s the purpose of those 17 virtual hard disks within VMware vCenter Server Appliance (VCSA) 8.0?
- VMware vSphere 8 Update 2 New Upgrade Process for vCenter Server details
- VMware vSAN 8 Update 2 with many enhancements announced during VMware Explore
- What’s New in VMware Virtual Hardware v21 and vSphere 8 Update 2?
- Homelab v 8.0
- vSphere 8.0 Page
- Veeam Bare Metal Recovery Without using USB Stick (TIP)
- ESXi 7.x to 8.x upgrade scenarios
- A really FREE VPN that doesn’t suck
- Patch your ESXi 7.x again
- VMware vCenter Server 7.03 U3g – Download and patch
- Upgrade VMware ESXi to 7.0 U3 via command line
- VMware vCenter Server 7.0 U3e released – another maintenance release fixing vSphere with Tanzu
- What is The Difference between VMware vSphere, ESXi and vCenter
- How to Configure VMware High Availability (HA) Cluster
Stay tuned through RSS, and social media channels (Twitter, FB, YouTube)